

Love
For Danish and German translation, click on the flags.


For this tutorial you will need the materials in the zip file below.

Thanks go to Dakara; to Nikita; and to Arasimages for the lovely tubes used. Please visit the tuber sites listed on my Links page for other lovely tubes.
Use the bookmark below to mark your place along the way.

Unzip the materials into a working folder. Open the materials in PSP, copy and close originals. Place the Pattern Red201 in your PSP/Patterns. You will need no plugins to do this tutorial. You will need Animation Shop which you may find for free on Waldgeist's site. Click on their banner on my Links page for download. I have used PSPX4 to create this tutorial but you may use an earlier version.
1. In Materials Palette, set Foreground to #94080b, Background to #000000.
2. New/New Image 760px by 660px. Flood fill with Background #000000.
3. Open nikita_couples (77).pspimage. Copy/Paste as New Layer.
4. Image/Resize/Resize by 70%/Resize all layers unchecked.
5. Image/Mirror. Move couple to upper right corner. Lower Opacity to 21.
6. Open cal-guis-paris1-8112008.pspimage. Copy/Paste as New Layer.
7. Image/Mirror. Move to center the top of the tower in image. Lower Opacity to 79.
8. Open nikita_couples (77).pspimage. Copy/Paste as New Layer.
9. Image/Resize/Resize by 80%/Resize all layers unchecked.
10. Move couple to bottom left side.
11. Open Love.pspimage. Copy Tubed layer/Paste as New Layer.
12. Move Love image to lower right side of image.
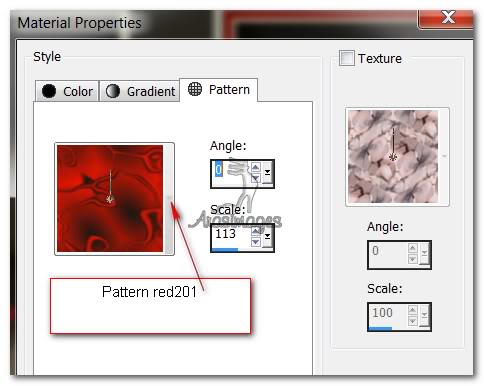
13. Again Paste as New Layer the Love.pspimage.
14. Image/Resize/Resize by 60%/Resize all layers unchecked.
15. Move Love image to upper left corner above couple.
16. Image/Add Borders/3px border, Symmetric checked, color #000000.
17. Image/Add Borders/Add border of 10px top, left side 10px, right side 10px, bottom at 65px, Symmetric UNchecked, color #b50808.
18. In Materials Palette, click on Foreground, change to Patterns and find Pattern red201.
19. Using Magic Wand, click inside the 10/10/10/60px border to activate it.
20. Layers/New Raster Layer. Flood fill with Pattern red201.
21. Set Blend Mode to Hard Light.
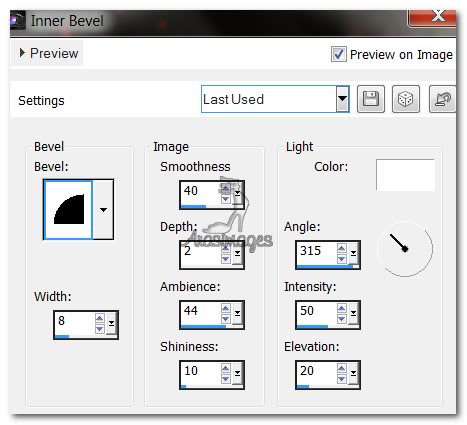
22. Effects/3D Effects/Inner Bevel. Use settings below.
23. Selections/Select None.
24. Image/Add Borders/15px border, Symmetric checked, color #000000.
25. Using Magic Wand, click inside 15px border to activate it.
26. Effects/3D Effects/Inner Bevel. Use same settings as Step #22.
27. Selections/Select None.
28. Image/Add Borders/3px border, Symmetric checked, color #b50808.
29. Open flower48.pspimage. Copy Tubed layer/Paste as New Layer.
30. Image/Mirror. Using the Pick tool, grab the double arrows of the box around the rose and move it until you have it in approximately the position I have mine. Use the Move tool to place it.
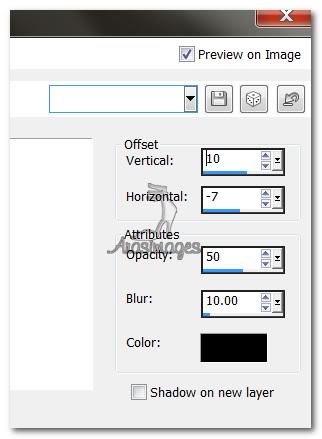
31. Effects/3D Effects/Drop Shadow. Vertical 10, Horizontal -7, Opacity 50, Blur 10, color #000000.
32. Effects/Edge Effects/Enhance.
33. Sign your name or leave watermark. Convert to Raster Layer if necessary.
34. Merge/Merge Visible. Save as Love.jpg file in your working folder or where you will easily find it.
35. Open Animation Shop.
36. File/Open. Open Love.jpg file. Duplicate until you have 23 frames.
37. Highlight the first frame. Edit/Select All.
38. File/Open. Open 029.gif file. (Hearts). Highlight first frame. Edit/Select All.
39. On the top bar of the .gif file, right click, COPY.
40. Go back to your Love.jpg image and right click within the first frame. Paste/Into Selected Frame. Place where you want the hearts to go and left click into place. (I chose to place them where the Love hearts are).
41. Place as many hearts on the image as you wish. Then using the View Animation button, view your finished work to see if it is as you like. If not, then use the Undo arrow and do over till you are satisfied.
42. To save your work, go to File/Save As. Save as .gif box will appear. Choose where you will save it, give it the name Love, and click Save. Continue to click Next 3 times, then Finish as the different boxes appear. There! You did it...you are all finished.
HAPPY VALENTINE'S DAY
Thank you Evatexas and PamelaD for testing this tutorial for me.
If you are going to use this tutorial for stationery, cards or place the tutorial/tag on another site, I would appreciate you contacting me for permission, giving Arasimages credit for the original tutorial and if possible, a link back to my site. Thank you.
Copyright © Arasimages All Rights Reserved