
Lost in the Forest
For Italian, Danish and French translation, click on the flags.


For this tutorial you will need the materials in the zip file below.

Thanks go to Sorensen_Designs; to JHanna; to Nikita and to Veda for the lovely tubes used. Please visit the tuber sites listed on my Links page for other lovely tubes.
Use the thumbtack below to mark your place along the way.

Unzip the materials into a working folder. Open the materials in PSP, copy and close originals. Place the Preset into your PSP Preset folder. You will need plugins Artistic/Watercolor, AP Paint, Xero, and Simple to do this tutorial. You will also need Animation Shop. I have used PSPX4 to create this tutorial but you may use an earlier version. It is assumed you have a working knowledge of PSP.
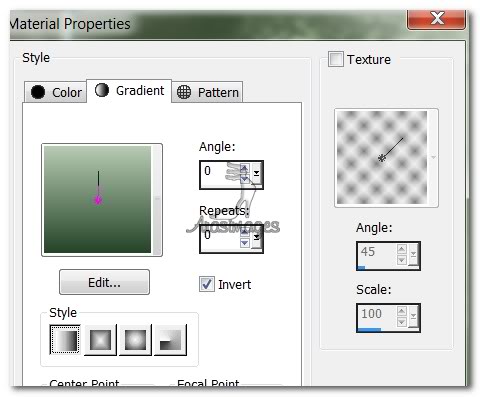
1. In Materials Palette, set Foreground to #b6cbb2, Background to #244328.
2. Create Gradient using Style Linear, Angle 0, Repeats 0, Invert checked.
3. New/New Image 650px by 650px. Flood fill with Gradient.
4. Layers/New Raster Layer. Selections/Select All.
5. Open JHanna_563 background.jpg. Copy/Paste into Selection. Set to Luminance (L). Selections/Select None.
6. Open Magical.jpg image. Copy/Paste as New Layer. Move to the right until the house on the right almost disappears.
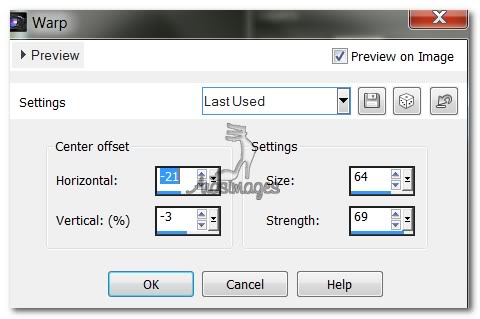
7. Effects/Distortion/Warp. Use settings as seen in example below.
8. Set to Luminance (L), drop Opacity to 60.
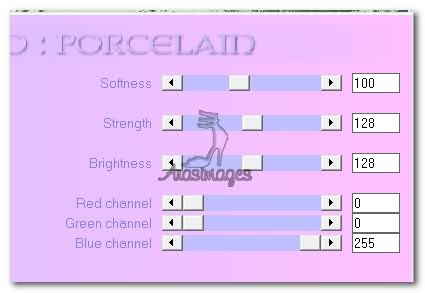
9. Effects/Xero/Porcelain.
10. Open VPC_ForestScene.pspimage. Copy/Paste as New Layer. Move to the right and up a little.
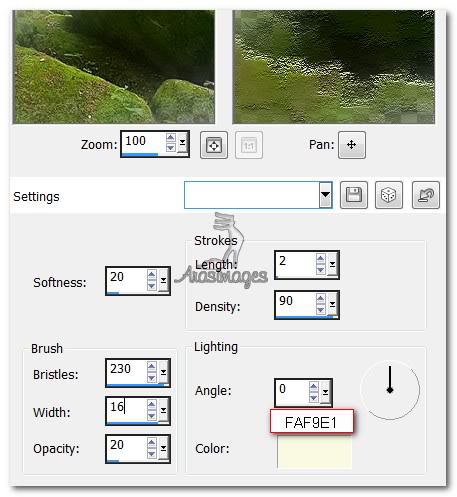
11. Effects/Art Media Effects/Brush Strokes. Use settings below.
12. Set Opacity at 51.
13. Duplicate. Image/Mirror. (Flip/Horizontal in PSPX4). Move left a little and set Opacity to 75.
14. Paste rocks again. Set Opacity to 87. They should rest about in the center of image.
15. Open 1220639620_animaux.pspimage. Copy/Paste as New Layer.
16. Image/Resize/Resize by 60%, Resize all layers unchecked.
17. Move the wolf image to left side of image. Set to Luminance (L). Set Opacity to 45.
18. Duplicate. Image/Mirror. (Flip/Horizontal in PSPX4). Move duplicated image of wolf to upper right corner.
19. Open Sorensen_Designs Mist Jan 154-12.pspimage. Copy/Paste as New Layer.
20. Image/Resize/Resize by 85%/Resize all layers unchecked. Move lady down so part of her is below bottom edge.
21. Highlight the 4 raster layers between the wolf and the trees one by one, and while using the Eraser tool, erase on the woman's arms to clean her image.

22. Go back to top layer and highlight to continue.
23. Open MA_misc470.pspimage. Copy/Paste as New Layer.
24. Image/Resize/Resize by 40%, Resize all Layers unchecked. Move lamp so it hangs from woman's hand on right of image.
25. Merge/Merge Visible.
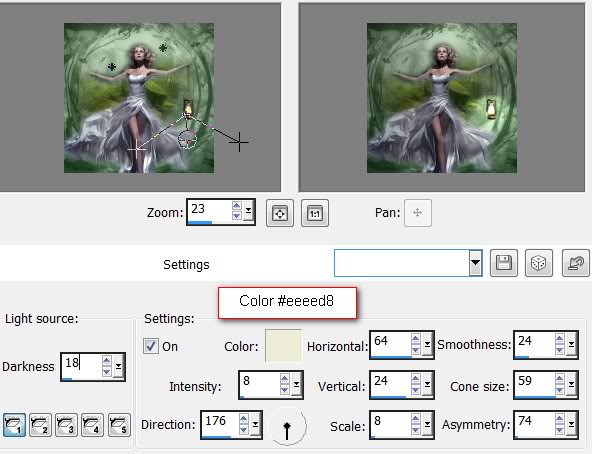
26. Effects/Illumination Effects/Lights. Use settings as seen below or you can use the Preset Script, Preset Lights Lost in the Forest.PspScript included in your materials. You may have to adjust Vertical and Horizontal settings so the light is exactly on your lamp.
27. Image/Add Borders/3px border, color #1b2402, Symmetric checked.
28. Open Magical.jpg image. Copy/Paste as New Image. Close original.
29. On New Image, Adjust/Blur/Gaussian Blur, Radial set to 19.
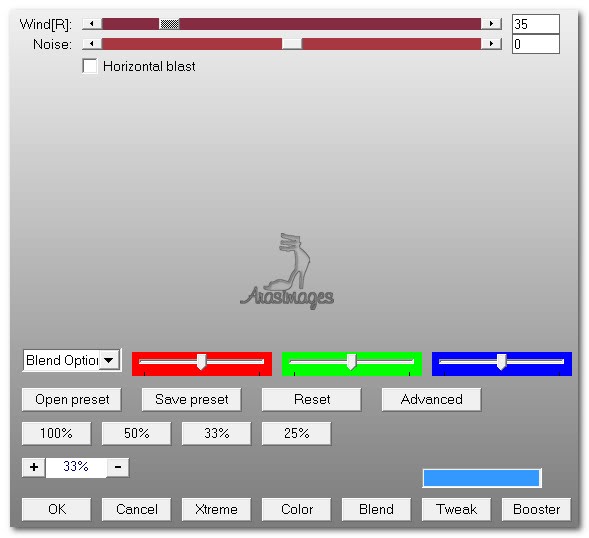
30. Effects/AP Paint/Windblast. Use settings as shown.
31. Effects/Edge Effects/Enhance.
32. Copy the working image with the woman and lamp. Paste as New Layer on the Magical image.
33. Selections/Select All. Click within the lady and lamp image with Magic Wand to activate it.
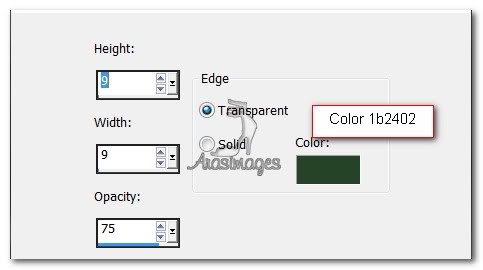
34. Effects/3D Effects/Buttonize. Use settings below.
35. Effects/3D Effects/Drop Shadow, Vertical -10, Horizontal 10, Opacity 50, Blur 15, color #000000.
36. Effects/3D Effects/Drop Shadow, Vertical 10, Horizontal -10, Opacity 50, Blur 15, color #000000.
37. Selections/Select None. Merge/Merge Visible.
38. Open Leaves.pspimage tube. Copy/Paste as New Layer. Image/Mirror.
39. Adjust/Hue and Saturation/Colorize. Use Hue 78, Saturation 50.
40. Image/Resize/Resize by 65%, Resize all layers unchecked.
41. Adjust/Sharpness/Sharpen. Place in upper left corner of woman and lamp image as I have mine.
42. Effects/3D Effects/Drop Shadow, Vertical 7, Horizontal -9, Opacity 50, Blur 8, color #000000.
43. Effects/Simple/Top Left Mirror. Apply drop shadow as in Step #42.
44. Image/Add Borders/3px border, Symmetric checked, color #b6cbb2.
45. Image/Add Borders/2px border, Symmetric checked, color #493b37.
46. Image/Add Borders/3px border, Symmetric checked, color #b6cbb2.
47. Change Background color in Materials Palette to #493b37 and Foreground to #b6cbb2.
48. Select Text tool. Choose Font Troutkings BTN, Size 72. Use settings as seen below.

49. Type the words "Lost in the Forest". Convert to Raster Layer.
50. Using the double arrow turn Node in the box around the text, turn the text so it is vertical. Place on the left side of the image in the large border.
51. Effects/3D Effects/Drop Shadow, Vertical 7, Horizontal -9, Opacity 50, Blur 8, color #000000.
52. Sign your name. Merge/Merge Visible.
53. Duplicate 9 times so you have 10 layers total. Close off all but top layer.
54. Effects/Illumination/Sunburst. Use the setting as you see below to start on the first layer.
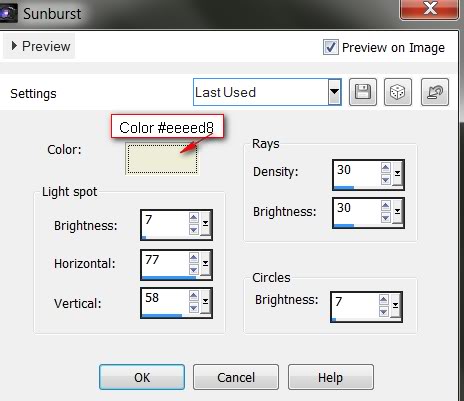
55. Close off the top layer. Highlight and open the layer under top Layer. Effects/Illumination/Sunburst. Change all of the settings higher by 2 EXCEPT for the HORIZONTAL AND VERTICAL. Light Spot Brightness will be changed to 9, Rays Density to 32, Rays Brightness to 32 and Circles Brightness to 9. Apply.
56. Close off this layer. Move to the layer beneath, highlight and open. Again, change all of the above named settings in Sunburst by 2, going higher in number in each area with the exceptions.
57. Close off this layer. Repeat as above until you finish with 5 layers. Now you close off the last layer worked on, and move to the layer beneath it. Open and highlight it. Now you will change those same areas to a LOWER NUMBER BY 2. Continue to do the same thing, lowering the numbers with each layer until you finish next to the last layer. No changes on bottom layer. Open all Layers.
58. Save your work as "Lost in the Forest" in your working folder, saving as a PSP Animation (*psp) file.
60. Open Animation Shop. File/Open "Lost in the Forest". Click on first frame, Edit/Select All. Click on Animations/Frame Properties. Change the Display to 13 to slow the flickering of the lamp.
61. Click on View Animation to see if you like your work. If so, then now we will save your work.
62. File/Save As. When the Save As box appears, give your file the name "Lost in the Forest", and click Save. As the boxes change, just click Next, Next, Next then Finish.
63. You are all finished with a complicated animated tutorial. Congratulations! Thank you for working my tutorial made for your enjoyment.
Thank you Evatexas and PamelaD for testing this tutorial for me.
If you are going to use this tutorial for stationery, cards or place the tutorial/tag on another site, I would appreciate you contacting me for permission, giving Arasimages credit for the original tutorial and if possible, a link back to my site. Thank you.
Copyright © Arasimages All Rights Reserved