
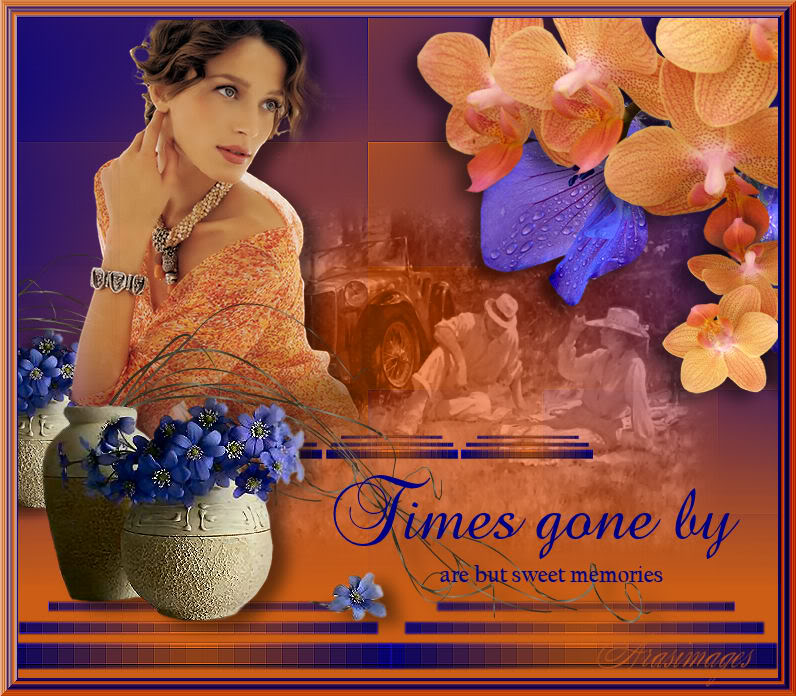
Times Gone By
For Italian and Danish translation, click on the flags.


For this tutorial you will need the materials in the zip file below.

Thanks go to Mou, Sorensen_Designs, and to Jet for the beautiful tubes used. The vrowu image origin is unknown. If this is your tube, please let me know so I can give you credit. Please visit the tuber sites listed on my Links page.
Use the bookmark below to mark your place along the way.

Unzip the materials into a working folder. Open the materials in PSP, copy and close originals. Place Selections in PSP/Selections Folder and Mask in PSP/Mask folder. You will need the plugins Bordermania and Toadies to do this tutorial. I have used PSPX3 to create this tutorial but you may use an earlier version. It is assumed you have a working knowledge of PSP.
1. In Materials Palette, set Foreground to #cb5d15, Background to #000080.
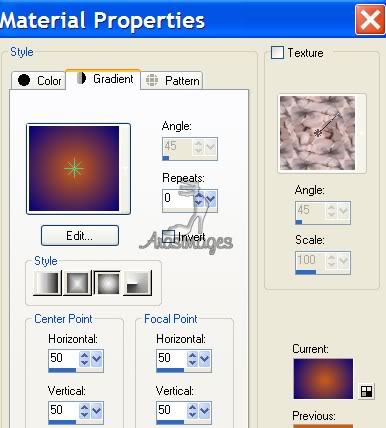
2. Create a Gradient in the Materials Palette using Sunburst, Angle 0, Repeats 0, Invert unchecked.
3. New/New Image 760px by 660px. Flood fill the new image with Gradient.
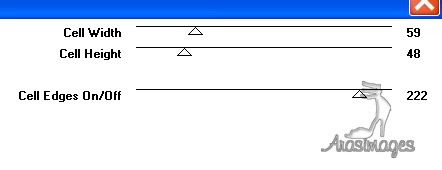
4. Effects/Toadies/Weaver. Use settings as seen below.
5. Layers/New Raster Layer. Flood fill with Foreground color #cb5d15.
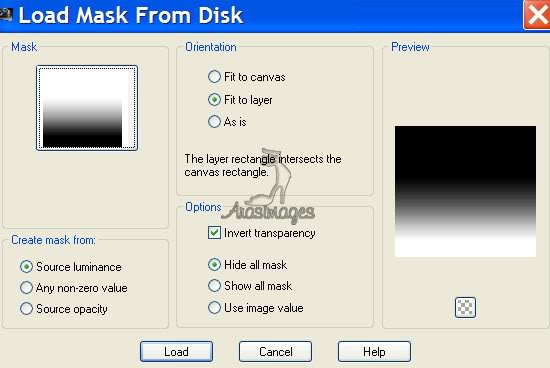
6. Layers/Load/Save Mask/Load Mask from Disk. Choose Mask Fadebottom_01. Invert transparency checked. Use settings as below.
7. Merge/Merge Group.
8. Open Sorensen_Designs Mist July 145-10.pspimage.
9. Copy/Paste as New Layer. Blend Mode to Luminance (L), Opacity to 60.
10. Move the scene layer down and to the right a little.
11. Open jet-flower-purple-februari-2008.pspimage. Copy/Paste as New Layer.
12. Image/Resize/Resize by 80%/Resize all layers unchecked.
13. Image/Flip. Pull flower up to top right side.
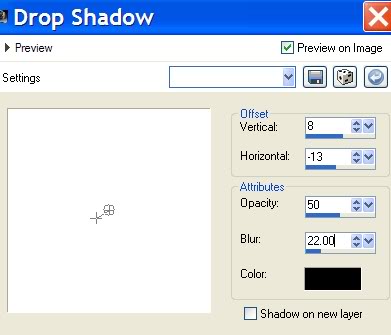
14. Effects/3D Effects/Drop Shadow, Vertical 8, Horizontal -13, Opacity 50, Blur 22, color #000000.
15. Open tw_orchid-3.pspimage. Copy/Paste as New Layer.
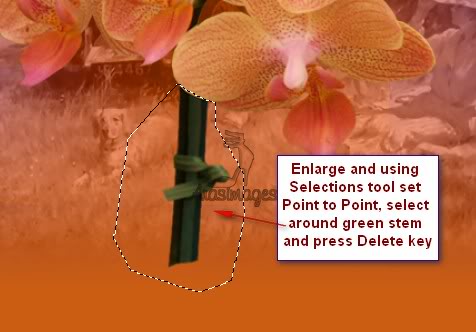
16. Scroll the image large enough so you can see well. Using the Freehand Selections tool, Point to Point, Select around the green stem and press Delete key once to delete stem. Selections/Select None. See example below.
17. Image/Resize/Resize by 80%/Resize all layers unchecked.
18. Effects/3D Effects/Drop Shadow, Vertical 8, Horizontal -13, Opacity 50, Blur 22, color #000000.
19. Move orchid upward to right corner over purple flower.
20. Duplicate. Image/Resize/Resize by 50%/Resize all layers unchecked.
21. Image/Mirror. Image/Flip. Apply Drop Shadow as in Step #18. Move to the bottom of larger orchid at the side of image.
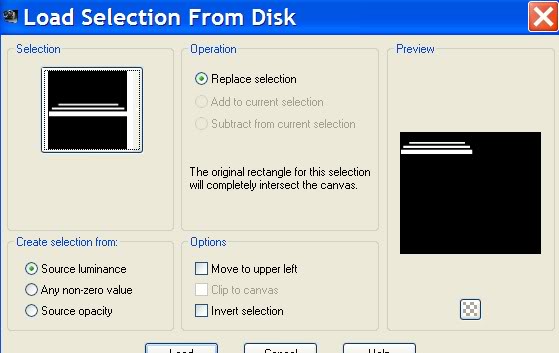
22. Layers/New Raster Layer. Selections/Load/SaveSelection. Load Selection From Disk. Choose ArasTripleBars. Apply. See example.
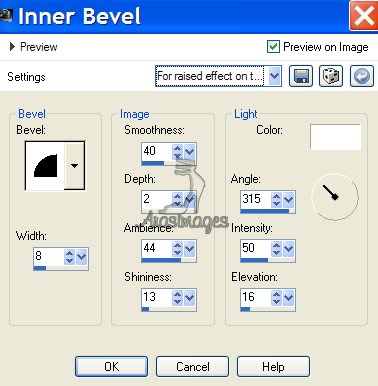
23. Flood fill with Gradient. Effects/3D Effects/Inner Bevel. Use example below.
24. Effects/Distortion/Pixelate, set to 16 on both Block Width/Block Height, Symmetric checked. Selections/Select None.
25. Pull bars down to lower right side of image. (Place to where I have mine). Effects/Edge Effects/Enhance.
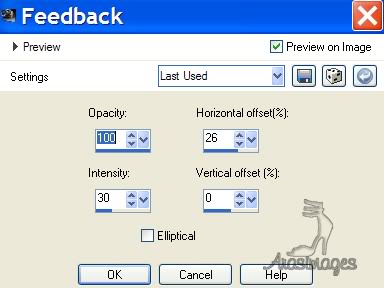
26. Effects/Reflection Effects/Feedback. Use settings below.
27. Adjust/Sharpness/Sharpen. Erase the two smaller top bars from image using Eraser tool or Freehand Selection/Delete method.
28. Duplicate/Image Mirror. For convenience use the Up/Down arrows to place the bars together and out to sides.
29. Apply Reflection Effects again to left side bars (make sure that layer is highlighted). Again, erase the small two top bars.
30. Merge/Merge Down.
31. Open mou_flowers.pspimage. Copy/Paste as New Layer.
32. Image/Resize/Resize by 80%/Resize all layers unchecked.
33. Place the resized flower pot on the left side of image, across from top bars.
34. Effects/3D Effects/Drop Shadow, Vertical 8, Horizontal -15, Opacity 50, Blur 14, color #000000.
35. Open vrouw.pspimage. Copy/Paste as New Layer.
36. Effects/3D Effects/Drop Shadow, Vertical 8, Horizontal 15, Opacity 50, Blur 22, color #000000.
37. Place woman near left side, over jar with flowers. Using Eraser tool, erase woman's arm away so jar will show through.
38. On flower jar layer, erase away flowers from woman's arm. Go back to top layer to continue.
39. Open mou_flowers.pspimage again. Copy/Paste as New Layer.
40. Move the two jars of flowers to set on the left lower bars.
41. Effects/3D Effects/Drop Shadow, Vertical 8, Horizontal 15, Opacity 50, Blur 22, color #000000.
42. From Text tool, choose BrockScript, Size 72, color #000080. Use settings below.

43. Type the words "Times gone by". Convert to Raster Layer. Place text where I have mine.
44. Change the font to Californian FB24, Size 24, color #000080, all other settings same as above and type the words "are but sweet memories". Convert to Raster Layer. Place below the first text as I have mine.
45. Image/Add Borders/3px border, Symmetric checked, color #000080.
46. Image/Add Borders/3px border, Symmetric checked, color #cb5d15.
47. Image/Add Borders/6px border, Symmetric checked, color #000080.
48. Image/Add Borders/6px border, Symmetric checked, color #cb5d15.
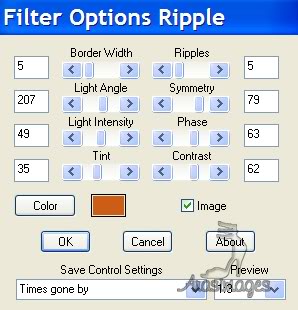
49. Effects/Bordermania/Ripple. Use settings as seen in example below, color #cb5d15.
50. Save as .jpg file named Times gone by.
A big thank you to Evatexas and PamelaD who tested this tutorial for me.
If you are going to use this tutorial for stationery, cards or place the tutorial/tag on another site, I would appreciate you contacting me for permission, giving Arasimages credit for the original tutorial and if possible, a link back to my site. Thank you.
Copyright © Arasimages All Rights Reserved