
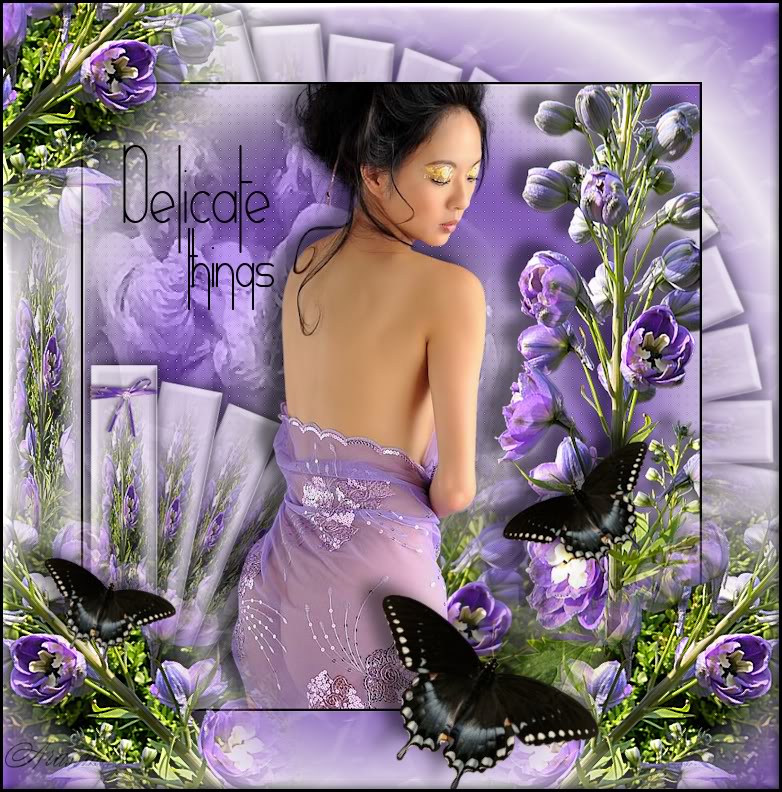
Delicate Things
For Italian, Portuguese and Danish translation, click on the flags.


For this tutorial you will need the materials in the zip file below.

Thanks go to Maryse, Sorensen_Designs, and to Arasimages for the beautiful tubes used. Please visit the tuber sites listed on my Links page.
Use the bookmark below to mark your place along the way.

Unzip the materials into a working folder. Place the Texture Corel 15_38 in Texture folder if you do not have one in there already. Open the materials in PSP, copy and close originals. You will need the plugins Penta and MuraMeister to do this tutorial. I have used PSPX4 to create this tutorial but you may use an earlier version. It is assumed you have a working knowledge of PSP.
1. In Materials Palette, set Foreground to #eee8f1, Background to #6C3EAE.
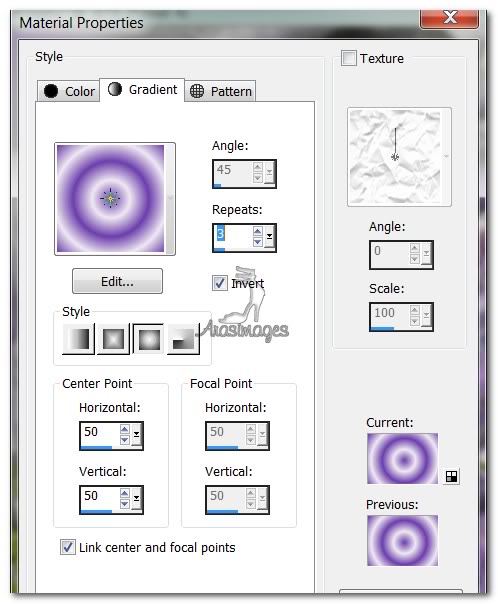
2. Create a Gradient in the Materials Palette using Sunburst, Angle 0, Repeats 3, Invert checked.
3. New/New Image 770px by 780px. Flood fill the new image with Gradient.
4. Adjust/Blur/Gaussian Blur/Radius of 36.
5. Open Sorensen_Designs Mist Jan 134-12.pspimage of women. Copy/Paste as New Layer.
6. Set Opacity at 71, Blend Mode to Luminance (L). Move women to left of image.
7. Merge/Merge Down.
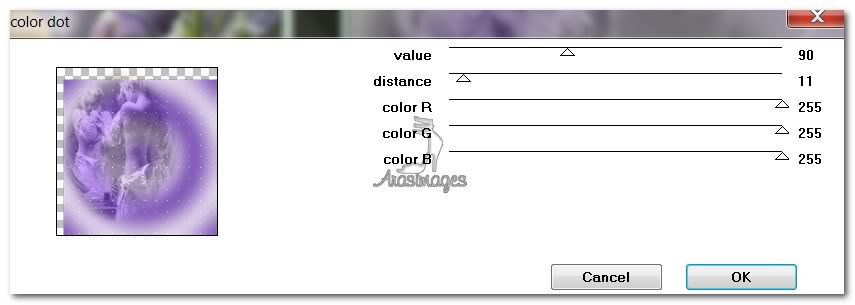
8. Effects/Penta/Color Dot. Use settings as seen below.
9. Effects/Edge Effects/Enhance.
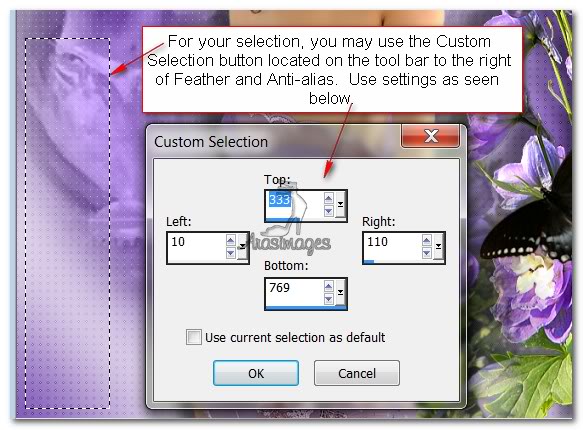
10. Using the Selection tool set to Rectangle, Replace/Feather 1, draw a rectangle on the left side of image. You may use the Custon Selection button for a more exact size. See example below.
11. Layers/New Raster Layer. Flood fill with Foreground color #eee8f1.
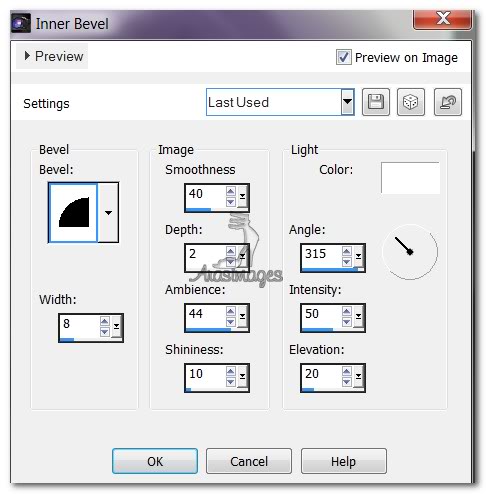
12. Effects/3D Effects/Inner Bevel set as in example below.
13. Set Opacity at 81. Image/3D Effects/Drop Shadow, Vertical -6, Horizontal 6, Opacity 50, Blur 21, color #000000. Repeat Drop Shadow except change V 6, H -6, all the rest the same.
14. Open LilacLovely.pspimage by Arasimages. Copy Misted Layer/Paste into Selection.
15. Selections/Select None. Effects/Edge Effects/Enhance.
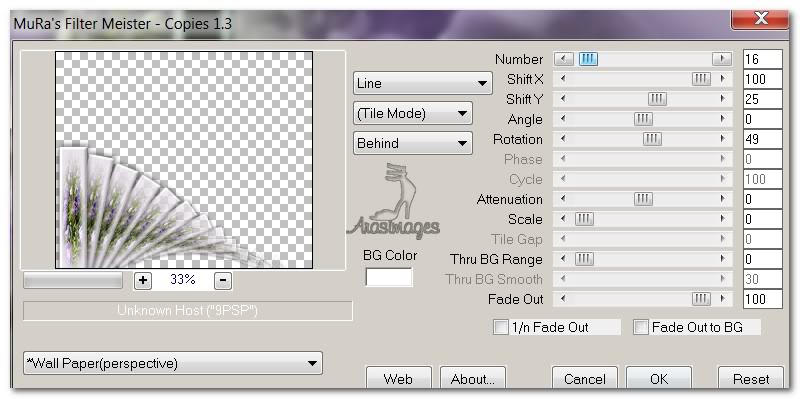
16. Effects/MuraMeister/Copies. Use settings as seen below. Copy/Paste as New Image in workspace. Minimize for later use.
17. Open ruban ribbon.pspimage. Copy/Paste as New Layer.
18. Using Color Changer tool, Tolerance 10, right click Background color on left edge of the ribbon.
19. Image/Resize/Resize by 38%/Resize all layers unchecked. Position at the top of original rectangle. If the ribbon is too wide, use a lesser percentage in resizing or simply erase excess.
20. Effects/3D Effects/Drop Shadow/Vertical -2, Horizontal -3, Opacity 50, Blur 5, color #000000.
21. Adjust/Sharpness/Sharpen.
22. Open LilacLovely.pspimage tubed layer flower. Copy/Paste as New Layer.
23. Move flowers to right side of image. Using the Pick Tool, stretch the top and bottom until the flower is touching both top and bottom border of image.
24. Adjust/Sharpness/Sharpen. Adjust/Sharpness/Sharpen More.
25. Effects/3D Effects/Drop Shadow/vertical -12, Horizontal -20, Opacity 50, Blur 21, color #000000.
26. Open LilacLovely.pspimage flower misted layer. Copy/Paste as New Layer and pull the flowers down toward bottom to left of first flowers.
27. Open MR_Sensuality.pspimage. Copy/Paste as New Layer. Move to center of image.
28. Effects/3D Effects/Drop Shadow/vertical -12, Horizontal -20, Opacity 50, Blur 21, color #000000.
29. Open butterflies-swallowtial.pspimage. Copy/Paste as New Layer.
30. Image/Resize/Resize by 42%, Resize all layers unchecked.
31. Move butterfly to right side of image over flowers. Using Pick Tool, grab turning node and turn on an angle, place as I have mine positioned.
32. Effects/3D Effects/Drop Shadow/vertical -12, Horizontal -20, Opacity 50, Blur 21, color #000000.
33. Image/Add Borders/Add border 3px, Symmetric checked, color #000000.
34. In Layers Palette, Promote Background Layer.
35. Image/Resize/Resize by 80%/Resize all layers unchecked. You will end up with a large blank border outside the main image.
36. In Materials Palette, once again set Foreground and Background to original Gradient. Check Texture box and choose Corel_15_38 Crumpled Paper Texture.

37. Using Magic Wand, select the blank large border. Layers/New Raster Layer.
38. Flood fill the new large border with the Gradient/Texture. Selections/Select None.
39. Maximize the Rectangle Copies that you have saved for later use. We will use it now.
40. Copy the Rectangle Copies/Paste as New Layer. Use the Pick tool, grabbing the move node, arrange the copies so they fan out on an angle. Move to right side of image similar to how I have mine. Adjust as necessary. You don't have to be exact...use what pleases you.
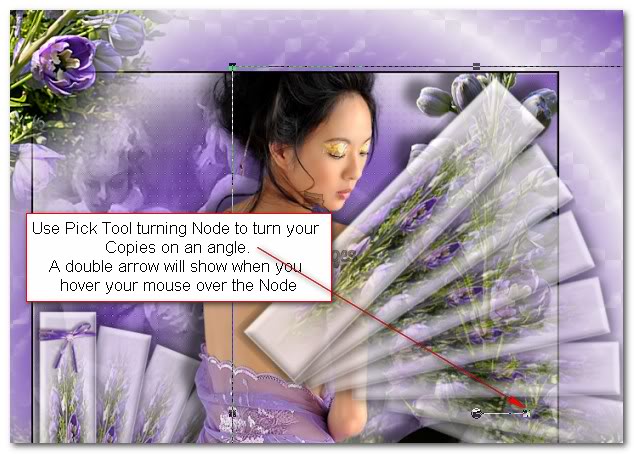
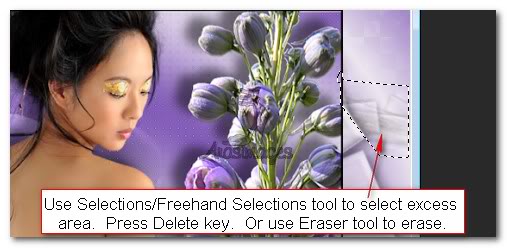
41. Paste again and bring to the top similar to how I have mine, using the Pick tool to adjust position and again on the left side so the one vertical Copy shows on the left side of image along border. If an excess shows on the right side from the "fan" of copies, just use your Selections/Freehand Selection tool, use settings below or use Eraser tool to erase it. Do the same with the top copies.

42. Move the Layer Raster 1 (Background) to the top. All layers of the "fan" of copies will now be beneath it.
43. Open LilacLovely.pspimage misted layer. Copy/Paste as New Layer.
44. Image/Resize/Resize by 80%/Resize all layers unchecked.
45. Using the Pick Tool, grab the move node and place it on an angle. Move to left top corner.
46. Adjust/Sharpness/Sharpen. Adjust/Sharpness/Sharpen More.
47. Duplicate. Pull duplicated image into bottom right corner.
48. Duplicate. Image/Mirror. (For PSPX4, you will have to use the Move tool to move the flowers to the left bottom corner after duplicating. For PSPX3 and below, Image/Mirror will do the moving for you.)
49. Open butterflies_swallowtail.pspimage. Copy/Paste as New Layer.
50. Image/Resize/Resize by 50%/Resize all layers unchecked.
51. Using the Pick Tool, grab the move node and place butterfly on an angle as I have mine. Place at bottom near right corner.
52. Effects/3D Effects/Drop Shadow/vertical -12, Horizontal -20, Opacity 50, Blur 21, color #000000.
53. Paste again as New Layer. Image/Resize/Resize by 28%/Resize all layers unchecked.
54. Use the Pick Tool once more to place the butterfly on an angle and place on left side of image above the flowers in the bottom left corner.
55. Effects/3D Effects/Drop Shadow/vertical -12, Horizontal -20, Opacity 50, Blur 21, color #000000.
56. Change the Background color to #000000.
57. From Text tool, choose font Verticalization, Size 80 , use settings as shown below, type the word "Delicate". Convert to Raster Layer. Move into position in top left area.

58. Change Size of font to 60, type the word "things". Convert to Raster Layer. Move into place beneath the word "Delicate".
59. Sign your name or leave your watermark. Convert to Raster Layer if necessary.
60. Image/Add Borders/Add 3px border, Symmetric checked, Color #000000.
61. Effects/3D Effects/Inner Bevel. Use settings below.
62. Save your work as a .jpg file called Delicate things.
A big thank you to Evatexas and PamelaD who tested this tutorial for me.
If you are going to use this tutorial for stationery, cards or place the tutorial/tag on another site, I would appreciate you contacting me for permission, giving Arasimages credit for the original tutorial and if possible, a link back to my site. Thank you.
Copyright © Arasimages All Rights Reserved