
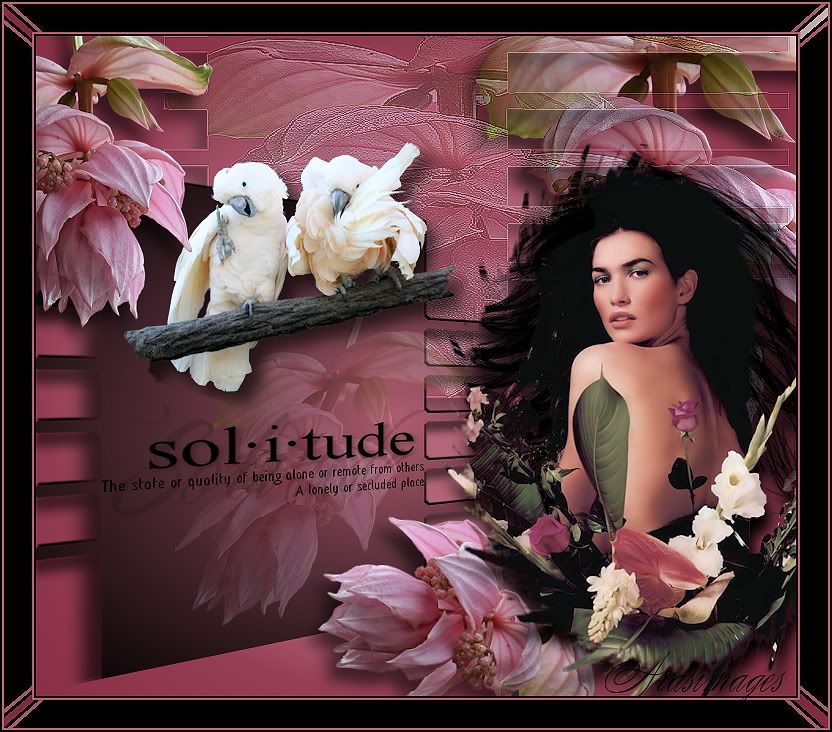
Solitude
For Italian and Danish translation, click on the flags.


For this tutorial you will need the materials in the zip file below.

Thanks go to JHanna, Guismo and our own PamelaD of Arasimages for the beautiful tubes used. Please visit the tuber sites listed on my Links page.
Use the bookmark below to mark your place along the way.

Unzip the materials into a working folder. Open the materials in PSP, copy and close originals. Export the Solitude brush into your PSP/Brushes folder. Place the Presets into your PSP/Presets folder and the circleflare2 mask in the PSP/Masks folder. You will need plugins DC Layer and Filter Factory B to do this tutorial. I have used PSPX4 to create this tutorial but you may use an earlier version. It is assumed you have a working knowledge of PSP.
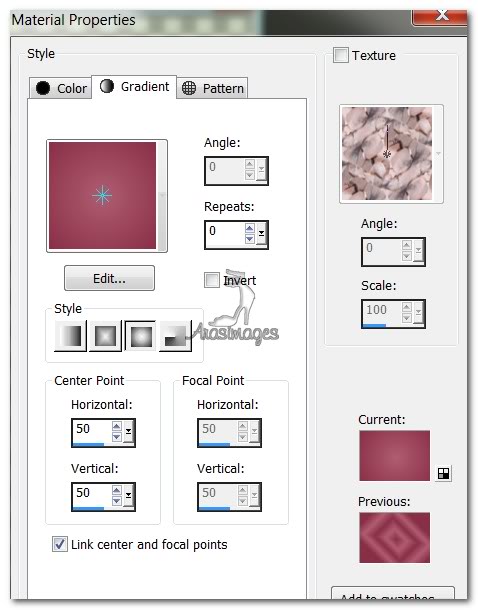
1. In Materials Palette, set Foreground to #af5d71, Background to #892f46.
2. In Materials Palette, create a Gradient using Sunburst, Angle 0, Repeats 0, Invert unchecked.
3. New/New Image 760px by 660px. Selections/Select All.
4. Open calguishurleyspring27410.pspimage/background layer. Copy/Background layer and Paste into Selection. Selections/Select None.
5. Layers/New Raster Layer. Flood fill with background #892f46.
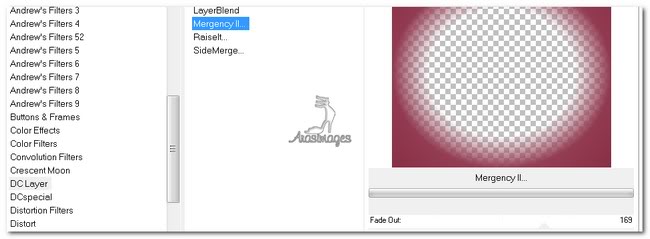
6. Effects/DC Layer/MergencyII/Fade Out set to 169. (I have my DC Layer in Filters Unlimited 2).
7. Open JHanna_573_tube.pspimage. Copy/Paste as New Layer. Place in upper right corner.
8. Effects/3D Effects/Drop Shadow, Vertical 12, Horizontal -12, Opacity at 60, Blur 20, color #000000.
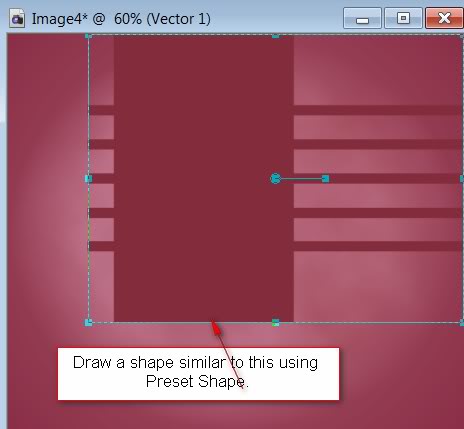
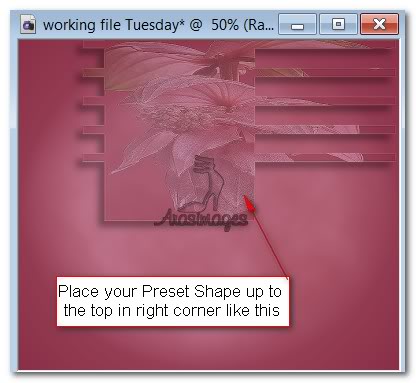
9. From Tool bar, select Preset Shapes/mcHT_Shape01/Shape7. Use settings below, Retain style unchecked.

10. Close off Foreground color in Materials Palette. Draw out the Preset Shape similar to what I have done. Convert to Raster Layer.
11. Using Magic Wand, select the Preset Shape. Open JHanna_573_tube.pspimage. Copy/Paste into selection. Selections/Select None. Drop Opacity to 36.
12. With your pick tool, using center Move Node, pull over toward right side and upward to top.
13. Effects/3D Effects/Drop Shadow, Vertical 12, Horizontal -12, Opacity at 100, Blur 12, color #000000.
14. Effects/Edge Effects/Enhance.
15. Change Background color in Materials Palette to #000000. Close off Foreground color.
16. From Tool bar, select Preset Shapes/mcHT_Shape01/Shape 7. Use settings below, Retain style checked.

17. Draw out another Preset shape as I have done. Convert to Raster Layer. See below.

18. Using Magic Wand, select newly drawn Preset shape. Selections/Modify/Contract by 2px.
19. Flood fill with Gradient (created by changing Background to #000000 and having Foreground open again.) Selections/Select None.
20. Effects/3D Effects/Drop Shadow, Vertical 12, Horizonal -12, Opacity at 60, Blur 22, color #000000.
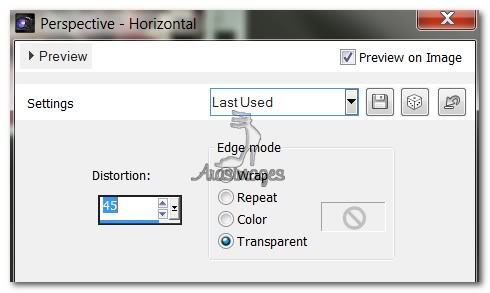
21. Effects/Geometric Effects/Perspective Horizontal. Use settings below.
22. Using Pick Tool nodes, adjust the Preset shape so it is the size you want or similar to what I have done.
23. Open JHanna_573_tube.pspimage. Copy/Paste as New Layer.
24. Image/Resize/Resize by 60%/Resize all layers unchecked.
25. Effects/3D Effects/Drop Shadow, Vertical 12, Horizonal -12, Opacity at 60, Blur 22, color #000000.
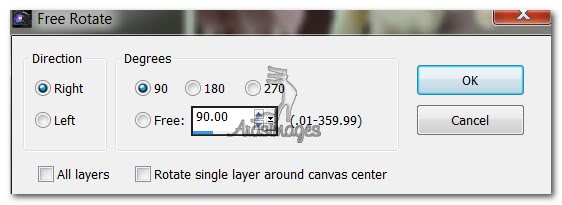
26. Image/Free Rotate/Right by 90 degrees. Image/Flip. Move flower down into lower right corner.
27. Paste flower as New Layer once more. Resize same as in Step #24. Lower Opacity to 26.
28. Using the Pick Tool, use the Move Node so flower is at an angle with the Perspective/Horizontal Preset image, placing flower on top of it.
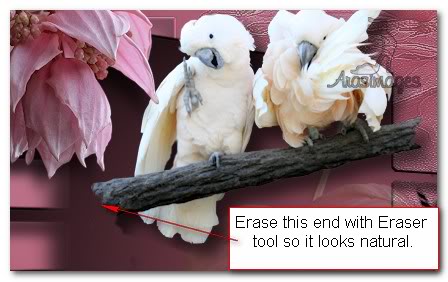
29. Open Corellas.pspimage. Copy/Paste as New Layer.
30. Image/Resize/Resize by 60%/Resize all layers unchecked.
31. Place the Corellas at the top of the Preset. Using the Eraser tool set to Size 15 (the rest of the settings are default), erase at the left end of the branch the birds are sitting on so it looks natural.
32. Effects/3D Effects/Drop Shadow/vertical 12, Horizontal 12, Opacity 60, Blur 22, color #000000.
33. Open calguishurleyspring 27410.pspimage. Copy/Paste as New Layer.
34. Image/Resize/Resize by 60%/Resize all layers unchecked.
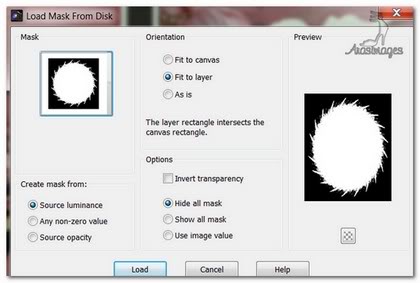
35. Layers/Load/Save Mask/Load Mask from Disk. Select circleflare2. Apply. Merge/Merge Group.
36. Move lady into bottom right corner over flower and a little beyond right border.
37. Effects/3D Effects/Drop Shadow/vertical 12, Horizontal 12, Opacity 60, Blur 20, color #000000.
38. Open JHanna_573_tube.pspimage. Copy/Paste as New Layer.
39. Image/Resize/Resize by 60%/Resize all layers unchecked.
40. Move flower into upper left corner. See my image for placement.
41. Effects/3D Effects/Drop Shadow/vertical 12, Horizontal -12, Opacity 60, Blur 22, color #000000.
42. Layers/New Raster Layer.
43. From Paint Brush tool, select agi_wb_Solitude brush. Stamp once below the birds using right click, background color #000000.

44. Effects/Geometric Effects/Perspective Horizontal as in Step #21. Move into correct position.
45. Image/Add Borders/add 2px border, Symmetric checked, color #000000.
46. Image/Add Borders/add 2px border, Symmetric checked, color #af5d71.
47. Image/Add Borders/add 28px border, Symmetric checked, color #000000.
48. Using Magic Wand, click the 28px border to activate it.
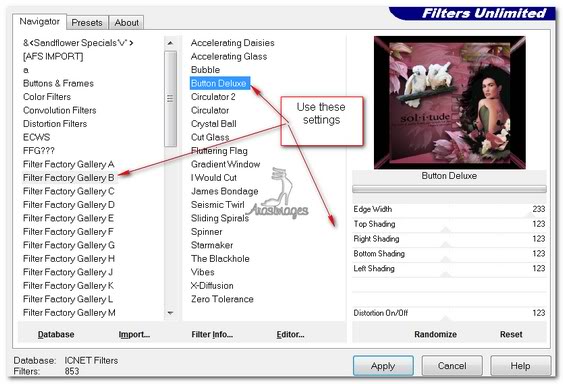
49. Effects/Filters Unlimited/Filter Factory B/Button Deluxe. All settings at 123 except top one at 233.
50. Selections/Select None.
51. Image/Add Borders/add 2px border, Symmetric checked, color #af5d71.
52. Image/Add Borders/add 2px border, Symmetric checked, color #000000.
53. Adjust/Sharpness/Sharpen.
54. Add your name or watermark. Save as .jpg in working folder as Solitude.
A big thank you to Evatexas and PamelaD who tested this tutorial for me.
If you are going to use this tutorial for stationery, cards or place the tutorial/tag on another site, I would appreciate you contacting me for permission, giving Arasimages credit for the original tutorial and if possible, a link back to my site. Thank you.
Copyright © Arasimages All Rights Reserved