
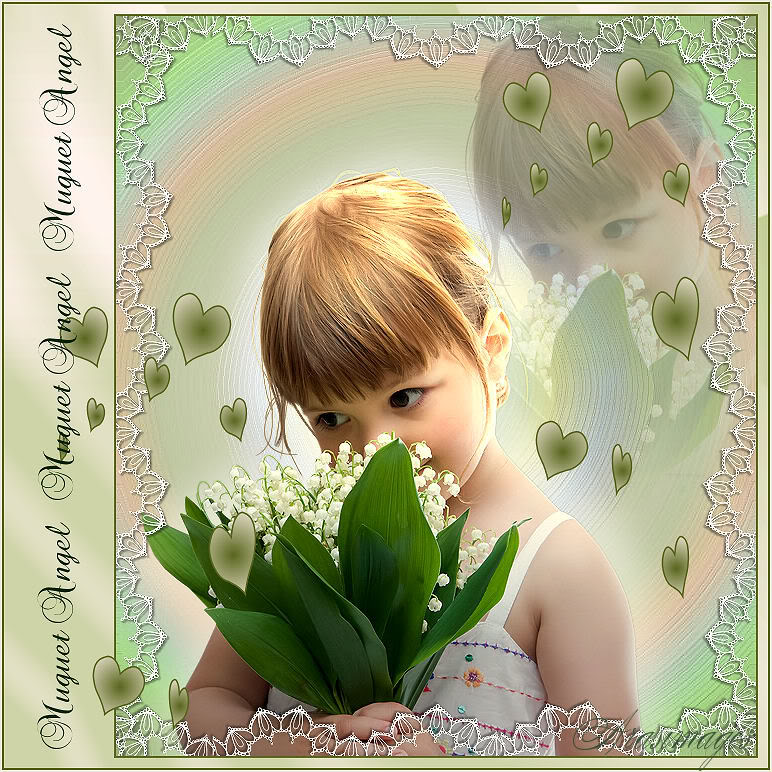
Muguet Angel
For Spanish, Danish and Dutch translation, click on the flags.


For this tutorial you will need the materials in the zip file below.

Thanks go to Maryse and to Arasimages for the beautiful tubes used. Please visit the tuber sites listed on my Links page.
Use the bookmark below to mark your place along the way.

Unzip the materials into a working folder. Open the materials in PSP, copy and close originals. Place the Mask in your PSP/Masks folder. You will need plugins AP_19 and Graphics Plus to do this tutorial. I have used PSPX3 to create this tutorial but you may use an earlier version. It is assumed you have a working knowledge of PSP.
1. Open 640px by 740px Circle Layer.jpg. Adjust/Sharpness/Sharpen.
2. In Materials Palette, set Foreground to #f0e9d7, Background to #ced4a7.
3. Open MR_Senteur de Muguet.pspimage. Copy/Paste as New Layer. (NOTE: Image will be mirrored later on in tutorial).
4. Using Selections tool, select around the words "tubed by Maryse" and hit Delete Key. Deselect.
5. Move the little girl to the upper left corner. Lower Opacity to 39.
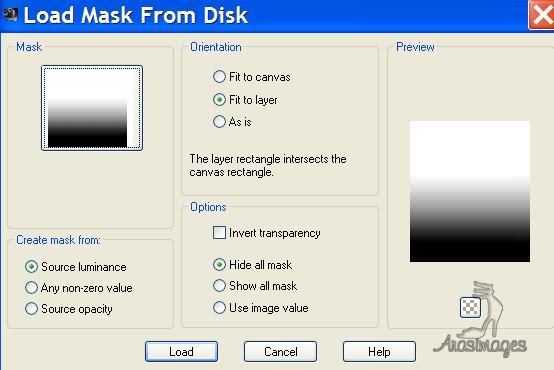
6. Layers/Load/Save Mask/Load Mask from Disk. Select Fadebottom_01 mask. Load.
7. Merge/Merge Group.
8. Paste the little girl again as New Layer. Move toward center fitting her to the bottom.
9. Select the words again and press Delete. Deselect.
10. Effects/3D Effects/Drop Shadow, Vertical 16, Horizontal 23, Opacity 50, Blur 50, color #ffffff.
11. Effects/3D Effects/Drop Shadow, Vertical -16, Horizontal -23, Opacity 50, Blur 50, color #ffffff.
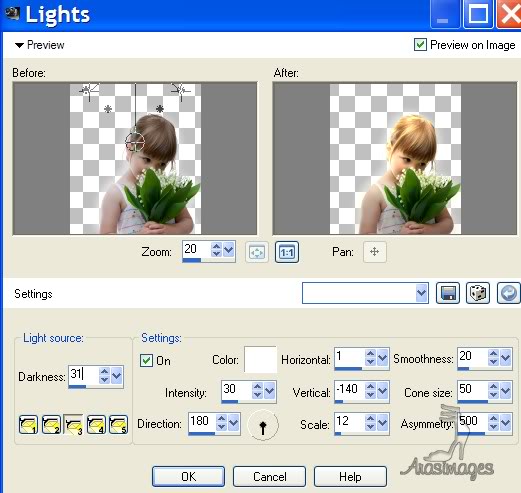
12. Effects/Illumination Effects/Lights. Use settings seen below.
13. Adjust/Sharpness/Sharpen.
14. Open Lace_Arasimages.pspimage. Copy/Paste as New Layer.
15. Move the Lace to the top of the image, adjusting so it is in place similar to mine.
16. Effects/3D Effects/Drop Shadow, Vertical 2, Horizontal 2, Opacity 50, Blur 2, color #000000.
17. Adjust/Sharpness/Sharpen.
18. Duplicate. Image/Flip.
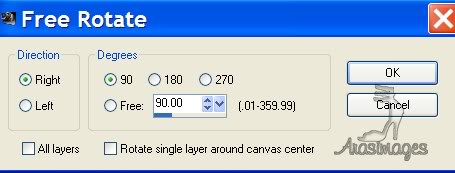
19. Duplicate again. Image/Free Rotate. Rotate to right to 90 degrees. See example below.
20. Duplicate once more. Image/Mirror.
21. Image/Add Borders/Border 2px, Symmetric checked, color #5a661e.
22. Image/Add Borders/Borders 10px top, 10px bottom, 10px left and 110px on right, Symmetric unchecked, color #f0e9d7.
23. Using Magic Wand, activate the large border.24. In Materials Palette, create a Gradient using Sunburst, Repeats 0, Invert unchecked.
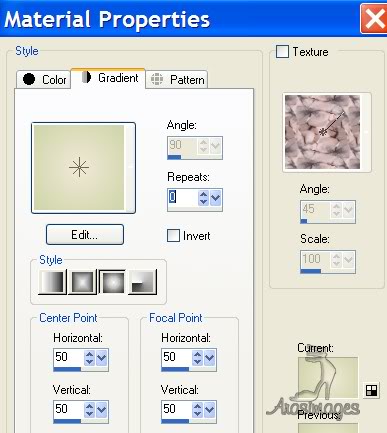
25. Layers/New Raster Layer. Flood fill with Gradient.
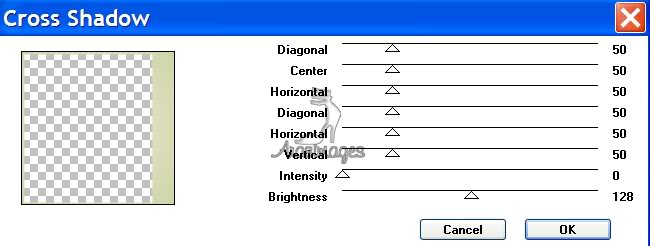
26. Effects/Graphics Plus/Cross Shadow, using settings as seen below.
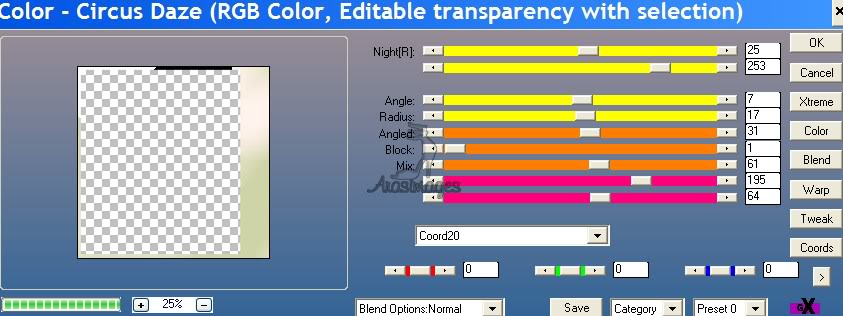
27. Effects/AP_19/Circus Daze. Use Default settings as seen below.
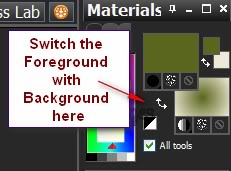
28. Selections/Select None.
29. Image/Add Borders/Add border of 2px, Symmetric checked, color #5a661e.
30. Image/Mirror.
31. In Materials Palette, change Background to #5a661e.
32. In Materials Palette, switch the Foreground with Background using double arrows so Gradient is on bottom.
33. From Tool bar, select the Preset Shape Tool. Find the Heart Preset and draw out hearts in random order and sizes, moving each while it is selected, placing as you like. Feel free to play a bit here using my finished tag as a guide. HINT: When drawing out the hearts, pulling to the left or right dictates which way they point.

34. Convert to Raster Layer. Duplicate.
35. Pull the duplicated layer to the left and down so they go into the larger border on left.
36. From the Tool bar, select the Text tool. Choose Font BrockScript, Size 36, set Background color to #042400.

37. Type out the words "Muguet Angel", space three times. Repeat twice more.
38. Use the turn node to turn the words on 90 degree angle and move to large border on left. Convert to Raster Layer.
39. Image/Add Borders/add 2px border, Symmetric checked, color #f0e9d7.
40. Adjust/Sharpness/Sharpen.
41. Sign your name and save as Muguet Angel.jpg.
A big thank you to Evatexas and PamelaD who tested this tutorial for me.
If you are going to use this tutorial for stationery, cards or place the tutorial/tag on another site, I would appreciate you contacting me for permission, giving Arasimages credit for the original tutorial and if possible, a link back to my site. Thank you.
Copyright © Arasimages All Rights Reserved