
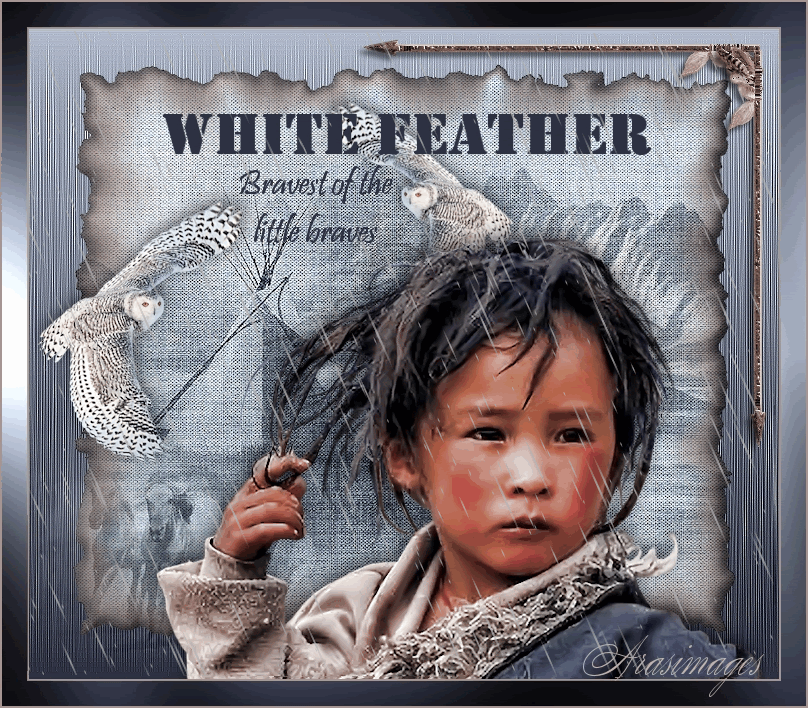
White Feather
For Danish translation, click on the flags.

For this tutorial you will need the materials in the zip file below.

Thanks go to Nikita, Marcio C of www.cantinhojulia.com (broken link) and to PamelaD and Evatexas of Arasimages for the beautiful tubes used.
Use the bookmark below to mark your place along the way.

Unzip the materials into a working folder. Open the materials in PSP, copy and close originals. You will need plugins Filters Unlimited2, DBS Flux, Xenofex2 and Graphics Plus to do this tutorial. You will also need the program Sqirlz. I have used PSPX4 to create this tutorial but you may use an earlier version. It is assumed you have a working knowledge of PSP.
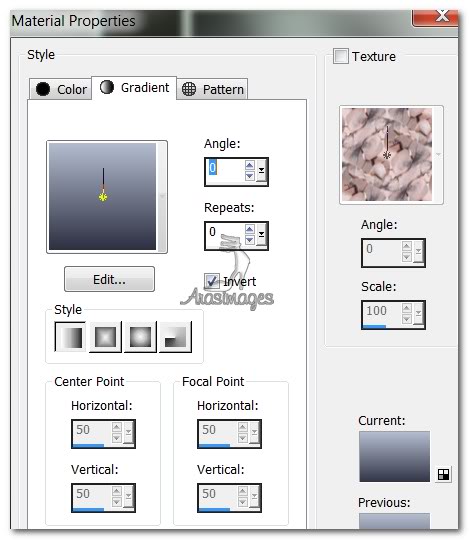
1. In Materials Palette, set Foreground to #b3bccf and Background to #2d3041.
2. Create a Gradient using Style Linear, Angle 0, Repeats 0, Invert checked.
3. New/New Raster Layer 750px by 650px. Selections/Select All.
4. Open snow.jpg image. Copy/Paste into Selection. Deselect.
5. Open Mask layer of TepeesE.pspimage. Copy/Paste as New Layer.
6. Blend Mode/Luminance (Legacy). Move tepees a little to left.
7. Merge/Merge Visible.
8. Effects/Filters Unlimited 2/Paper Textures/Canvas, Fine. Intensity set to 156, Lightness to 87.
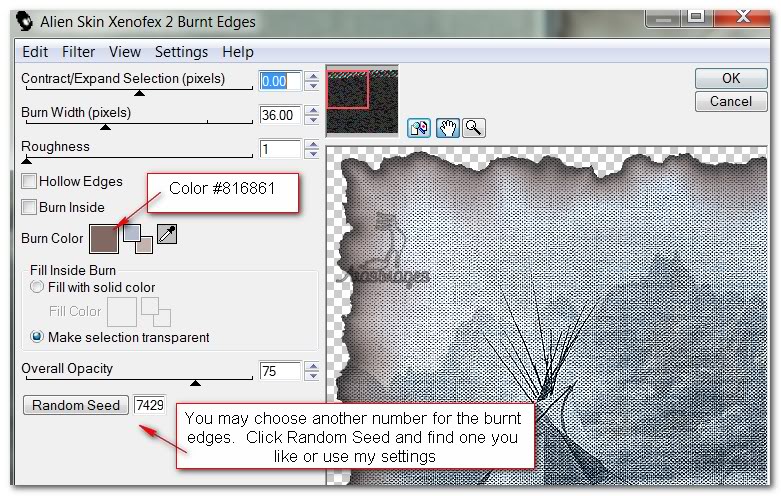
9. Effects/Alien Skin Xenofex 2/Burnt Edges. See settings below.
10. Image/Resize/Resize by 90%/Resize all layers unchecked.
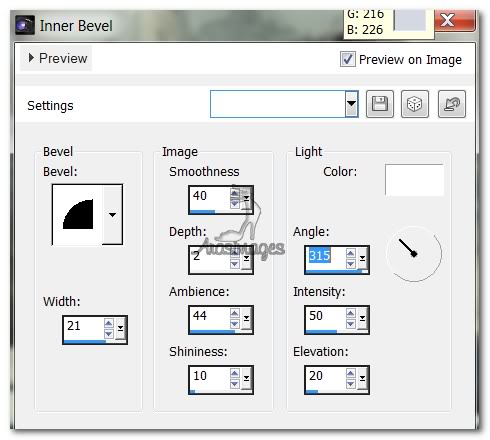
11. Effects/3D Effects/Inner Bevel. Use settings below.
12. Layer/New Raster Layer. Flood fill with Gradient.
13. Effects/DBS Flux/Blast. See below.

14. Effects/Edge Effects/Enhance. Repeat.
15. Pull below Merged layer. Go back to Raster 1 (Merged layer) and highlight.
16. Open SnowOwl.pspimage. Copy/Paste as New Layer.
17. Image/Resize/Resize by 60%/Resize all layers unchecked.
18. Move owl by center left edge.
19. Effects/3D Effects/Drop Shadow, Vertical -5, Horizontal 2, Opacity 60, Blur 23, color #000000.
20. Duplicate. Image/Resize/Resize by 90%/Resize all layers unchecked.
21. Image/Mirror. Move smaller owl near upper center.
22. Open mc672.pspimage. Copy/Paste as New Layer.
23. Image/Resize/Resize by 60%/Resize all layers unchecked.
24. Move horses to left and down into left bottom corner of burnt edges layer. Set to Luminance (Legacy).
25. Open 1293385529_enfants_nikita.pspimage. Copy/Paste as New Layer.
26. Image/Resize/Resize by 90%/Resize all layers unchecked.
27. Move little boy to right bottom corner.
28. Effects/3D Effects/Drop Shadow, Vertical -5, Horizontal -2, Opacity 60, Blur 23, color #000000.
29. From Tool bar, select Font Stencil, Size 60 in Bold, color #2d3041. Use settings below.

30. Type "White Feather". Convert to Raster Layer. Move to center top of image.
31. Select Font Pristina, Size 36, color #2d3041. Type "Bravest of the little braves". Convert to Raster Layer. Use settings below.

32. Duplicate, Merge/Merge Down and move under the "White Feather" text.
33. Image/Add Borders/add 2px border, Symmetric checked, color #a79592.
34. Image/Add Borders/add 25px border, Symmetric checked, color #2d3041.
35. Select 25px border with Magic Wand.
36. Change the Gradient to Repeats 1. Flood fill the 25px border.
37. Effects/Graphics Plus/Cross Shadow. Use default settings of all 50s and for the last two set at 128.
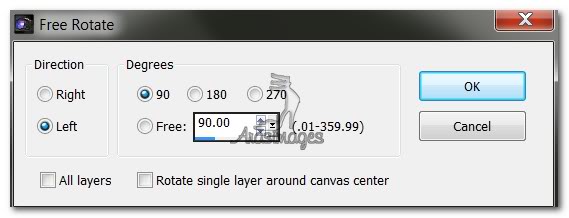
38. Selections/Select None.
39. Image/Add Borders/add 2px border, Symmetric checked, color #a79592.
40. Open IndianArrow.pspimage. Copy/Paste as New Layer.
41. Place in upper right corner, horizontal position.
42. Duplicate. Image/Flip.
43. Image/Free Rotate by 90 degrees, left. Place in upper right corner, vertically.
44. Merge/Merge Visible. Adjust/Sharpness/Sharpen.
45. Save as a .jpg image named White Feather.
46. For Animation, open Sqirlz program. Open the saved .jpg White Feather.
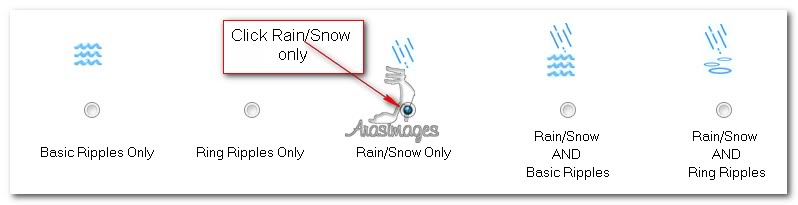
47. Click on the large Y in tool bar and set to Rain/Snow Only.
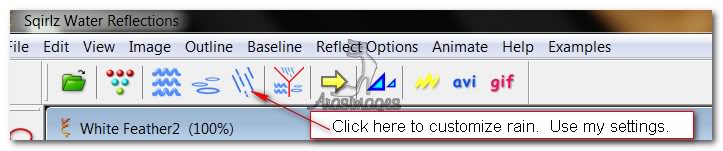
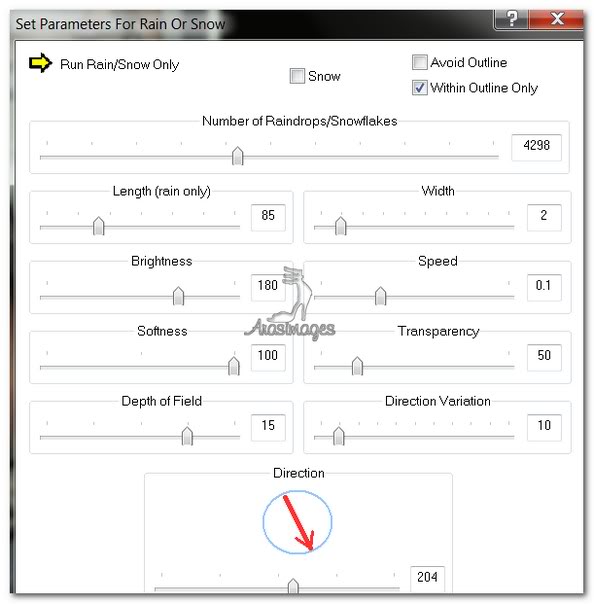
48. Click on the Rain tool to the left of the Y and set your settings as I have mine.
49. Click on Outline tool. Draw a line inside the borders on all sides, right clicking to close outline.
50. Click on the 5 colored dots in tool bar and set the number of frames to 30.
51. Click the large yellow arrow to view your animation. If it appears correct, then click the .gif button in tool bar and save as GIF file, giving it the file name "White Feather". The Frame Rate box will appear and it will have 15 set in it. Leave it that way and Save.
52. A box will appear showing Squirlz is saving your animation. Wait until it is finished.
53. I hope you have enjoyed creating our "little brave warrior White Feather" as he stands in the rain, contemplating his future.
A big thank you to Evatexas and PamelaD who tested this tutorial for me.
If you are going to use this tutorial for stationery, cards or place the tutorial/tag on another site, I would appreciate you contacting me for permission, giving Arasimages credit for the original tutorial and if possible, a link back to my site. Thank you.
Copyright © Arasimages All Rights Reserved