

She sells Seashells
For Italian, Danish and German translation, click on the flags.


For this tutorial you will need the materials in the zip file below.

Thanks go to Suzi Sgai, Kara PamelaD and Evatexas of Arasimages for the beautiful tubes used.
Use the shell below to mark your place along the way.

Unzip the materials into a working folder. Open the materials in PSP, copy and close originals. You will need no plugins to do this tutorial. I have used PSPX4 to create this tutorial but you may use an earlier version. It is assumed you have a working knowledge of PSP.
1. In Materials Palette, set Foreground to #fafaf2 and Background to #4e769d.
2. Create a Gradient using Style Linear, Angle 0, Repeats 0, Invert unchecked.
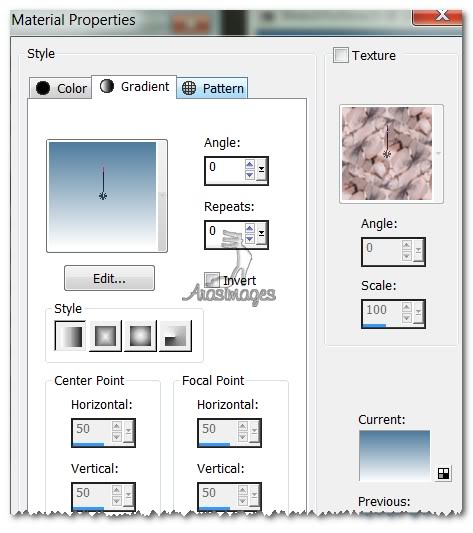
3. New/New Raster Layer 750px by 650px. Flood fill with Gradient.
4. Open BeautifulBeach.pspimage. Copy/Paste as New Layer.
5. Using Pick tool nodes, stretch to fit to sides.
6. Open SailboatsE.pspimage. Copy/Paste as New Layer.
7. Image/Resize/Resize by 63%/Resize all Layers unchecked.
8. Move toward left side along the ocean horizon. Lower Opacity to 57.
9. Open ocean.pspimage. Copy/Paste as New Layer. Move upwards a bit and use Pick tool to pull to left edge.
10. Using Selections tool, select any of the ocean layer that is above the horizon and press Delete key. This step cleans any excess that is over the ships.
11. Open KaraT3139.pspimage. Copy/Paste as New Layer.
12. Move down to left lower side.
13. Adjust/Hue and Saturation/Colorize. Hue set to 146, Saturation to 86.
14. Lower Opacity to 75.
15. Open Woman84.pspimage. Copy/Paste as New Layer.
16. Move woman to bottom right corner.
17. Effects/3D Effects/Drop Shadow/Vertical -3, Horizontal -3, Opacity 50, Blur 20, color #2d3041.
18. Open plant1.pspimage. Copy/Paste as New Layer.
19. Move to left bottom corner.
20. Adjust/Hue and Saturation/Colorize. Hue set to 146, Saturation to 86.
21. Open GTB Shells on a lineKMG.pspimage. Copy/Paste as New Layer.
22. Image/Resize/Resize by 80%/Resize all layers unchecked.
23. Duplicate twice. Move each line of shells so they go across the entire image.
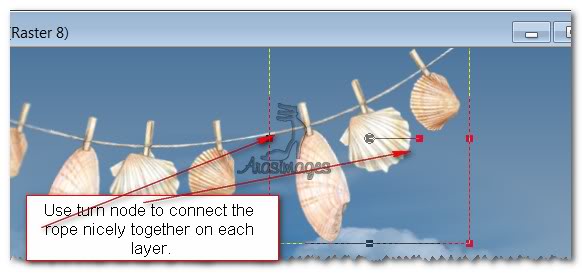
24. Use the Pick tool turning node to turn the rope so it connects nicely with the one next to it. Do this to each layer of shells/ropes.
25. Merge the three layers together by highlighting the top layer, Merge/Merge Down twice.
26. Adjust/Sharpness/Sharpen.
27. Duplicate. Image/Mirror and move so a second row of shells overlaps the first on the right side. Use my finished image as an example.
28. Effects/3D Effects/Drop Shadow of Vertical -3, Horizontal-3, Opacity 50, Blur 8, color #000000. Apply on each of the two layers of seashells.
29. Merge/Merge Down. Copy/Paste as New Image in a blank area of your workspace. (This creates a Pattern for Materials Palette.)
30. Image/Add Borders/2px border, Symmetric checked, color #fafaf2.
31. Image/Add Borders/5px top, 5px each side, 52px bottom, Symmetric unchecked, color #4e769d.
32. In Materials Palette, set to Pattern (current image) using the settings below.
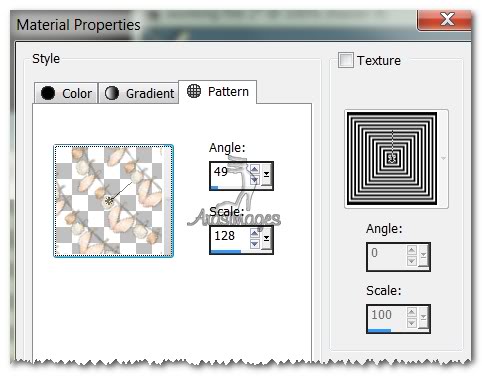
33. Select the large border with Magic Wand to activate it. Flood fill with Pattern (which is your seashell new image).
34. Adjust/Blur/Gaussian Blur, Radius set to 12.
35. Selections/Select None.
36. Image/Add Borders/2px border, Symmetric checked, color #fafaf2.
37. From Tool bar, select Text tool, Font VivianXtremeByWiescher, Size 48, color #fafaf2. Type "She sells Seashells by the Seashore". Convert to Raster Layer.

38. Effects/3D Effects/Drop Shadow, Vertical 1, Horizontal 1, Opacity 100, Blur 1, color #000000.
39. Duplicate text. Merge/Merge Down and center in bottom border.
40. Save as .jpg image in working folder.
A big thank you to Evatexas and PamelaD who tested this tutorial for me.If you are going to use this tutorial for stationery, cards or place the tutorial/tag on another site, I would appreciate you contacting me for permission, giving Arasimages credit for the original tutorial and if possible, a link back to my site. Thank you.
Copyright © Arasimages All Rights Reserved