
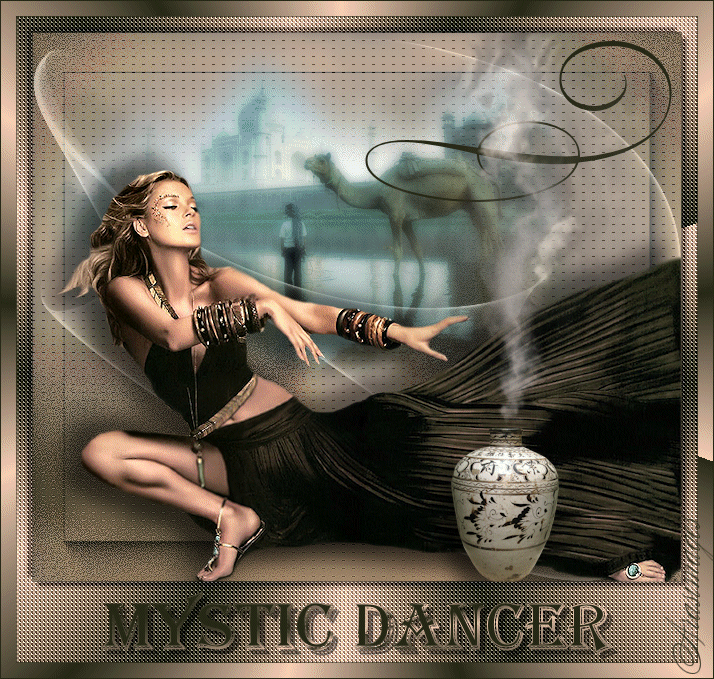
Mystic Dancer
For Italian and Danish translation, click on the flags.


For this tutorial you will need the materials in the zip file below.

Thanks go to LuzCristina; MDS and to Evatexas of Arasimages for the lovely tubes used in this tutorial. Please visit the other tubers links on my Links page.
Use the bookmark below to mark your place along the way.

Unzip the materials into a working folder. Open the materials in PSP, copy and close originals. You will need Plugins Graphics Plus, Dragonfly/Sinedots11 and AP 01 (Innovations) to do this tutorial. I have used PSPX4 to create this tutorial but you may use an earlier version. It is assumed you have a working knowledge of PSP.
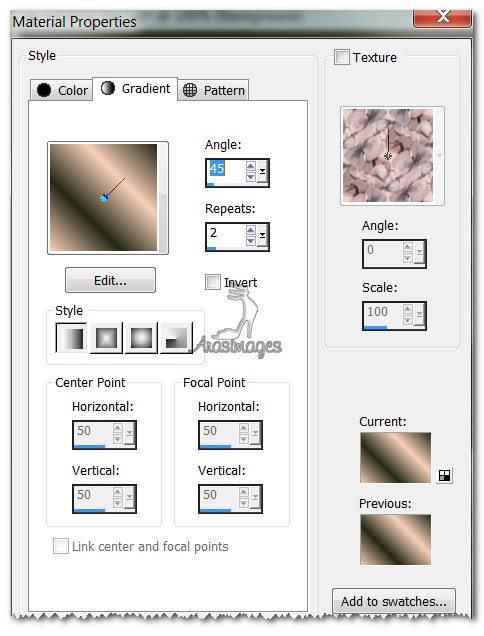
1. In Materials Palette, set Foreground color to #f7cfb7, Background color to #252816.
2. Set to Gradient, Style Linear, Angle 45, Repeats 2, Invert unchecked.
3. New/New Image 650px by 550px. Selections/Select All.
4. Open 3017-luzcristina.pspimage of Raster 2. Copy/Paste into Selection. Selections/Select None.
5. Layers/New Raster Layer. Flood fill with Gradient.
6. Adjust/Blur/Gaussian blur, Radius 25.
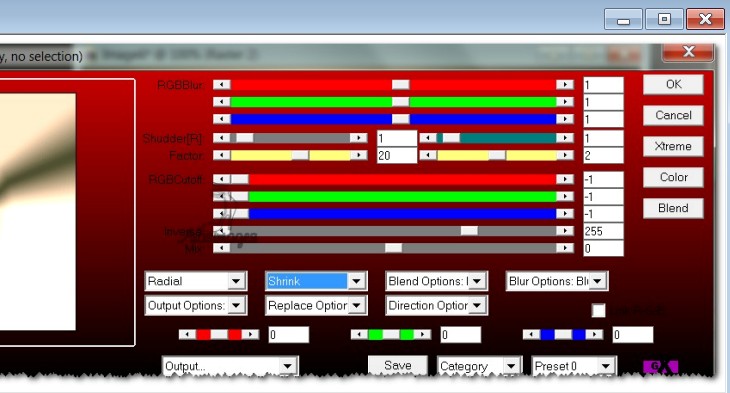
7. Effects/AP 01 [Innovations]/Blur-Shudder. Use settings as seen below.
8. Image/Flip.
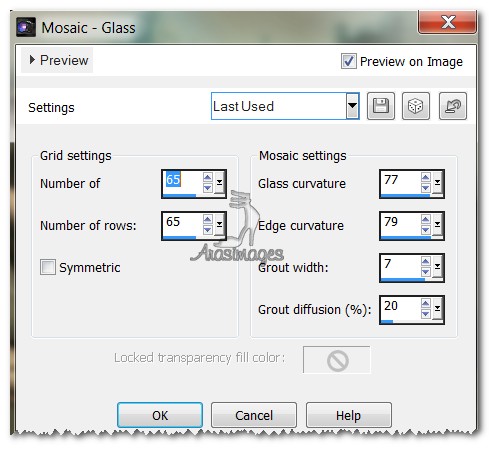
9. Effects/Texture Effects/Mosiac-Glass. Use settings below.
10. Effects/Edge Effects/Enhance. Lower Opacity to 36.
11. Open mds8105 TajMahal.pspimage. Copy/Paste as New Layer.
12. Move to center of image a little toward the top.
13. Layers/New Raster Layer.
14. Effects/DragonFly/Sinedots 11. Use settings below, color #90aeae.

15. Drop Opacity to 59. Set Blend Mode to Luminance (Legacy).
16. Open 3017-luzcristina.pspimage of woman. Copy/Paste as New Layer.
17. Image/Resize/Resize by 85%, Resize all Layers unchecked.
18. Effects/3D Effects/Drop Shadow, Vertical 15, Horizontal -15, Opacity 50, Blur 25, color #000000.
19. Effects/3D Effects/Drop Shadow, Vertical -15, Horizontal -15, Opacity 50, Blur 25, color #000000.
20. Adjust/Sharpness/Sharpen.
21. Open WineJar.pspimage-WineJar Layer. Copy/Paste as New Layer.
22. Image/Resize/Resize by 25%/Resize all layers unchecked.
23. Effects/3D Effects/Drop Shadow, Vertical 15, Horizontal -15, Opacity 50, Blur 25, color #000000.
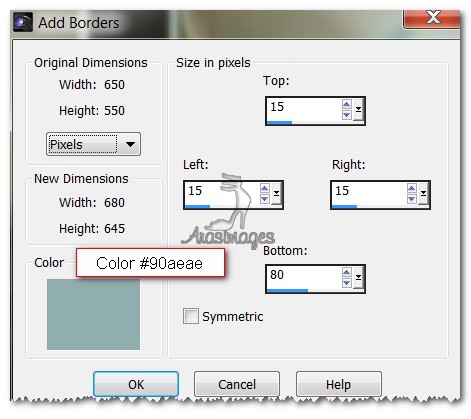
24. Image/Add Borders, 15px borders on top and sides, 80px on bottom, Symmetric UNCHECKED.
25. Using Magic Wand, click inside border to activate it.
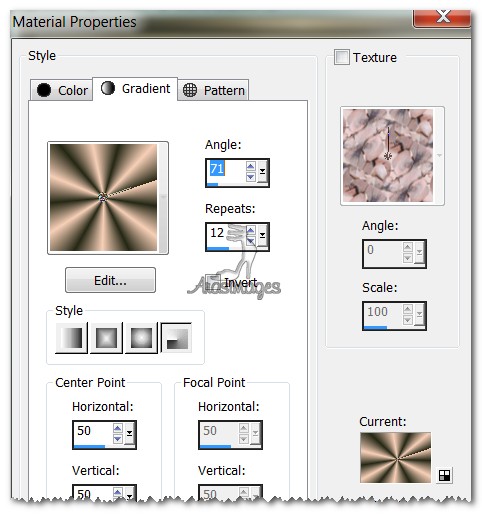
26. In Materials Palette, change the Gradient to Angle 71, Repeats 12, Style Radial, Invert unchecked.
27. Layers/New Raster Layer.
28. Flood fill the border with the new Gradient. Selections/Invert.
29. Effects/3D Effects/Drop Shadow, Vertical 5, Horizontal 5, Opacity 50, Blur 5, color #000000.
30. Effects/3D Effects/Drop Shadow, Vertical -5, Horizontal -5, Opacity 50, Blur 5, color #000000.
31. Selections/Invert.
32. Effects/Graphics Plus/Cut Glass. Have settings to Number of Facets at 255, Transparency at 77.
33. Selections/None.
34. Image/Add Borders, 1px border, Symmetric checked, color #252816.
35. Image/Add Borders, 15px border, Symmetric checked, color #f7cfb7
36. Use Magic Wand to activate 15px border. Layers/New Raster Layer.
37. Flood fill with Gradient. Image/Flip. Selections/Select None.
38. Image/Add Borders, 1px border, Symmetric checked, color #252816.
39. From Tool bar, select the Text tool. Choose Font Dekor01, Size 200, color #252816. Close off the Foreground color in Materials Palette. Press "Q" on the keyboard.

40. Convert to Raster Layer. Place decoration in upper right corner.
41. Choose Font Algerian, Size 68, Stroke width 1.0, open Foreground layer in Materials Palette.

42. Using both Foreground and Background colors, type "Mystic Dancer".
43. Convert to Raster Layer. Move into place in bottom large border.
44. Effects/3D Effects/Drop Shadow, Vertical 5, Horizontal 5, Opacity 50, Blur 2, color #000000.
45. Sign your name or leave your watermark if you wish. Merge/Merge Visible then save as .jpg file in your working folder.
46. Copy your finished tag. Open Animation Shop and Paste New Image.
47. Duplicate the image so you have 5 frames. Highlight first frame. Edit/Select All.
48. Open Mystic Dancer Smoke.psp Animation shop image. Highlight first frame. Edit/Select All. Copy by right clicking on top of frames/Copy.
49. Now go to your main image, right click inside the first frame, Paste/Into Selected Frame. Place the smoke so it fits between the opening of the wine jar and the inside border at the top of image. Left click to position.
50. Animation/Frame Properties, set to 18, click okay.
51. Click on the View Animation button in the Tool bar to see if your animation works properly. If so, you will now save your work. File/Save As. When the box comes into view, give your work a name such as Mystic Dancer, leave it set to save as a .gif file and click Save. Then click Next, Next, Next and Finish.
You are all done! I hope you enjoyed working this tutorial.
Big hugs to Evatexas and PamelaD who tested this tutorial for me.
If you are going to use this tutorial for stationery, cards or place the tutorial/tag on another site, I would appreciate you contacting me for permission, giving Arasimages credit for the original tutorial and if possible, a link back to my site. Thank you.
Copyright © Arasimages All Rights Reserved