
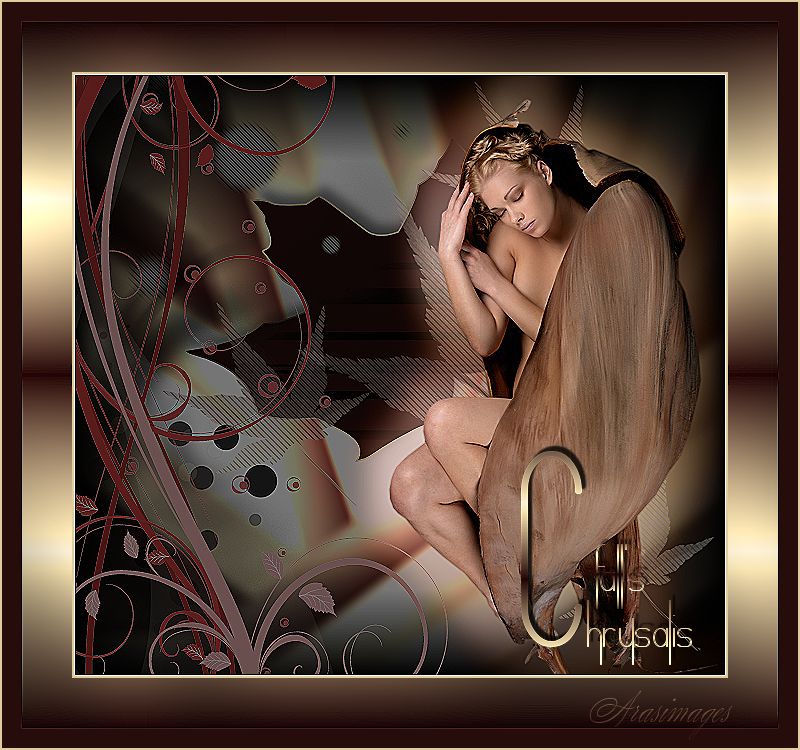
Fall's Chrysalis
For Italian and Danish translation, click on the flags.


For this tutorial you will need the materials in the zip file below.

Unzip the materials into a working folder. Open the materials in PSP, copy and close originals. You will need Plugins Graphics Plus, Plugin Galaxy, VM Distortion, MuraMeister, Transparency and Penta to do this tutorial. I have used PSPX4 to create this tutorial but you may use an earlier version. Check to see if the ES Chic 01 pspGradient is already in your Gradients. If not, place the ES Chic 01 Gradient into your Gradient folder. Export the leaf 19 as a brush in your PSP Brushes folder. Just open the other brushes on your desktop and minimize them OR from your working folder, use them through the Organizer if you are using a newer version of PSP. It is assumed you have a working knowledge of PSP. Remember to occasionally save your work for possible future changes.
Thanks go to Guismo for the lovely tube used in this tutorial. Please visit the other tubers links on my Links page.
Use the bookmark below to mark your place along the way.

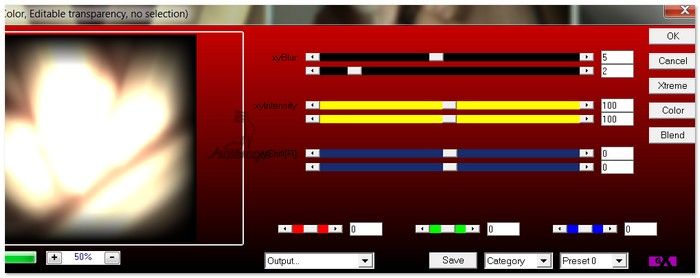
1. In Materials Palette, set Foreground color to #eee3d5, Background color to #260c0b.
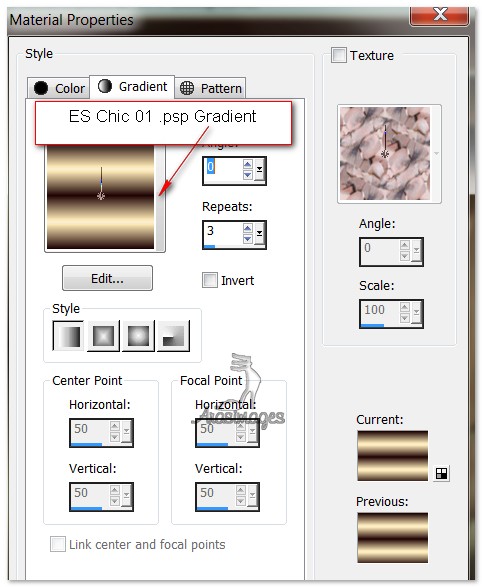
2. Set the Gradient to the ES Chic 01 Gradient, Style Linear, Angle 0, Repeats 3, Invert unchecked.
3. New/New Image 650px by 600px. Flood fill with Gradient.
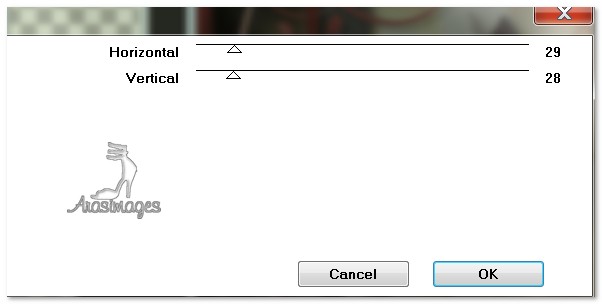
4. Effects/VM Distortion/FlipChop. Use settings as seen below.
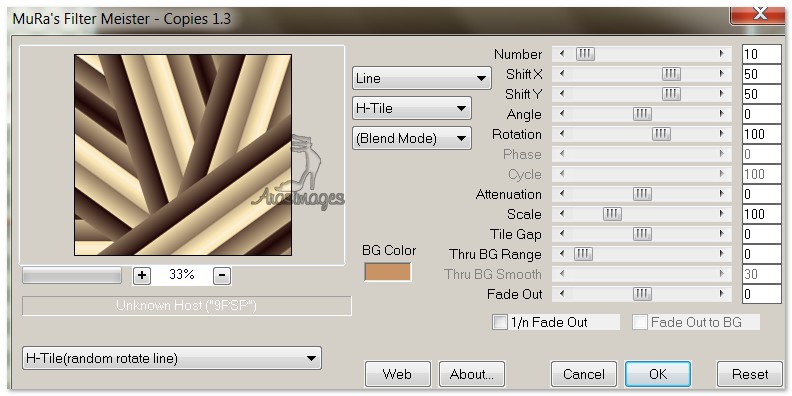
5. Effects/MuraMeister/Copies. Use settings as seen below, color #c89466.
6. Effects/AP 04/Blurs/Smears/Blur-Burnt. Use settins below.
7. From the Tool bar, choose your Preset Shapes/Leaf. Draw out a large leaf in the center of your image. (See my image for approximate size.) Convert to Raster Layer.

8. Click inside leaf with Magic Wand to activate it.
9. Open Grunge_Lines_Brushes_Part_1_by_DieheArt_12.png. Copy/Paste into Selection.
10. Selections/Select None.
11. Effects/3D Effects/Drop Shadow, Vertical -9, Horizontal 5, Opacity 50, Blur 15, color #000000.
12. Open FantasyLights-Dirt2-PS7-9.png. Copy/Paste as New Raster Layer.
13. Image/Resize/Resize by 50%, Resize all layers unchecked.
14. Move to bottom left corner.
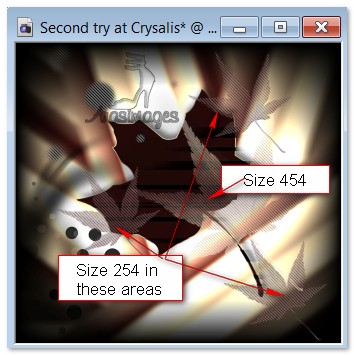
15. Layers/New Raster Layer.
16. From Tool bar, select the Paint Brush tool. Choose leaves_and_trees19 brush. Left click once with Size 454, change Brush Size to 254 and click on each side of dark leaf and in bottom corner.
17. Open FantasyLights-Dirt-PS7-5.png. Copy/Paste as New Layer.
18. Image/Resize/Resize by 42%, Resize all layers unchecked
19. Place dots toward upper left corner. Merge/Merge Down.
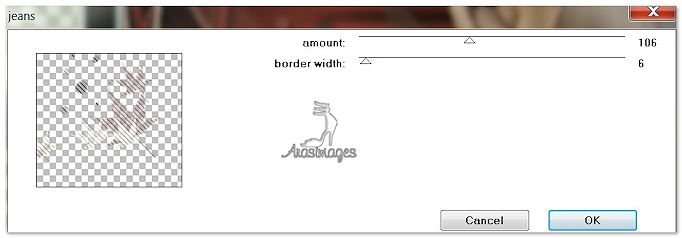
20. Effects/Penta/Jeans. Use settings below.
21. Open cl_ornament120109(6)*.png. Layers/Promote Background Layer.
22. Effects/Transparency/Eliminate White to make it have a transparent background.
23. Copy the ornament.png/Paste as New Layer. Move to left side of image to fit against left border.
24. Adjust/Hue and Saturation, Colorize. Hue set to 1, Saturation set to 141.
25. Open calguisladyautumne24910.pspimage. Copy/Paste as New Layer.
26. Image/ImageMirror. Move to right side of image.
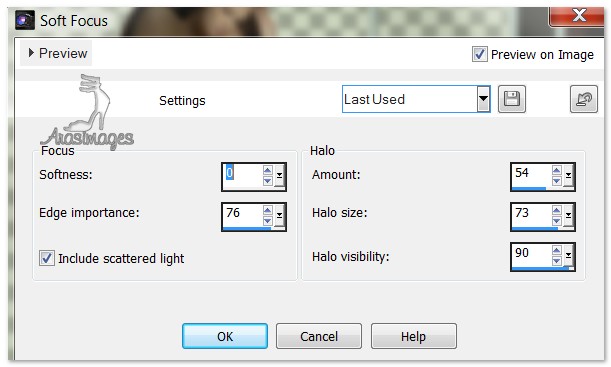
27. Adjust/Softness/Soft Focus. Use settings below.
28. Copy/Paste as New Layer the sleeping lady cocoon. Image/ImageMirror. Place directly over the first layer of the lady cocoon.
29. Image/Add Borders/Add 3px border, Symmetric checked, color #e1cc9d.
30. Effects/Edge Effects/Enhance.
31. Image/Add Borders/Add 50px border, Symmetric checked, color #260c0b.
32. Using Magic Wand, select the 50px border to activate it. Flood fill with Gradient.
33. Effects/Graphics Plus/Cross Shadow. Use settings below.

34. Selections/Select None.
35. Image/Add Borders/Add 20px border, Symmetric checked, color #260c0b.
36. Select with Magic Wand. (Selection will "bleed" into the 50px border...it is intended to in order to get the effect I want.) Effects/Edge Effects/Enhance More. Selections/Select None.
37. Image/Add Borders/Add 2px border, Symmetric checked, color #e1cc9d.
38. From Tool bar, select the Text tool. Choose Font Verticalization, Size 48, type "fall's", using Gradient.
39. Convert to Raster Layer.
40. Choose Font Verticalization, Size 200, Bold type, type the letter C. Change Size to 48 and type "hrysalis".

41. Convert to Raster Layer.
42. Move the text to the bottom right corner. Merge/Merge Down. Adjust/Sharpness/Sharpen.
43. Effects/3D Effects/Drop Shadow, Vertical -5, Horizontal 4, Opacity 80, Blur 2, color #000000.
44. Leave your name or watermark if you wish, Merge/Merge Visible and save as .jpg file in your working folder.
Thanks go to Evatexas and PamelaD who test my tutorials for me.
If you are going to use this tutorial for stationery, cards or place the tutorial/tag on another site, I would appreciate you contacting me for permission, giving Arasimages credit for the original tutorial and if possible, a link back to my site. Thank you.
Copyright © Arasimages All Rights Reserved