
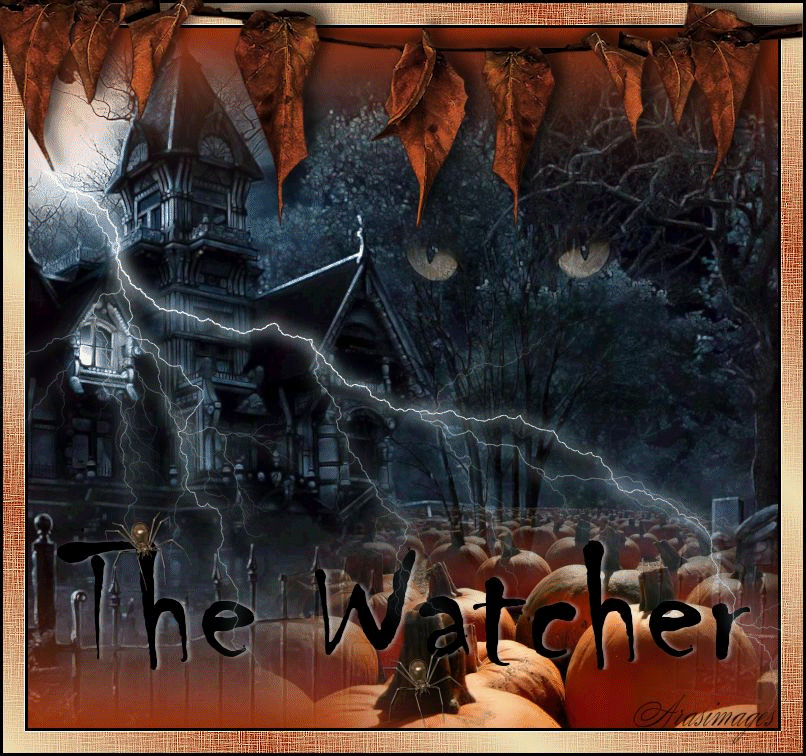
The Watcher
For Italian, Danish, French and German translation, click on the flags.


For this tutorial you will need the materials in the zip file below.

Unzip the materials into a working folder named The Watcher. Open the materials in PSP, copy and close originals. You will need Plugins FM Tile Tools and AlienSkin Xenofex II to do this tutorial. I have used PSPX4 to create this tutorial but you may use an earlier version. Place the Texture Corel 15-013 in your PSP/Textures folder if you do not have it as a default Texture. It is assumed you have a working knowledge of PSP. Remember to occasionally save your work for possible future changes.
Thanks go to MDZ to MarcioC; to Outlaw by Design to MTM (Bridget) and to Nikita for the lovely tubes used in this tutorial. Please visit the tubers links on my Links page.
Use the bookmark below to mark your place along the way.

1. In Materials Palette, set Foreground color to #eedfb2, Background color to #9d2e0b.
2. Set the Gradient to Style Rectangular, Angle 0, Repeats 0, Invert unchecked.
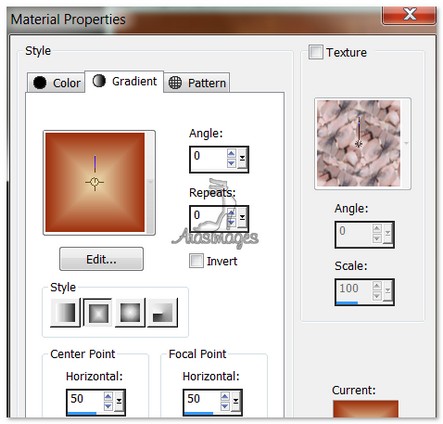
3. New/New Image 750px by 700px. Flood fill with Gradient.
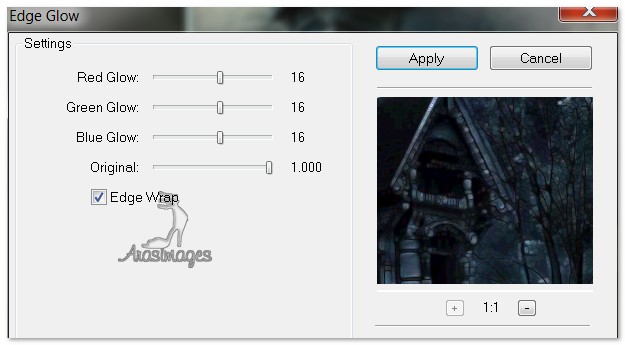
4. Open HAUNTED HOUSE MDZ MIST image. Copy/Paste as New Layer.
5. Effects/FM Tile Tools/Edge Glow. Use settings below.
6. Open 1220639742_divers.pspimage. Copy/Paste as New Layer.
7. Move the pumpkins to bottom right corner.
8. Open mc212.pspimage. Copy/Paste as New Layer.
9. Image/Resize/Resize by 75%/Resize all layers unchecked.
10. Move the cat to upper right corner. Using the Eraser tool set to settings below, erase around the eyes and nose of the cat showing in the trees; leave eyes intact.

11. Set the Opacity to 51.
12. In Materials Palette, set Background color to #000000.
13. From Tool bar, select the Text tool. (See settings below). Find Font Chiller and set to Size 180. Type "The Watcher".

14. Convert to Raster Layer. Move into position toward bottom of image over pumpkins.
15. Effects/3D Effects/Drop Shadow. Vertical 0, Horizontal 3, Opacity 50, Blur 5, color #e0dfea.
16. Open outlawbydesignft186.pspimage. Copy/Paste as New Layer.
17. Image/Resize/Resize by 15%/Resize all layers unchecked.
18. Effects/3D Effects/Drop Shadow. Vertical 1, Horizontal 1, Opacity 50, Blur 1, color #000000.
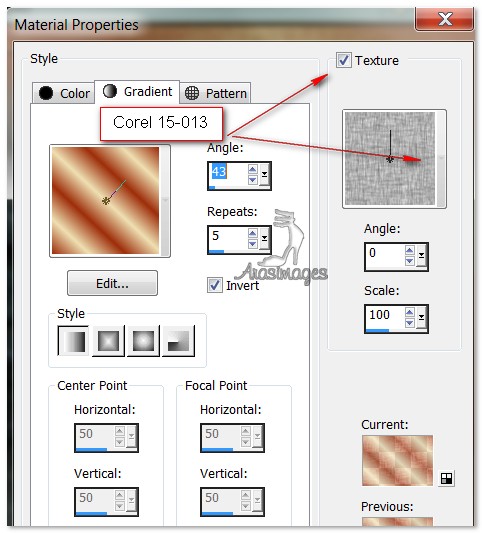
19. Duplicate Spider. Place one at the top of the letter "h" in "The" and the other on a pumpkin stem.
20. Image/Add Borders/add 3px border, color #000000, Symmetric checked.
21. Image/Add Borders/add 22px border, color #eedfb2, Symmetric checked.
22. Using Magic Wand, select the 22px border to activate it.
23. In Materials Palette, change Background color back to #9d2e0b.
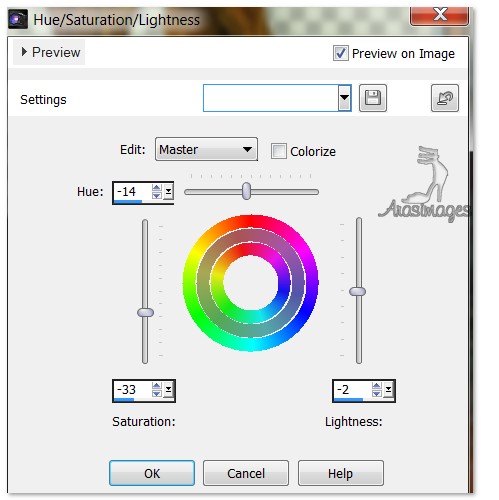
24. Change the Gradient to Linear, Angle 43, Repeats 5, Invert checked, Check Texture box and select the Texture Corel 15-013/CanvasCourse.
25. Layers/New Raster Layer. Flood fill the selected border with new Gradient/Texture.
26. Effects/Edge Effects/Enhance. Selections/Select None.
27. Image/Add Borders/add 3px border, color #000000, Symmetric checked.
28. Open mtm_bomen_7_brown_leaves_16_sept_2006.pspimage. Copy/Paste as New Layer.
29. Adjust/Hue and Saturation/Hue/Saturation/Lightness. Use settings as seen below.
30. Image/Resize/Resize by 75%/Resize all layers unchecked.
31. Image/Mirror. Move leaves into upper right corner.
32. Paste leaves again as a New Layer. Repeat Step 29 to recolor the leaves.
33. Image/Resize/Resize by 88%/Resize all layers unchecked.
34. Move the leaves into upper left corner, overlapping the other leaves. Using the Freehand Selections tool, draw around the overlapping leaves and stem on left image, press Delete key to remove them. Deselect.


35. Apply a Drop Shadow of Vertical -6, Horizontal 8, Opacity 50, Blur 15, color #000000 on each leaf layer. Repeat Drop Shadow on each layer.
36. Have top layer highlighted, sign your name or leave your watermark if you wish. Merge/Merge Visible. Save as .jpg file named The Watcher in your working folder.
ANIMATION: Open Animation Shop. Open PSP Animation Shop(*psp) The Watcher file of lightening. Open The Watcher .jpg file.
37. Duplicate The Watcher .jpg file until you have 7 frames in all. Highlight the first frame.
38. Now go to the animation file of lightening. Highlight the first frame and Copy. (Note the position of the lightening). Go to the first frame of the .jpg file, highlight and Right click to bring up menu/Paste into Selected Frame. Left click to set it in place.
39. Go back to the animation file of lightening. Highlight the 2nd frame of lightening. Copy.
40. Highlight the 4th frame of the .jpg file. Right click/Paste into Selected Frame. Left click to set it in place just as you did the first frame.
41. Go back to the animation file of lightening and highlight the last frame. Copy.
42. Now go to the 7th and last frame of the .jpg file. Highlight it and Right click/Paste into Selected Frame.
43. While on the .jpg frames, highlight the first frame. Edit/Select All.
44. In the Tool bar at the top, click Animation/Frame Properties. Change the number to 40. The higher the number, the slower the lightening will flash. You may set it to flash faster or slower.
45. Click on the Animation button at the top to the right in the tool bar to check your animated tag to see if it is as you wish. If so, now we will save our work.
46. File/SaveAs. When the box comes up, give your work a name and where you will save it, and Save as .gif file. In the next few boxes that come up, you will click Next, Next, Next and Finish.
You are now finished with your scary Halloween tag!
Thanks go to Evatexas and PamelaD who test my tutorials for me.
If you are going to use this tutorial for stationery, cards or place the tutorial/tag on another site, I would appreciate you contacting me for permission, giving Arasimages credit for the original tutorial and if possible, a link back to my site. Thank you.
Copyright © Arasimages All Rights Reserved