Nature's Bounty
For Italian, Danish, German and French translations, click on the flags.
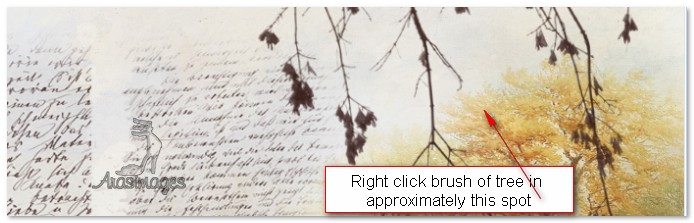
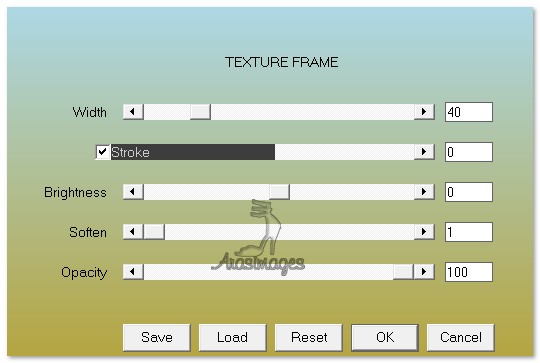
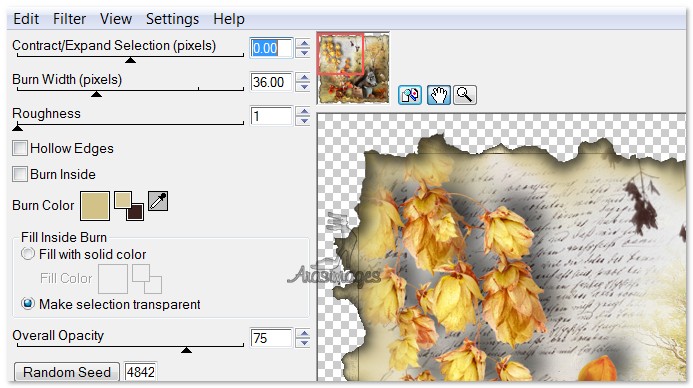
For this tutorial you will need the materials in the zip file below. Unzip the materials into a working folder named Nature's Bounty. Open the materials in PSP, copy and close originals. You will need AAA Frames and AlienSkin Xenofex II to do this tutorial. I have also used Animation Shop for the animated portion of the tutorial. You can find it on Waldgeist site for free. I have used PSPX4 to create this tutorial but you may use an earlier version. Export the Tree BordersIII 2 into your PSP Brushes folder and place the evebrush_man8.PSPBrush in your PSP Brushes folder. It is assumed you have a working knowledge of PSP. Remember to occasionally save your work for possible future changes. Thanks go to Misssilly; and to Marif Tubes and Misted; and to the creators/owners of the various fall scraps used in this tutorial. Please visit the tubers links on my Links page. Use the bookmark below to mark your place along the way. 1. In Materials Palette, set Foreground color to #dccb9a, Background color to #3a211e. 2. New/New Image 680px by 650px. Select All. 3. Open the Pastel_Fall_Background.pspimage. Copy/Paste into Selection. Selections/None. 4. Layers/New Raster Layer. 5. From Tool bar, select Paint Brush/evebrush_man_8.brush. Using the background color, right click in upper left corner near top of image. 6. Layers/New Raster Layer. 7. From tool bar, select Paint Brush/Tree Borders III_2.brush. Using the background color, right click in upper right corner in the trees as shown in example. 8. Open Marif_2006_novembre_misted_fleurs0119.pspimage. Copy/Paste as New Layer. 9. Image/Resize/Resize by 60%/Resize all layers unchecked. 10. Move the flower into the bottom right corner. 11. Effects/3D Effects/Drop Shadow. Vertical -15, Horizontal 14, Opacity 60, Blur 28, color #000000. 12. Open Misssilly-Flowers2-February2008.pspimage. Copy/Paste as New Layer. 13. Effects/3D Effects/Drop Shadow. Vertical-15, Horizontal 14, Opacity 60, Blur 28, color #000000. 14. Move toward lower left side, resting at bottom border, pulling low enough to hide lower half of the vase. 15. Open Sticks_In_Square.pspimage. Copy/Paste as New Layer. 16. Move to right bottom corner over flower. 17. Effects/Drop Shadow as in Step #11. 18. Open Squirrel.pspimage. Copy/Paste as New Layer. 19. Image/Resize/Resize by 80%/Resize all layers unchecked. 20. Effects/Drop Shadow as in Step #11. 21. Move Squirrel over left part of Sticks_In_Square. 22. Open Brown_Bag.pspimage. Copy/Paste as New Layer. 23. Resize/Resize by 70%/Resize all layers unchecked. 24. Effects/Drop Shadow as in Step #11. 25. Move bag to sit in front of left side of Squirrel. 26. From Tool bar, select the Text tool. Find Font Bradley Hand ITC, set to Size 22, Bold and type "Nuts and Seeds". Convert to Raster Layer. Use turn tool to slant the text on the bag. 27. Duplicate. Merge/Merge Down. 28. Open Leaves_Acorns.pspimage. Copy/Paste as New Layer. 29. Effects/Drop Shadow as in Step #11. 30. Move to bottom center of image. 31. Open Small_Acorns.pspimage. Copy/Paste as New Layer. 32. Effects/Drop Shadow as in Step #11. 33. Place in bottom right corner of image. 34. Open Orange_Paper_Flowers.pspimage. Copy/Paste as New Layer. 35. Effects/Drop Shadow as in Step #11. 36. Place to the right of the flowers and vase. The top of flowers will overlap some of the stamped text. 37. Open Dried_Weeds.pspimage. Copy/Paste as New Layer. 38. Repeat Drop Shadow as in Step #11. 39. Move the weeds to bottom right corner over the Square Sticks. 40. Open Yellow_Droops.pspimage. Copy/Paste as New Layer. 41. Place in upper left corner. 42. Repeat Drop Shadow as in Step #11. 43. Image/Add Borders. Add border 3px, color #3a211e, Symmetric checked. 44. Effects/AAA Frames/Texture Frame. Apply as in settings below. 45. Open Yellow_Droops.pspimage. Copy/Paste as New Layer. 46. Place in upper left corner, a bit to the right of first flowers so they overlap. 47. Repeat Drop Shadow as in Step #11. 48. Using Eraser tool, erase excess stem of flower that is on top of first flowers. 49. Merge/Merge Visible. 50. Effects/Alien Skin Xenofex 2/Burnt Edges. Use default settings with Transparent ticked. 51. Effects/3D Effects/Drop Shadow. Vertical -7, Horizontal -7, Opacity 50, Blur 12, color #565038. 52. Effects/3D Effects/Drop Shadow. Vertical 7, Horizontal 7, Opacity 50, Blur 12, color #565038. 53. Layers/New Raster Layer. Flood fill with Foreground color #dccb9a. 54. Pull New Raster Layer below image layer. Merge/Merge Visible. 55. Effects/AAA Frames/Texture Frame. Apply as in Step #44. 56. Image/Add Borders/Add 3px border, Symmetric checked, color #3a211e. 57. Open Banner.pspimage. Copy/Paste as New Layer. 58. Image/Resize/Resize by 60%/Resize all layers unchecked. 59. Place Banner across image near the top. 60. Effects/3D Effects/Drop Shadow, Vertical -7, Horizontal -7 , Opacity 50, Blur 12 , color #565038. Repeat with V at 7, H at 7. 61. From Tool bar, select Text tool. Choose font Aurora Script, Size 48, Vector, color #3a211e and type out "Nature's Bounty". Convert to Raster Layer. 62. Move into center of the banner. 63. Duplicate. Merge/Merge Down. 64. Open Orange Ribbon.pspimage. Copy/Paste as New Layer. 65. Move into upper left corner to the inner line. 66. Paste as New Layer again. Image/Mirror. 67. Pull beneath the Banner layer so it looks like a streamer is coming down from right side of bow. Highlight top layer to continue. 68. Open Dried_Leaf.pspimage. Copy/Paste as New Layer. 69. Move down into bottom left corner. 70. Effects/3D Effects/Drop Shadow. Vertical -14, Horizontal 14, Opacity 50, Blur 28, color #000000. 71. Sign your name or leave a watermark if you wish. Save as a .jpg file in your working file with the name Nature's Bounty. 72. OPTIONAL ANIMATION: Open Animation Shop. File/Open Nature's Bounty .jpg which you have saved in your working folder. Duplicate it until you have 41 frames. 73. File/Open ArasimagesFallingLeaf.gif file with 41 frames. Highlight the first frame. Edit/Select All. COPY by right clicking on top bar/Copy. 74. Go to your Nature's Bounty.jpg file of 41 frames and highlight the first frame. Edit/Select All. 75. Inside the first frame, right click then left click Paste/Paste into Selected Frame. Using your mouse to move the leaf, place the large leaf of the animation over the large leaf in the .jpg image trying to get it to match edges. Left click mouse to set it in place. 76. Click Animation in the top tool bar, click on Reverse Animation. This should now create a leaf that goes from top to bottom. 77. Click on the Animation button at the top to the right in the tool bar to check your animated tag to see if it is as you wish. If so, now we will save our work. 78. File/SaveAs. When the box comes up, give your work a name and where you will save it, and Save as .gif file. In the next few boxes that come up, you will click Next, Next, Next and Finish. You are now finished with a long and I hope fun animated tutorial. Big hugs go to Evatexas and PamelaD who test my tutorials for me and are my valued advisors. If you are going to use this tutorial for stationery, cards or place the tutorial/tag on another site, I would appreciate you contacting me for permission, giving Arasimages credit for the original tutorial and if possible, a link back to my site. Thank you. Copyright © Arasimages All Rights Reserved