
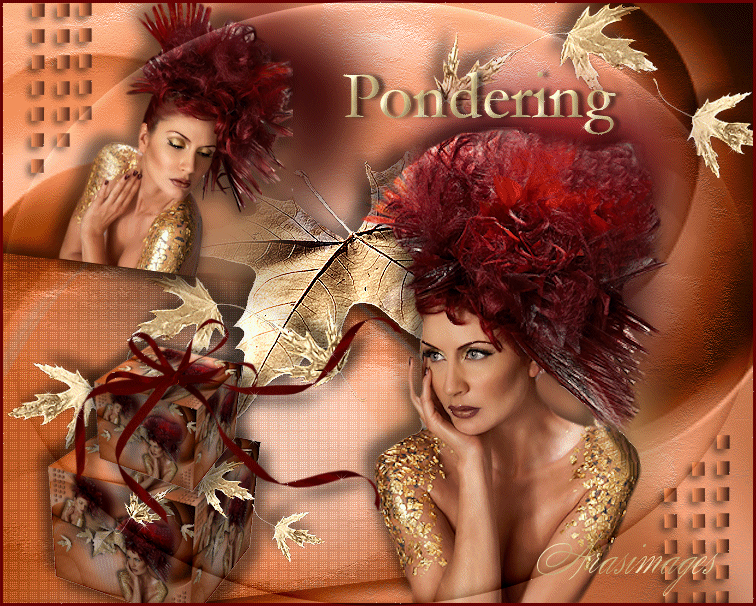
Pondering
For Italian and Danish translation, click on the flags.


For this tutorial you will need the materials in the zip file below.

Unzip the materials into a working folder named Pondering. Open the materials in PSP, copy and close originals. You will need Penta, ColorEfexPro 3.0, Bordermania, AlienSkin Xenofex2 and Vizros to do this tutorial. You will also be using Animation Shop. May I suggest you look for plugins on Waldgeist site listed on my Links page if you need them. I have used PSPX4 to create this tutorial but you may use an earlier version. It is assumed you have a working knowledge of PSP. Remember to occasionally save your work for possible future changes.
Thanks go to Silvie for the ladies tube, to Evatexas of Arasimages for the leaf and to the creators/owners of the scraps used in this tutorial. Please visit the tubers links on my Links page.
Use the bookmark below to mark your place along the way.

1. In Materials Palette, set Foreground color to #fd975f, Background color to #a5522a.
2. Create a Gradient using Linear, Angle 90, Repeats 0 and Invert null.

3. New/New Image 760px by 600px. Flood fill with Gradient.
4. Layer/New Raster Layer. Select All.
5. Open the Circles.pspimage. Copy/Paste into Selection. Selections/Select None.
6. Lower Opacity to 66. Luminance (L).
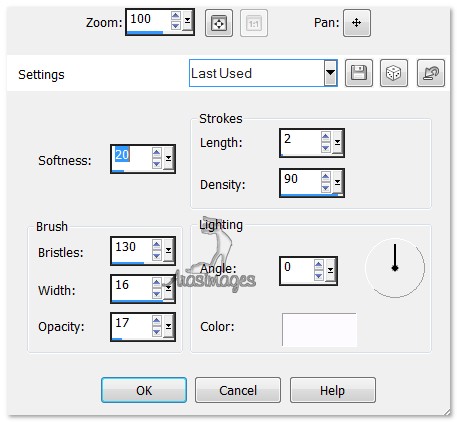
7. Effects/Art Media Effects/Brush Strokes. Use settings below.
8. Layers/New Raster Layer. Selections/Select All.
9. Open yandex.jpg. Copy/Paste into Selection. Selections/Select None.
10. Lower Opacity to 64. Luminance (L).
11. Highlight Raster 2. Copy. Highlight Raster 3. Paste as New Layer.
12. Image/Resize/Resize by 70%/Resize all layers unchecked.
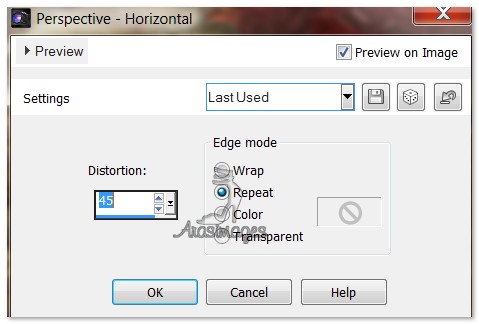
13. Effects/Geometric Effects/Perspective Horizontal. Use settings below.
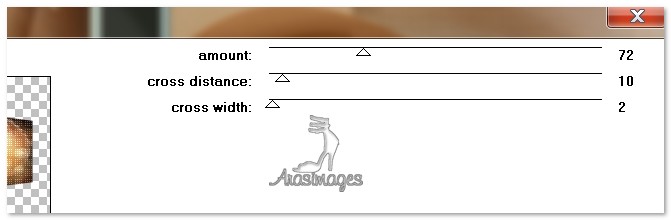
14. Effects/Penta/Dot and Cross. Use settings below.
15. Effects/3D Effects/Drop Shadow. Vertical 10, Horizontal 10, Opacity 100, Blur 20, color #000000.
16. Effects/3D Effects/Drop Shadow. Vertical -10, Horizontal -10, Opacity 100, Blur 20, color #000000.
17. Pull geometric image to meet left edge/bottom corner.
18. Open autumnleafE.pspimage. Copy/Paste as New Layer.
19. Image/Resize/Resize by 70%/Resize all layers unchecked.
20. Effects/Nik Software/Color Efects Pro 3.0 Complete. Use the settings as seen below.

21. Effects/3D Effects/Drop Shadow. Vertical -10, Horizontal -10, Opacity 50, Blur 17, color #000000. Repeat with V 10, H 10, all the rest the same.
22. Effects/Edge Effects/Enhance. Move leaf a little upward.
23. Open LeavesThree.PNG. Copy/Paste as New Layer.
24. Image/Mirror. Image/Resize/Resize by 120%/Resize all layers unchecked.
25. Move to upper right corner.
26. Effects/Edge Effects/Enhance.
27. Effects/3D Effects/Drop Shadow. Vertical -10, Horizontal -10, Opacity 50, Blur 17, color #000000.
28. Paste again the LeavesThree.PNG. Move leaves to the left overlapping the large leaf. See my image for placement.
29. Image/Resize/Resize by 120%/Resize all layers unchecked. Effects/Edge Effects/Enhance.
30. Effects/3D Effects/Drop Shadow. Vertical -10, Horizontal -10, Opacity 50, Blur 17, color #000000.
31. Change Background color to #462016. Close off Background color in Materials Palette. Using Pen tool set to the below settings/Line Style/Dot, draw out 7 squares starting in upper left corner pulling downward. Apply. Convert to Raster Layer.


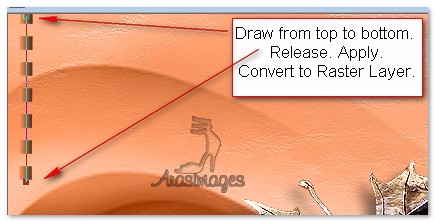
32. Repeat drawing 6 squares, Apply. Convert to Raster Layer. Repeat with 5 squares as you did with 6. Note: Make sure your lines are straight up and down when drawing them. See my tag as example.
33. Use Move Tool to move lines of squares if needed so they are evenly distributed. Then Merge/Merge Down all lined square together.
34. Effects/3D Effects/Drop Shadow. Vertical 4, Horizontal -4, Opacity 50, Blur 10, color #000000.
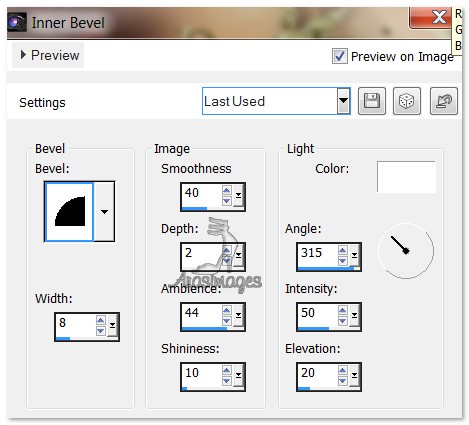
35. Effects/Inner Bevel. Use settings below.
36. Repeat the same drawing of squares on the bottom right corner as you did on the upper left corner. Draw from bottom upward. Apply. Drop Shadow when finished merging.
37. Apply Inner Bevel as you did in Step #35.
38. Open Ladys_09.03.2012.pspimage. Using Selection Tool, select around the bottom lady. Have Tube layer highlighted. Copy.
39. Paste as New Layer on your working image. Image/Resize/Resize by 80%/Resize all layers unchecked.
40. Move lady into upper left corner between leaf and squares.
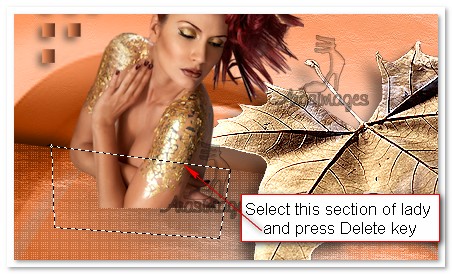
41. Using Freehand Selection tool, select the portion of lady that overlaps the horizontal perspective layer. Press Delete key, then Selections/Select None.
42. Duplicate Lady. Highlight the original lady layer. Adjust/Blur/Gaussian blur, Radius set to 25.
43. Pull blurred lady to the right. Highlight top layer of Lady.
44. Effects/3D Effects/Drop Shadow. Vertical -10, Horizontal -10, Opacity 50, Blur 17, color #000000.
45. With Ladys_09_03.2012 open, using Selection Tool, select around the top lady. Have Tube layer highlighted. Copy.
46. Paste as New Layer. Image/Resize/Resize by 120%/Resize all layers unchecked.
47. Move lady toward bottom right corner. Duplicate.
48. Highlight the first lady you pasted on. Adjust/Blur/Gaussian blur/Radius set to 25.
49. Pull blurred lady to right and up a bit.
50. Highlight the top layer. Apply a Drop Shadow like you did in Step #44.
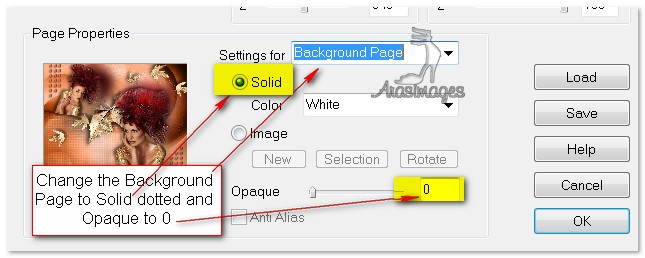
51. Adjust/Sharpness/Sharpen. Place lady at bottom border.
52. Pull the bottom right squares layer to the top in Layers Palette.
53. Merge/Merge Visible. Copy/Paste as New Image! You will use this pasted image to make your box.
54. UNDO MERGED ORIGINAL. Minimize the original image you have been working on so you will not get mixed up and we will use it later.
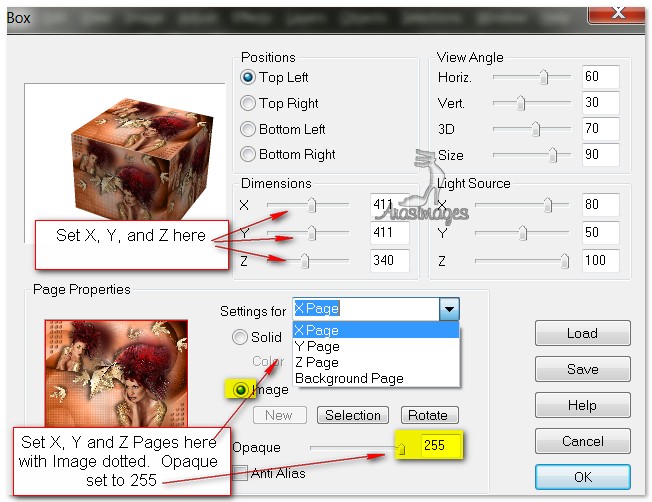
55. Using the Copied/Pasted image: Effects/Vizros 4/Box.
56. To use Vizros, change the Settings as follows; please study the examples if you have never used Vizros: Dimensions X/411, Y/411, Z/340, Image dotted and Opaque at 255. Simply click on the Settings dropdown and you will see XPage, YPage and ZPage. Click each one at a time and make sure the settings are right. Then click on the Background Page so Solid is dotted and Opaque at 0. Then click OK. Your box is made!
57. Image/Resize/Resize by 40%/Resize all layers CHECKED.
58. Maximize your original working image. Using the newly made box, Copy/Paste as New Layer on the working image.
59. Effects/3D Effects/Drop Shadow. Vertical -10, Horizontal -10, Opacity 50, Blur 17, color #000000. Repeat with V.10 and H.10, all other settings the same.
60. Place the box near the bottom left corner.
61. Duplicate. Image/Resize/Resize by 70%/Resize all layers unchecked.
62. Place the smaller box on top of the larger box. Apply a Drop Shadow on it as in Step #59.
63. Open LeavesThree.pspimage. Copy/Paste as New Layer. Image/Resize by 70%, all layers not checked.
64. Image/Mirror. Effects/Edge Effects/Enhance. Apply the Drop Shadow as in Step #59, omitting the V 10 and H 10.
65. Pull the small leaves between the box layers. Highlight the top layer to continue.
66. Open RedBow.pspimage. Copy/Paste as New Layer.
67. Place bow on top of small box. Apply Drop Shadow V 10, H 10, O 50, B 17, color #000000.
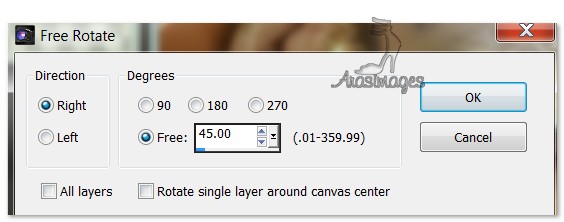
68. Image/Free Rotate as in example below.
69. Paste RedBow again, apply the drop shadow and place on top of first bow.
70. Image/Add Borders/Add 3px border in color #670304.
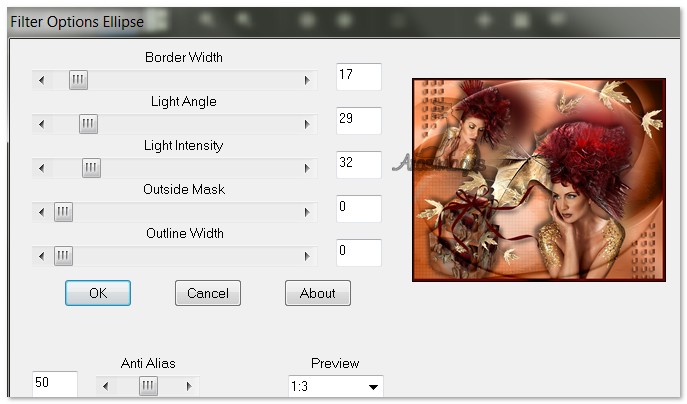
71. Effects/Bordermania/Ellipse. Use settings seen below.
72. In Materials Palette, set the Background to Pattern cmv-gold.bmp. Angle 0, Scale 75.
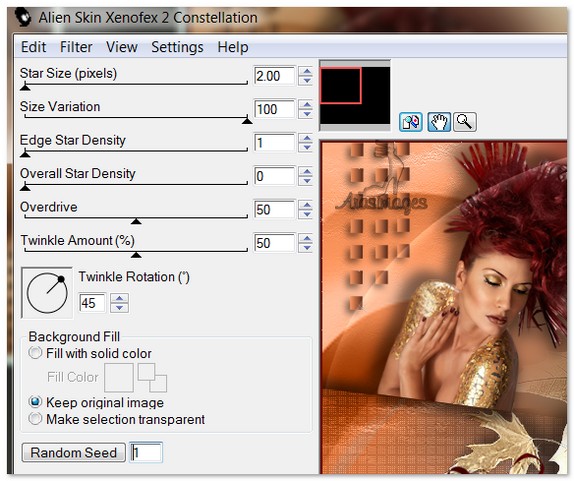
73. From tool bar, select font (Gara_TTF) Garamond, Size 68, color Pattern cmv-gold.bmp. Type out "Pondering". Convert to Raster Layer.
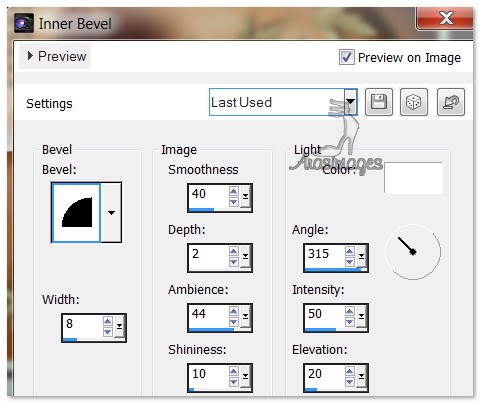
74. Selections/Select All. Float/Defloat. Effects/Inner Bevel as shown below. Selections/Select None.
75. Effects/3D Effects/Drop Shadow. Vertical 0, Horizontal 6, Opacity 60, Blur 6, color #000000.
76. Sign your name or leave your watermark if you wish. Merge/Merge Visible.
77. Duplicate twice having 3 layers in all. Close off the middle and bottom layer, having the top layer activated.
78. Effects/Alien Skin Xenofex2Ali/Constellation. Use settings below for the top layer. Close off first layer, move to middle layer and highlight it.
79. In Constellation, press Random Seed once. Apply. Close off middle layer and move to bottom layer, highlighting it.
80. In Constellation, press Random Seed once more. Apply. Open all layers and SaveAs/PSP Animation Shop (*psp) file.
81. Open the saved file in Animation Shop. Click on Animation button in tool bar to check your animation. If it is sparkling as you wish, then we will now save it.
82. File/Save As. When the Save As box appears, Type in your file name and where to save in as a .gif file. Click Save.
83. Next you will click Next three times as the boxes change and finally Finish. Your file is now saved as an animation.
My love is extended to Evatexas and PamelaD who test my tutorials for me and are my valued advisors.
If you are going to use this tutorial for stationery, cards or place the tutorial/tag on another site, I would appreciate you contacting me for permission, giving Arasimages credit for the original tutorial and if possible, a link back to my site. Thank you.
Copyright © Arasimages All Rights Reserved