
Sister Dancers
For Italian and Danish translation, click on the flags.


For this tutorial you will need the materials in the zip file below.

Unzip the materials into a working folder named Sister Dancers. Open the materials in PSP, copy and close originals. You will need Gregs Factory Output II/Cross Shadow to do this tutorial. I have used PSPX4 to create this tutorial but you may use an earlier version. It is assumed you have a working knowledge of PSP. Remember to occasionally save your work for possible future changes.
Use the bookmark below to mark your place along the way.

1. In Materials Palette, set Foreground color to #bdeaf2, Background color to #27455d.
2. In Materials Palette, create a Gradient by setting the Style to Radial, Angle to 45, Repeats to 5, Invert checked.

3. New/New Image 790px by 500px.
4. Select All.
5. Open HeavenlyStairway.pspimage. Copy/Paste into Selection. Selections/Select None.
6. Drop the Opacity of theHeavenlyStairway image to 85.
7. Effects/Edge Effects/Enhance.
8. Open LargeVineFlower.pspimage. Copy/Paste as New layer.
9. Set Blend Mode to Luminance (L), pull to bottom.
10. Effects/3D Effects/Drop Shadow. Vertical 5, Horizontal 6, Opacity 60, Blur 15, color #000000. (Most of the drop shadows will be this same setting)
11. Open Curtain. Copy/Paste as New Layer.
12. Image/Resize/Resize by 40%/Resize all layers unchecked.
13. Adjust/Hue & Saturation/Colorize. Use settings below.
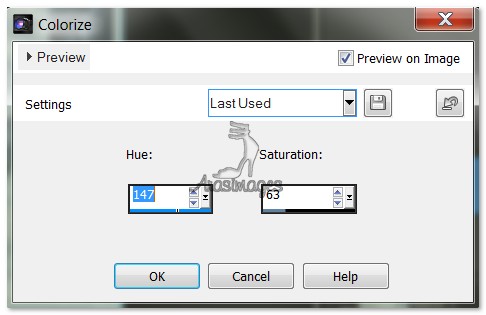
14. Move Curtain into upper right corner. Drop Opacity to 90.
15. Effects/3D Effects/Drop Shadow. Vertical 5, Horizontal -6, Opacity 60, Blur 15, color #000000.
16. Duplicate. Image/Mirror.
17. Open BlueButterflies.pspimage. Copy/Paste as New Layer.
18. Image/Resize/Resize by 60%/Resize all layers unchecked.
19. Move to left side of image.
20. Effects/3D Effects/Drop Shadow. Vertical 5, Horizontal 6, Opacity 60, Blur 15, color #000000.
21. Open BlueDancer.pspimage. Copy/Paste as New Layer.
22. Image/Resize/Resize by 80%/Resize all layers unchecked.
23. Lower Opacity to 34. Move BlueDancer to top center of image.
24. Paste the Blue Dancer again as New Layer.
25. Move her down and to the left a little.
26. Adjust/Sharpness/Sharpen.
27. Apply Drop Shadow as before.
28. Open SisterDancers.pspimage. Copy/Paste as New Layer.
29. Move dancers to right side of image.
30. Apply Drop Shadow as before.
31. Drop Opacity to 90.
32. Using Eraser tool, having Raster 2 vine layer highlighted, erase the Vine from the bottom ballerina.
33. Highlight top layer to continue.
34. Open SingleBlue.pspimage. Copy/Paste as New Layer.
35. Image/Resize/Resize by 20%/Resize all layers unchecked.
36. Image/Free Rotate/Rotate Left by 25.
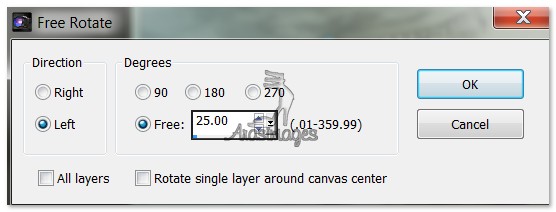
37. Move to center bottom of image. Apply Drop Shadow as before.
38. Image/Add Borders/Add 3px border, Symmetric checked, color #27455d.
39. Image/Add Borders/Add 3px border, Symmetric checked, color #cebbb8.
40. Image/Add Borders/Add 3px border on sides and top, 60px border at bottom, Symmetric unchecked, color #27455d.
41. Select border with Magic Wand to activate it. Add New Raster Layer. Flood fill with Gradient.
42. Effects/Greg's Factory Output II/Pool Shadow. All settings at 50 except the last one, set to 128.
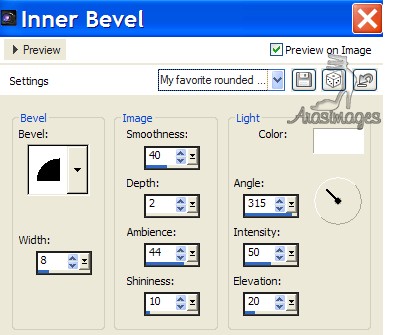
43. Effects/Inner Bevel. Use settings as shown below. Selections/Select None.
44. Image/Add Borders/Add 3px border, Symmetric checked, color #27455d. (Add your watermark here if you wish). Merge/Merge Visible if you stamp it on a separate layer.
45. From Tool bar, select Font English 111 Presto BT,(TT0595M) Size 60, Anti-alias Sharp, Stroke width 0, color #f1f2f4.

46. Type out the words "Sister Dancers". Convert to Raster Layer.
47. Place in center of large bottom border. Objects/Align/Horizontal Center.
48. Effects/3D Effects/Drop Shadow. Vertical 1, Horizontal 1, Opacity 100, Blur 1, color #000000.
49. Effects/3D Effects/Drop Shadow. Vertical 5, Horizontal 6, Opacity 60, Blue 15, color #000000.
50. Open SideFlower.pspimage. Copy/Paste as New Layer.
51. Effects/3D Effects/Drop Shadow. Vertical 5, Horizontal 6, Opacity 60, Blue 15, color #000000.
52. Place SideFlower in the top left corner as I have mine positioned.
53. Duplicate. Image/Resize/Resize by 65%/Resize all layers unchecked.
54. Place the smaller stem of flowers under the larger stem of flowers at the upper left corner as I have mine.
55. Paste SideFlower once again. Image/Mirror. Pull to lower right corner as I have mine.
56. Effects/3D Effects/Drop Shadow. Vertical 5, Horizontal 6, Opacity 60, Blue 15, color #000000.
57. Duplicate. Image/Resize/Resize by 65%/Resize all layers unchecked.
58. Place the smaller stem of flowers under the larger stem of flowers at the bottom right corner.
59. Duplicate. Image/Mirror. Image/Flip. Move flower to bottom left corner as I have done so it lays over the large border at bottom.
60. Close off the Background (bottom) image. Merge/Merge Visible all of the flower layers and font layer.
61. Duplicate the Background layer twice. Duplicate the Merged layer twice.
62. Close all layers except the top Merged layer.
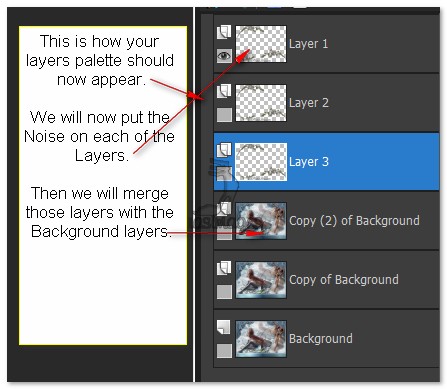
63. Rename the top Merged layer, Layer 1. Rename the middle Merged layer, Layer 2. Rename the bottom Merged layer, Layer 3.
64. Highlight Layer 1 and make sure it is open.
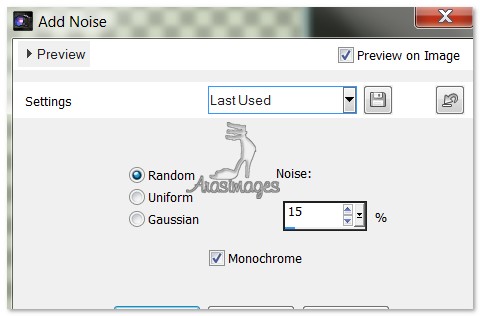
65. Adjust/Add/Remove Noise/Add Noise. Start with Random/Monochrome/15.
66. Close off Layer 1. Move to Layer 2, highlight it and repeat the Noise with 25, other settings remain the same.
67. Close off Layer 2. Move to Layer 3, highlight it and repeat the Noise with 35, other settings remain the same.
68. Having Layer 3 open, open bottom Background layer. Merge/Merge Visible. Close off.
69. Having Layer 2 open, open middle layer of Background. Merge/Merge Visible. Close off.
70. Having Layer 1 open, open top layer of Background. Merge/Merge Visible.
71. You now have three Merged layers. Having all Merged layers open, Save As/PSP Animation Shop (*psp) file named Sister Dancers.
72. In Animation Shop, open the Sister Dancers file.
73. Check your work by clicking on the Animation button at the top of the tool bar.
74. When you are ready to save your work, go to File/Save As. When the box opens, name where you are to save your work (working folder of Sister Dancers), give it a name and Save. As the boxes continue to change, keep clicking on Next, Next, Next then Finish. Your work is now saved as a .gif file.
75. I hope you enjoyed working this tutorial. If you wish to leave a comment about this tutorial or any others I've done, please feel free to use the Contact button on my tutorial page. Thank you!
Big hugs go to Evatexas and PamelaD who test my tutorials for me and are my valued advisors.
If you are going to use this tutorial for stationery, cards or place the tutorial/tag on another site, I would appreciate you contacting me for permission, giving Arasimages credit for the original tutorial and if possible, a link back to my site. Thank you.
Copyright © Arasimages All Rights Reserved