
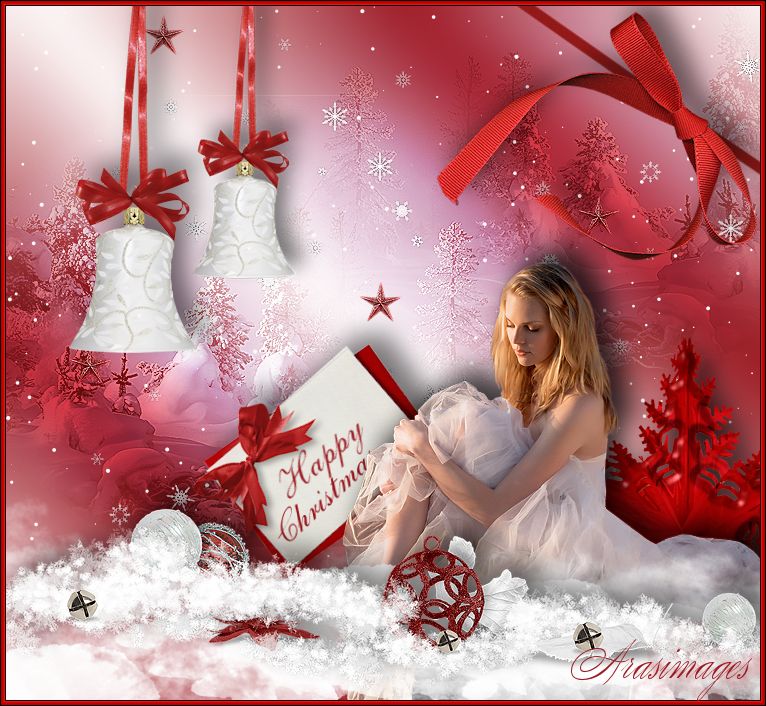
Happy Christmas
For Italian, Russian and Danish translation, click on the flags.


For this tutorial you will need the materials in the zip file below.

Unzip the materials into a working folder named Happy Christmas. Open the materials in PSP, copy and close originals. Export brushes into your PSP Brushes folder. You will need Plugins VanDerLee, AAA Frames and Eye Candy 3.1 to do this tutorial. I have used PSPX4 to create this tutorial but you may use an earlier version. It is assumed you have a working knowledge of PSP.
Thanks go to Guismo and to the unknown creators/owners of the various images used in this tutorial. Please visit tubers links on my Links page.
Use the bookmark below to mark your place along the way.

1. In Materials Palette, set Foreground color to #ffffff, Background color to #98141d.
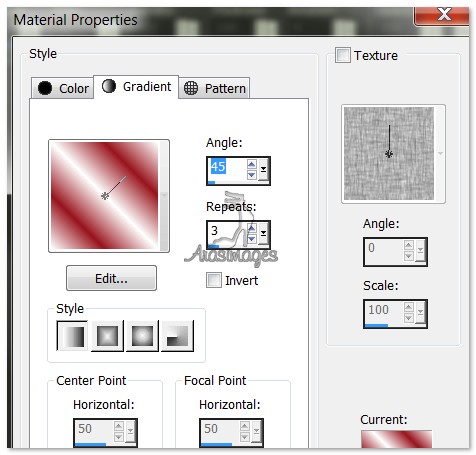
2. In Materials Palette, create a Gradient by setting the Style to Linear, Angle to 45, Repeats to 3, Invert unchecked.
3. New/New Image 760px by 700px. Flood fill with Gradient.
4. Adjust/Blur/Gaussian Blur/Radius 25.
5. Open Mysticwinter.pspimage. Copy Group Layer/Paste as New Layer.
6. Set Blend Mode to Overlay, Opacity to 95. Move to left side of image.
7. Effects/Edge Effects/Enhance.
8. Duplicate. Image/Mirror. Pull to right side and upward. Drop Opacity to 60.
9. Layers/New Raster Layer.
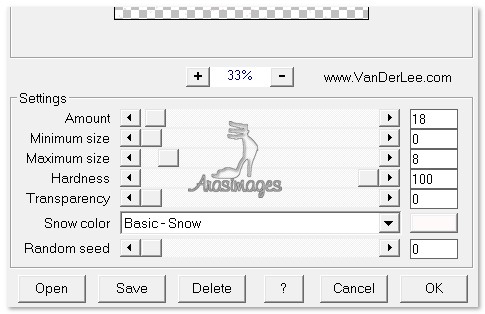
10. Effects/VanDerLee/Snowflakes. Use settings below.
11. Open Stars.pspimage. Copy/Paste as New layer.
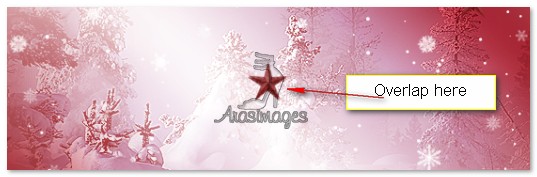
12. Duplicate. Move the first layer to the right. Move the duplicated layer to the left and up overlapping the second layer on center star. Erase the second center star overlap so it isn't too thick. Note: Only erase the center large star. See example for where to overlap.
13. Merge/Merge Down. Effects/Edge Effects/Enhance.
14. Open RedSnowflake.pspimage. Copy/Paste as New Raster Layer.
15. Move into bottom right corner.
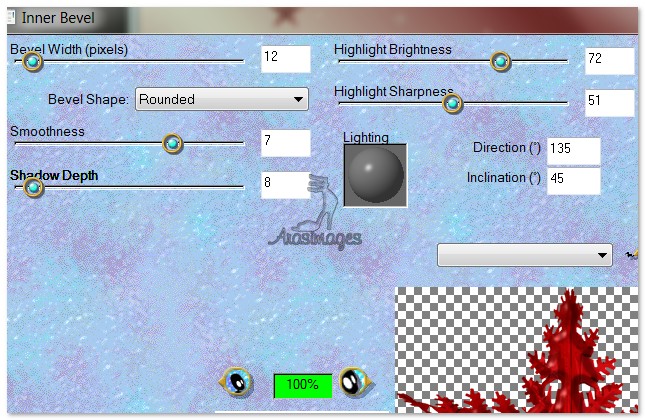
16. Effects/EyeCandy 3.1/Inner Bevel. Use settings below.
17. Effects/3D Effects/Drop Shadow/Vertical -15, Horizontal 15, Opacity 75, Blur 36, color #000000.
18. Open ChristmasNote.pspimage. Copy/Paste as New Layer.
19. Image/Free Rotate. Rotate Left by 35 degrees, all layers unchecked.
20. Image/Resize/Resize by 62%/Resize all layers unchecked.
21. Move downward a little. See my image for placement.
22. Effects/3D Effects/Drop Shadow/Vertical -15, Horizontal 15, Opacity 50, Blur 36, color #000000.
23. Using the Text tool, color #98141d, Saffron, Size 40, type the word "Happy". Convert to Raster Layer.

24. Image/Free Rotate. Rotate Left by 35 degrees, all layers unchecked. (Or use Pick tool to turn). Place under bow in Note.
25. Type the word "Christmas", Convert to Raster Layer. Repeat Image/Free Rotate. (Or use Pick tool to turn). Place the word below Happy on the Note.
26. Open calguismelacolie28112011.pspimage. Copy/Paste as New Layer.
27. Move lady toward bottom right corner so the stones are only partially showing at the bottom.
28. Adjust/Sharpness/Sharpen.
29. Effects/3D Effects/Drop Shadow/Vertical -15, Horizontal -15, Opacity 75, Blur 36, color #000000.
30. Layers/New Raster Layer.
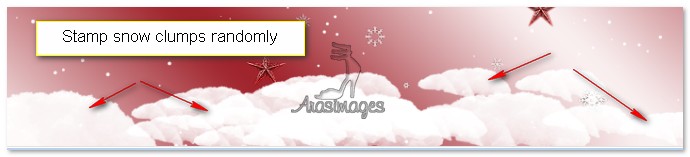
31. From Tool bar, choose Paint Brushes, find the Snow brush. Set to Size 220, Foreground color #ffffff and stamp a few times along bottom of image, then change Size to 150 and stamp a few more. See my example.

32. From Tool bar, choose Paint Brushes, select Fog 131, color #ffffff, Size 220 and stamp over the snow at the top to soften the edge. See settings below.

33. Open OrnamentsInSnow.pspimage. Copy/Paste as New Layer.
34. Adjust/Sharpness/Sharpen. Pull down over the top of stamped snow below lady and Note.
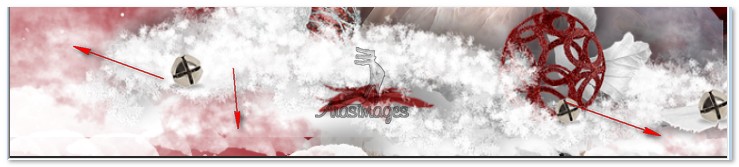
35. Using color #98141d with settings as in Step #32, stamp on snow about 3 times to blend. See example.
36. Effects/3D Effects/Drop Shadow, Vertical -15, Horizontal 15, Opacity 50, Blur 36, color #000000.
37. Open ChristmasBell.pspimage. Copy/Paste as New Layer.
38. Image/Resize/Resize by 55%/Resize all layers unchecked.
39. Move ChristmasBell to upper left side of image.
40. Effects/3D Effects/Drop Shadow, Vertical -15, Horizontal 15, Opacity 50, Blur 36, color #000000.
41. Duplicate. Image/Resize/Resize by 80%/Resize all layers unchecked.
42. Move to the right and up from first ChristmasBell.
43. Open StraightRibbon.pspimage. Copy/Paste as New Layer.
44. Image/Free Rotate. Rotate 35 degrees Right. Place in upper right corner.
45. Open RedRibbon.pspimage. Copy/Paste as New Layer.
46. Image/Resize/Resize by 80%/Resize all layers unchecked.
47. Move RedRibbon over top of the StraightRibbon, covering buckle of straight ribbon. Merge/Merge Down.
48. Effects/3D Effects/Drop Shadow, Vertical -15, Horizontal 15, Opacity 50, Blur 36, color #000000.
49. Adjust/Sharpness/Sharpen.
50. Image/Add Borders/Add 3px border, Symmetric checked, color #98141d.
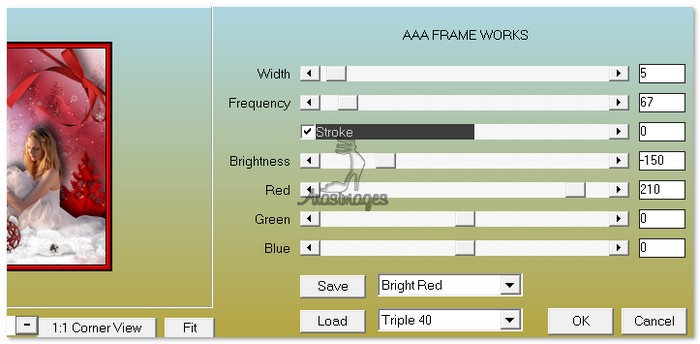
51. Effects/AAA Frames/Frame Works. Use settings below.
52. Sign your name or leave your watermark if you wish. Merge/Merge Visible if needed. Happy Christmas to you!
Big hugs go to Evatexas and PamelaD who test my tutorials for me and are my valued advisors.
If you are going to use this tutorial for stationery, cards or place the tutorial/tag on another site, I would appreciate you contacting me for permission, giving Arasimages credit for the original tutorial and if possible, a link back to my site. Thank you.
Copyright © Arasimages All Rights Reserved