
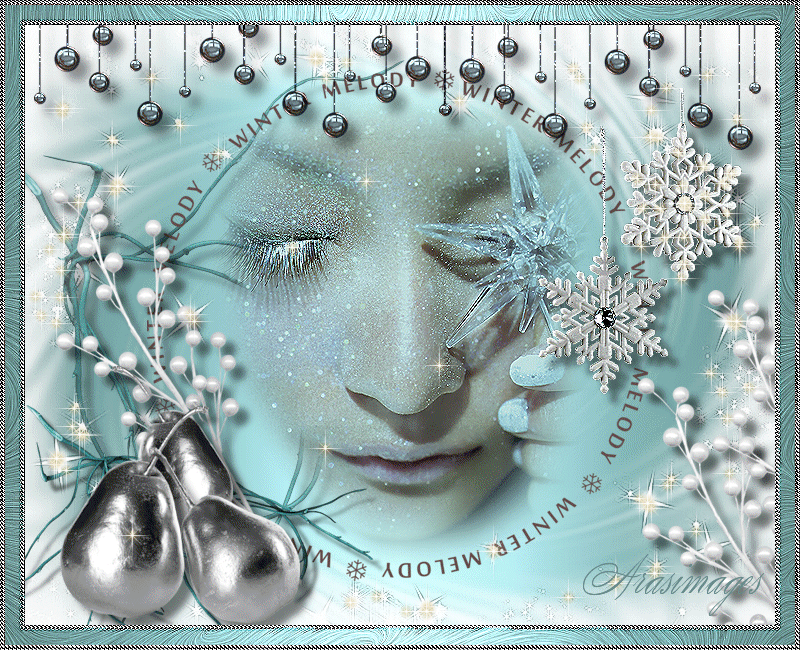
Melody of Winter
For Italian, Danish and German translation, click on the flags.


For this tutorial you will need the materials in the zip file below.

Unzip the materials into a working folder named Melody of Winter. Open the materials in PSP, copy and close originals. Place the Gradient in your PSP Files/Gradient folder and your Silverpunk Pattern in your PSP Files/Patterns. Export the WhiteStar into your PSP Files/Tubes(Tub) folder. You will need Plugins Nik ColorEfex and Eye Candy 4000 to do this tutorial. I have used PSPX5 to create this tutorial but you may use an earlier version. It is assumed you have a working knowledge of PSP.
Thanks go to fanou66 for the beautiful face tube used and to the unknown creators/owners of the various images used in this tutorial which were found on free sites. Please visit tubers links on my Links page.
Use the bookmark below to mark your place along the way.

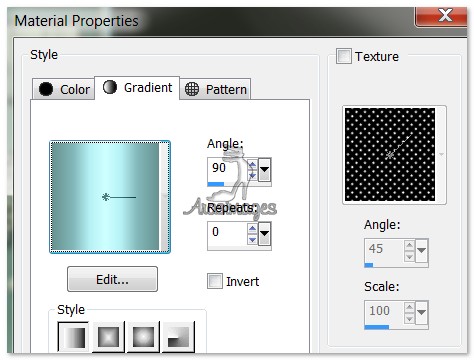
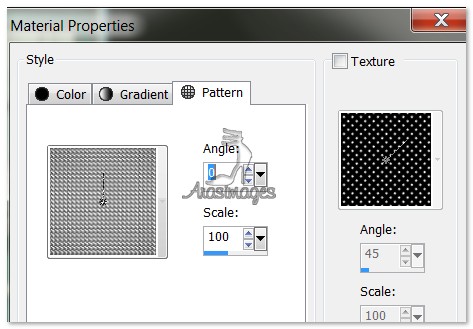
1. In Materials Palette, set Foreground to Silverpunk Pattern, Background to Wintergreen_CC.gradient.
2. Set the Style to Linear, Angle to 90, Repeats to 0, Invert unchecked for the Gradient.
3. Set the Pattern Angle at 0, Scale at 100.
4. New/New Image 750px by 600px. Flood fill with Gradient.
5. Layers/New Raster Layer. Flood fill with #ffffff.
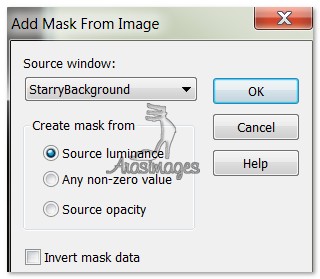
6. Open StarryBackground.jpg, leaving it open on workspace. Go back to the main image. Layers/New Mask Layer/From Image. In the box that opens, from the dropdown choose StarryBackground. In Layers Palette, right click/Merge/Merge Group.
7. Effects/Edge Effects/Enhance.
8. Open TwistedWillowBranch1.pspimage. Adjust/Saturation and Hue/Colorize.

9. Copy/Paste as New Layer.
10. Image/Mirror. Move to left side.
11. Effects/3D Effects/Drop Shadow/Vertical 10, Horizontal 10, Opacity 50, Blur 10, color #000000.
12. Drop Opacity down to 69.
13. Open fanou66_octobre_2012.pspimage. Copy/Paste as New Layer.
14. Image/Resize/Resize by 65%/Resize all layers unchecked.
15. Effects/Nik Software/ColorEfex Pro 3 Complete. Use settings as seen below.

16. Effects/Edge Effects/Enhance.
17. Open WinterMelodyText.pspimage. Copy/Paste as New Layer.
18. Image/Resize/Resize by 50%/Resize all layers unchecked.
19. Effects/3D Effects/Drop Shadow/Vertical 10, Horizontal 10, Opacity 50, Blur 15, color #000000.
20. Open Snowflakes.pspimage. Copy/Paste as New Layer
21. Image/Resize/Resize by 65%/Resize all layers unchecked.
22. Move Snowflakes to right side of Lady in image.
23. Effects/Edge Effects/Enhance.
24. Effects/3D Effects/Drop Shadow, Vertical 10, Horizontal 10, Opacity 50, Blur 10, color #000000.
25. Open HangingBalls.pspimage. Copy/Paste as New Layer.
26. Image/Resize/Resize by 80%/Resize all layers unchecked.
27. Move to top of image and to left side.
28. Effects/Edge Effects/Enhance.
29. Effects/3D Effects/Drop Shadow/Vertical 10, Horizontal 10, Opacity 50, Blur 15, color #000000.
30. Drop Opacity to 85%. Duplicate. Move duplicated HangingBalls to right side of image, overlapping center hanging ball.
31. Open TwistedWillowBranch2.pspimage. Copy/Paste as New Layer.
32. Adjust/Hue and Saturation/Colorize. Set Saturation at 129, Hue at 97.
33. Image/Resize/Resize by 50%/Resize all layers unchecked.
34. Move branch into bottom left corner.
35. Effects/3D Effects/Drop Shadow/Vertical 10, Horizontal 10, Opacity 50, Blur 5, color #000000.
36. Open WhiteSprig.pspimage. Copy/Paste as New Layer.
37. Image/Resize/Resize by 80%/Resize all layers unchecked.
38. Effects/3D Effects/Drop Shadow/Vertical 10, Horizontal 10, Opacity 50, Blur 10, color #000000.
39. Move into bottom left side over branches.
40. Again Copy/Paste as New Layer the WhiteSprig.
41. Image/Resize/Resize by 80%/Resize all layers unchecked. Repeat Drop Shadow as in Step #38.
42. Move down into right bottom corner. Duplicate and pull upward and right so just part of the sprig shows.
43. Open SilverPears.pspimage. Copy/Paste as New Layer.
44. Image/Resize/Resize by 65%/Resize all layers unchecked.
45. Image/Mirror. Using Eraser tool using settings below, erase pear on left side.

46. Move remaining pear over the WhiteSprig.
47. Effects/3D Effects/Drop Shadow/Vertical 10, Horizontal 10, Opacity 50, Blur 10, color #000000.
48. Copy/Paste as New Layer the SilverPears.
49. Image/Resize/Resize by 80%/Resize all layers unchecked.
50. Move the pears over the single pear in the bottom left corner.
51. Effects/3D Effects/Drop Shadow/Vertical 10, Horizontal 10, Opacity 50, Blur 10, color #000000.
52. Image/Add Borders/Add border of 5px, Symmetric checked, color #000000.
53. Activate the 5px border with the Magic Wand. Flood fill with the Silverpunk Pattern.
54. Effects/Edge Effects/Enhance. Deselect.
55. Image/Add Borders/Add border of 15px, Symmetric checked, color #ffffff.
56. Activate the 15px border with Magic Wand. Add a new Raster Layer and flood fill it with Wintergreen_CC.Gradient.
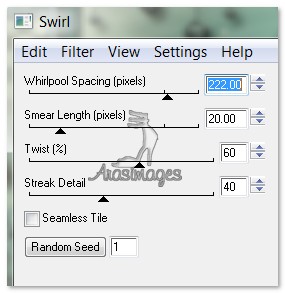
57. Effects/Eye Candy 4000/Swirl. See settings below.
58. Effects/Edge Effects/Enhance. Deselect.
59. Image/Add Borders/Add border of 5px, Symmetric checked, color #000000.
60. Activate the 5px border with the Magic Wand. Flood fill with the Silverpunk Pattern.
61. Effects/Edge Effects/Enhance. Deselect.
62. You may save this now as a finished image or continue with the Animation below.
63. ANIMATION: Duplicate the image twice having three layers in all. Close off bottom and middle layer.
64. Have the top layer open and activated. From the Tube tool, select White star and set the Scale to 15. Use settings below.

65. Click the star around the image where you want to see small sparkles. Be generous but not so much that it is covered. You will be adding larger sparkles on the next two layers.
66. Change the star Scale to 25. Close off top layer, open middle layer and highlight it. Click again around the image where you want sparkles.
67. Change the star Scale to 35. Close off middle layer, open bottom layer and highlight it. Click again around the image where you want larger stars. Do not put too many of these on.
68. Change the star Scale to 45 and click only a few times on the larger stars on the bottom layer.
69. Open all layers and save as an Animation Shop (*.psp) file in your working folder.
70. Open Animation Shop. File/Open, open the file you just saved. Click on the Animation button to see if you like your sparkles. If they are moving too fast, Edit/Select All. Set the Animation/Frame Properties to 13. Check again to see if this is what you want. You may wish to play with the speed. The higher the number, the slower the sparkle. If you are satisfied then we will now save.
71. File/SaveAs. A box will come up and you will name your work (Melody of Winter), type in where it will be saved as a .gif file and click Save. More boxes will appear and you continue to click Next, Next, Next and then Finish.
72. Thank you for working my tutorial.
Big hugs go to Evatexas and PamelaD who test my tutorials for me and are my valued advisors.
If you are going to use this tutorial for stationery, cards or place the tutorial/tag on another site, I would appreciate you contacting me for permission, giving Arasimages credit for the original tutorial and if possible, a link back to my site. Thank you.
Copyright © Arasimages All Rights Reserved