
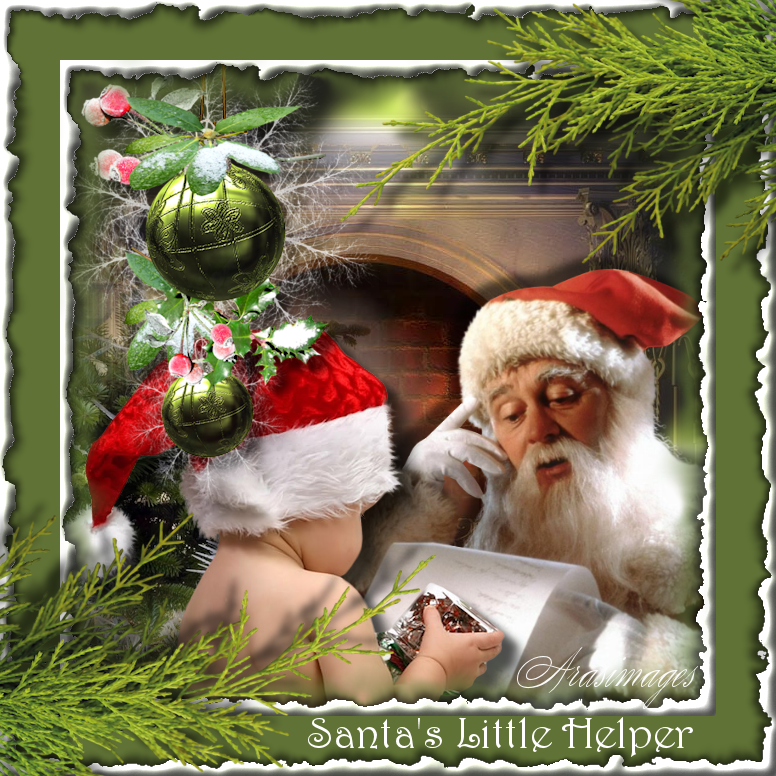
Santa's Little Helper
For Italian and Danish translations, click on the flags.


For this tutorial you will need the materials in the zip file below.

Unzip the materials into a working folder named Santa's Little Helper. Open the materials in PSP, copy and close originals. You will use AlienSkin Xenofex2/Burnt Edges to do this tutorial. I have used PSPX5 to create this tutorial but you may use an earlier version. It is assumed you have a working knowledge of PSP.
Thanks go to Nikita; Misssilly; to Guismo; to Evatexas of Arasimages (see my tubes) and the unknown creators/owners of the various images used in this tutorial which were found on free sites. Please visit tubers links on my Links page.
Use the bookmark below to mark your place along the way.

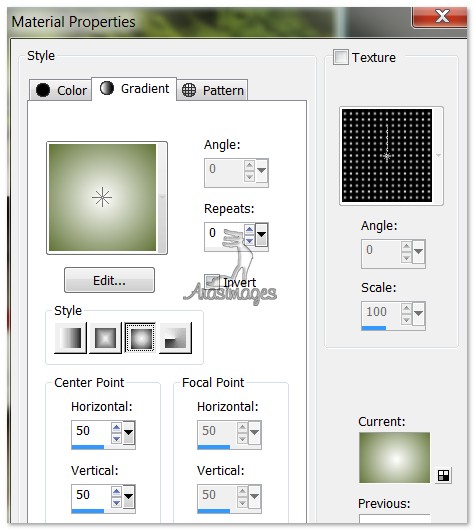
1. In Materials Palette, set Foreground #ffffff, Background to #607235.
2. Create a Gradient in Materials Palette using Sunburst, Angle 0, Repeats 0, Invert unchecked.
3. New/New Image 650px by 650px. Flood fill with Gradient.
4. Layers/New Raster Layer. Selections/Select All.
5. Open SolidBall.pspimage. Copy.
6. Paste into Selection. Selections/Select None.
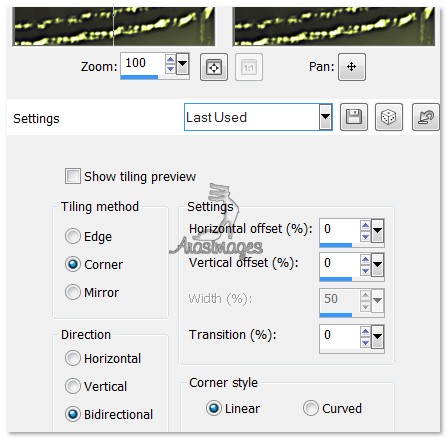
7. Effects/Image Effects/Seamless tiling as seen below.
8. Adjust/Blur/Gaussian Blur, Radius set to 8.
9. Open calguischeminee26112011.pspimage. Copy Misted layer/Paste as New Layer.
10. Open GreenTreeE.pspimage. Copy/Paste as New Layer.
11. Image/Mirror. Pull tree to the left side of image so large white ball is showing at edge.
12. Open Misssilly-Santa-dec2007small.pspimage. Copy/Paste as New Layer.
13. Effects/3D Effects/drop Shadow, Vertical -12, Horizontal -12, Opacity 60, Blur 12, color #000000. Repeat with V at 12, H at 12, all the other settings the same.
14. Place Santa in bottom right corner.
15. Open 1293385548_enfants_nikita.pspimage. Copy/Paste as New Layer.
16. Using Selections tool, select around Nikita's tag in the new layer and press Delete key. Selections None.
17. Image/Resize/Resize by 80%/Resize all layers unchecked.
18. Move Santa Baby to the bottom toward left so his hat's ball is over white ball on the GreenTreeE image.
19. Effects/3D Effects/drop Shadow, Vertical 12, Horizontal 12, Opacity 60, Blur 12, color #000000.
20. Open GreenHangingBalls.pspimage. Copy/Paste as New Layer. Image/Resize/Resize by 75%/Resize all layers unchecked.
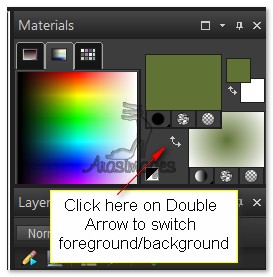
21. Move the green balls to upper left corner.
22. Effects/3D Effects/drop Shadow, Vertical 12, Horizontal 12, Opacity 60, Blur 12, color #000000.
23. Image/Add Borders/Add 3px border in color #607235, Symmetric checked.
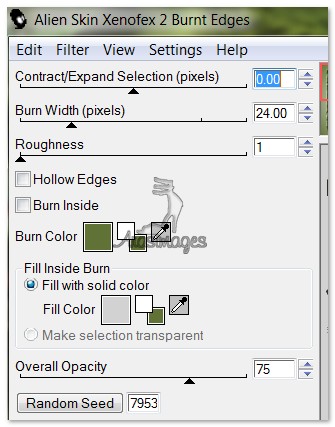
24. Effects/AlienSkin Xenofex 2/Burnt Edges. Use settings below.
25. Make sure your Mode is set to Replace and Match mode is set to RGB Value. Using Magic Wand, select on the outside of the burnt edges to activate it.
26. Switch the double arrow in the Materials palette to change background color with gradient (foreground).
27. Layers/New Raster Layer. Flood fill the activated area with Gradient now in bottom (background) box.
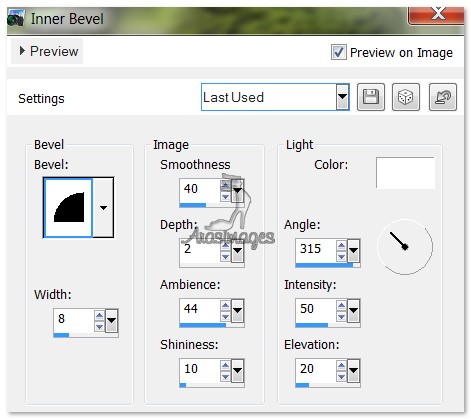
28. Effects/3D Effects/Inner Bevel. Using settings below, apply Inner Bevel twice.
29. Selections/Select None.
30. Image/Add Borders/Add 60px border in color #607235, Symmetric checked.
31. Repeat burnt edges as in Step #24.
32. With Magic Wand, select outside the burnt edges to activate it.
33. Layers/New Raster Layer. Flood fill with Gradient.
34. Effects/3D Effects/Inner Bevel. Using settings in Step #28, apply Inner Bevel twice.
35. Open BranchInGreen.pspimage. Copy/Paste as New Layer.
36. Effects/3D Effects/drop Shadow, Vertical -12, Horizontal -12, Opacity 60, Blur 12, color #000000.
37. Place in upper right corner.
38. Duplicate. Image/Flip. Image/Mirror.
39. Place branch in bottom left corner.
40. From Tool bar, choose Text tool, Font Harrington, Size 48, color #ffffff, type the words "Santa's Little Helper".
41. Convert to Raster Layer. Place to the right of the branch in the 60px border.
42. Sign your name or leave your watermark if you wish. Please, if you are going to be using this tutorial's image for stationery or display on a webpage, out of respect for my work/me, give Arasimages credit. A link would be especially appreciated. Thanks so much.
43. Convert to Raster Layer if needed. Merge/Merge Visible. Save as .jpg
Big hugs go to Evatexas and PamelaD who test my tutorials for me and are my valued advisors.
If you are going to use this tutorial for stationery, cards or place the tutorial/tag on another site, I would appreciate you contacting me for permission, giving Arasimages credit for the original tutorial and if possible, a link back to my site. Thank you.
Copyright © Arasimages All Rights Reserved