
Happy New Year
For Italian and Danish translation, click on the flags.


For this tutorial you will need the materials in the zip file below.

Unzip the materials into a working folder named Happy New Year. Open the materials in PSP, copy and close originals. You will use no plugins but you will use Animation Shop to do this tutorial. I have used PSPX5 to create this tutorial but you may use an earlier version. It is assumed you have a working knowledge of PSP to follow these directions.
Thanks go to K@rine_Dre@ms; Maryse; to Guismo; and to Dieter und Marion for the tubes used in this tutorial . Please visit tubers links on my Links page.
Use the bookmark below to mark your place along the way.
![]()
1. In Materials Palette, set Foreground #e9af6d, Background to #000000.
2. New/New Image 750px by 780px. Flood fill with Background #000000.
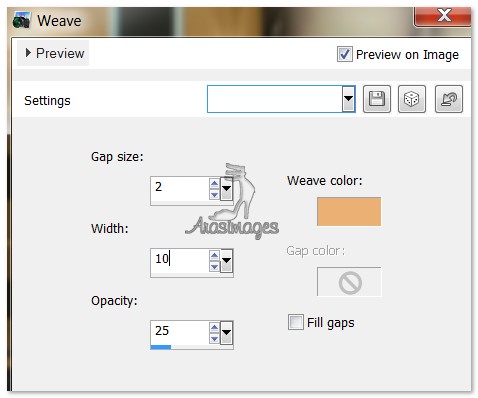
3. Effects/Texture Effects/Weave. Use settings below.
4. Open k@rine_dreams_Man_2373_Decembre_2012.pspimage. Copy Raster 2/Paste as New Layer.
5. Image/Resize/Resize by 70%/Resize all layers unchecked.
6. Move into upper right corner.
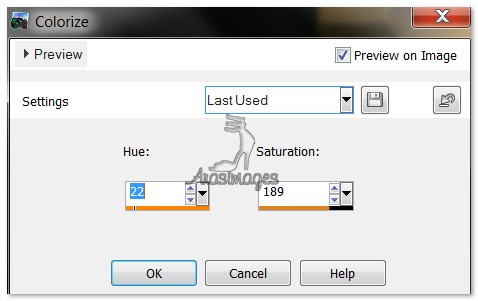
7. Adjust/Hue and Saturation/Colorize. Hue set to 22, Saturation at 189.
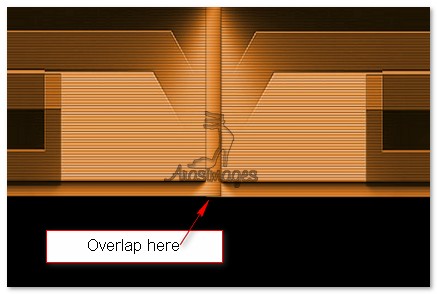
8. Duplicate. Image/Mirror (or Flip Horizontal and pull to the left side overlapping the center of the two backgrounds.)
9. Open mds969Fountains02.11.pspimage. Copy/Paste as New Layer.
10. Using Pick tool, grab each side node and stretch across to edges of image. Place approximately where I have placed mine.
11. Blend Mode set to Luminance (L).
12. Open k@rine_dreams_Man_2373_Decembre_2012.pspimage. Copy Raster 1 (man)/Paste as New Layer.
13. Image/Resize/Resize by 60%/Resize all layers unchecked.
14. Move man to right side of image so the bottom edge rests on top edge of black textured rectangle on the bottom.
15. Effects/3D Effects/Drop Shadow/Vertical -10, Horizontal 20, Opacity 50, Blur 23, color #000000.
16. Open calguisnewyear18122011.pspimage. Copy/Paste as New Layer.
17. Image/Resize/Resize by 27%/Resize all layers unchecked.
18. Move the bottle/clock to right side over the bottom of man/rectangle.
19. Effects/3D Effects/drop Shadow, Vertical -10, Horizontal 20, Opacity 50, Blur 23, color #000000.
20. Open cal-guis-glamour-11102008.pspimage. Copy/Paste as New Layer.
21. Image/Resize/Resize by 85%/Resize all layers unchecked.
22. Effects/3D Effects/drop Shadow, Vertical -10, Horizontal 20, Opacity 50, Blur 23, color #000000.
23. Move lady to left side of image. Adjust/Sharpness/Sharpen.
24. Using double arrows in Materials Palette, switch Background color with Foreground color.
25. From Tool bar, choose Text tool, Yolanda Princess, Size 72, color #e9af6d, type the words "Happy New Year".

26. Convert to Raster Layer. Place below the clock in bottom right corner.
27. From Tool bar, choose Text tool, Vani, Size 26, color #e9af6d, type the words "Waiting for a".

28. Convert to Raster Layer. Place above the text "Happy New Year". Adjust both lines of text as needed.
29. Sign your name or leave your watermark if you wish. Please, if you are going to be using this tutorial's image for stationery or display on a webpage, out of respect for my work/me, give Arasimages credit. A link would be especially appreciated. Thanks so much.
30. Image/Add Borders/Add 2px border, Symmetric checked, color #e9af6d.
31. Image/Add Borders/Add 12px border, Symmetric checked, color #000000.
32. Image/Add Borders/Add 2x border, Symmetric checked, color #e9af6d.
33. Promote Background Layer.
34. Use Freehand selection tool (by the Magic Wand), set as seen below. Left click point to point around the fountains and right click to close each selection. Do this on each one of the 5 fountains. See my example below.


35. Duplicate 4 times, having 5 layers in all.
36. Close off all layers except for Copy (4) of Raster 1. (Top layer).
37. Having the top layer highlighted, Adjust/Add/Remove Noise/Add Noise. Use setting below.

38. Close off top layer. Move to layer below it (Copy (3) of Raster 1), open and highlight it.
39. Set and apply Noise at 35. Close this layer, move to next layer below, open and highlight it.
40. Set and apply Noise at 30. Close this layer, move to next layer below, open and highlight it.
41. Set and apply Noise at 25. Close this layer, move to bottom layer, open and highlight it.
42. Set and apply Noise at 20. Open all layers and save as PSP Animation Shop (*psp) image.
43. Open Animation Shop. File/Open the PSP Animation Shop (*psp) image. Click on the Animation button at the top tool bar to check your animation. If it looks the way you like, then we will now save your work.
44. File/Save As. When the box opens, browse to where you want to save it, then in line below, type in file name. Leave Save as type: (*gif) as is. Click Save.
45. As the boxes come up, click Next, Next, Next and Finish. You are now finished with your work and your .gif file is saved in your working folder.
Big hugs go to Evatexas and PamelaD who test my tutorials for me and are my valued advisors.
If you are going to use this tutorial for stationery, cards or place the tutorial/tag on another site, I would appreciate you contacting me for permission, giving Arasimages credit for the original tutorial and if possible, a link back to my site. Thank you.
Copyright © Arasimages All Rights Reserved