
Night Marauders
For Italian and Danish translation, click on the flags.


For this tutorial you will need the materials in the zip file below.

Unzip the materials into a working folder named Night Marauders. Open the materials in PSP, copy and close originals. You will use plugins Filters Unlimited 2, Nik Software/Color Efex Pro and Graphics Plus and you will use Animation Shop to do this tutorial. I have used PSPX5 to create this tutorial but you may use an earlier version. It is assumed you have a working knowledge of PSP to follow these directions.
Thanks go to the various unknown owners/tubers of the elements used which were found at free sites on the internet; the Moon is from Arasimages. Please visit tubers links on my Links page.
Use the bookmark below to mark your place along the way.
1. In Materials Palette, set Foreground #917d65, Background to #5a402f.
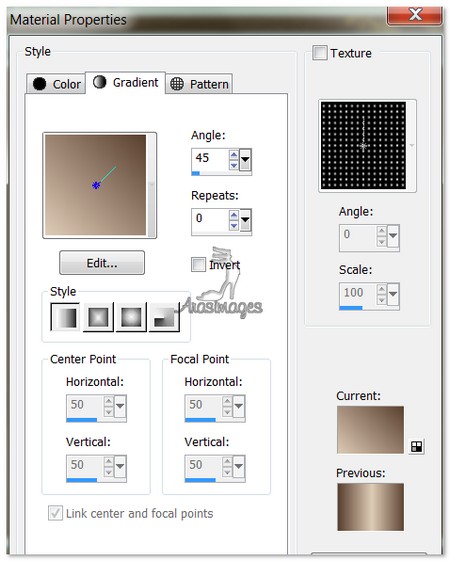
2. Create a Gradient using the above colors, Angle 45, Repeats 0, Invert unchecked, Style Linear.
3. New/New Image 770px by 550px. Flood fill with Background #5a402f.
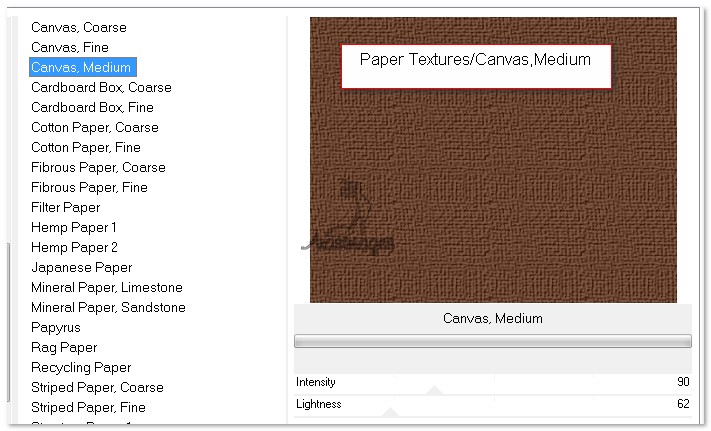
4. Effects/Filters Unlimited 2/Paper Textures/Canvas, Medium. Use settings below.
5. Open Bittersweet.pspimage. Copy/Paste as New Layer.
6. Image/Resize/Resize by 60%/Resize all layers unchecked.
7. Move to right side of image a little above center. Drop Opacity to 74.
8. Effects/3D Effects/Drop Shadow, Vertical 10, Horizontal 10, Opacity 84, Blur 11, color #000000.
9. Paste Bittersweet again as New Layer. Image/Mirror.
10. Image/Resize/Resize by 60%/Resize all layers unchecked.
11. Place at bottom left corner of image. Crop Opacity to 74.
12. Effects/3D Effects/Drop Shadow, Vertical 10, Horizontal 10, Opacity 84, Blur 11, color #000000.
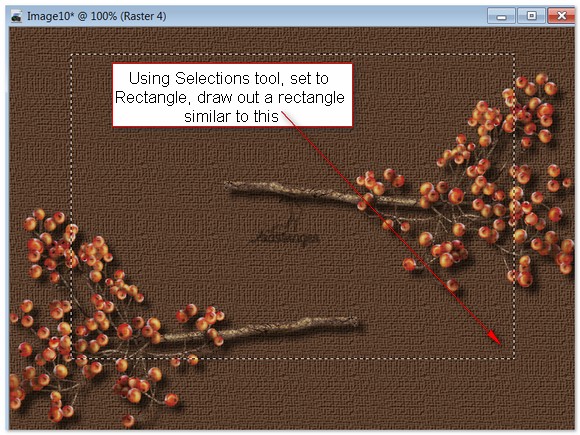
13. Layers/New Raster Layer.
14. Using Selections tool, Selection type/rectangle, Mode/Add(Shift), Feather 0, draw out a rectangle similar to mine.
15. Flood fill rectangle with Gradient.
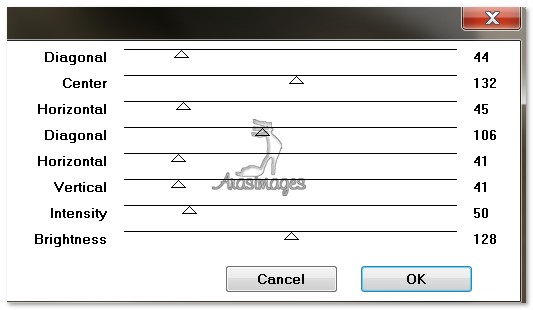
16. Effects/Graphics Plus/Cross Shadow. Use setting below.
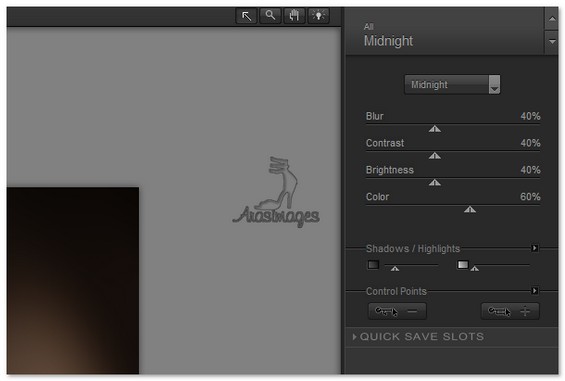
17. Effects/Nick Software/ColorEfexPro 3.0. Select Midnight with the Midnight settings below.
18. Effects/3D Effects/drop Shadow, Vertical 20, Horizontal 20, Opacity 50, Blur 22, color #000000.
19. Effects/3D Effects/drop Shadow, Vertical -20, Horizontal -20, Opacity 50, Blur 22, color #000000.
20. Open Moon-PDPhoto.org.pspimage of moon. Copy/Paste as New Layer.
21. Move upwards to right of middle. Selections/Invert. Press Delete key once. Selections/Invert.
22. Open Brenders_Carl-Double_Trouble.pspimage of Raccoons. Copy/Paste as New Layer.
23. Move Raccoons to bottom left corner of rectangle. Some will be outside of rectangle. Selections/Invert. Press Delete key once. Selections/Invert.
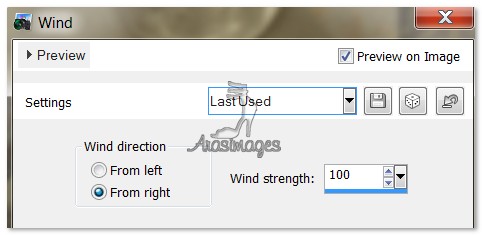
24. Effects/Distortion/Wind. Use Wind Direction from Right ticked, Wind strength: 100.
25. Adjust/Blur/Gaussian Blur, Radius set to 12.
26. Copy/Paste again the Raccoons as New Layer.
27. Image/Resize/Resize by 74%, Resize all layers unchecked.
28. Move Raccoons to center on left side.
29. Adjust/Sharpness/Sharpen.
30. Open Brenders_Carl-Double_Trouble.pspimage of Raccoons again. Image/Mirror.
31. Copy/Paste as New Layer. Resize as in Step #27.
32. Move the resized Raccoons into bottom right corner. See example below.
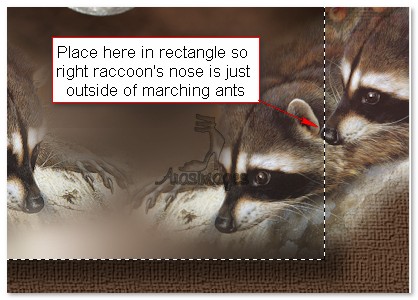
33. Selections/Invert. Press Delete key once. Selections/Invert.
34. Layers/New Raster Layer. Flood fill with color #b68e69.
35. Selections/Modify/Contract by 2px. Press Delete key once. Selections/Select none.
36. Open LightLeaves.pspimage. Copy/Paste as New Layer.
37. Effects/3D Effects/drop Shadow, Vertical 2, Horizontal 10, Opacity 75, Blur 18, color #000000.
38. Place in upper right corner.
39. Duplicate and pull into bottom left corner. (See my placement).
40. Using Eraser tool, erase the top right leaf off the face of the middle Raccoon.
41. Effects/3D Effects/Drop Shadow, Vertical 10, Horizontal 10, Opacity 84, Blur 22, color #00000.
42. Layers/New Raster Layer. Using Selections tool like you did with the creation of the large rectangle, draw out another one below the large one for your hanging tag. See example.

43. Flood fill with Gradient set to Style Linear, Angle 90, Repeats 1, Invert checked, colors as in original Gradient.
44. Effects/NikSoftware/ColorEffectsPro/Low Key set to default.
45. Layers/New Raster Layer. Flood fill with color #b68e69.
46. Selections/Modify/Contract by 2px. Click OK. Press Delete key once. Selections None. Layers/Merge/Merge Down.
47. Effects/3D Effects/drop Shadow, Vertical 20, Horizontal 20, Opacity 50, Blur 22, color #000000.
48. Open bandLucy.pspimage. Copy/Paste as New Layer.
49. Image/Resize/Resize by 60%/Resize all layers unchecked.
50. Effects/3D Effects/Drop Shadow, Vertical 5, Horizontal 5, Opacity 84, Blur 11, color #000000.
51. Place on left side of tag/rectangle images. Duplicate. Pull to right side of tag/rectangle images. (See mine for example).
52. From Text tool, select Vivaldi font, Size 48, color #b68e69. Type the words "Night Marauders".

53. Convert to Raster Layer. Move words to center on the tag.
54. Effects/3D Effects/Drop Shadow, Vertical -2, Horizontal -3, Opacity 84, Blur 4, color #000000.
55. Effects/3D Effects/Drop Shadow, Vertical 10, Horizontal 10, Opacity 84, Blur 11, color #000000. Apply again.
56. Sign your name or leave your watermark if you wish. Please, if you are going to be using this tutorial's image for stationery or display on a webpage, out of respect for my work/me, give Arasimages credit. A link would be especially appreciated. Thanks so much.
57. Image/Add Borders/Add 2px border, Symmetric checked, color #b68e69.
58. Image/Add Borders/Add 2px border, Symmetric checked, color #382728.
59. Image/Add Borders/Add 12x border, Symmetric checked, color #b68e69.
60. Image/Add Borders/Add 2px border, Symmetric checked, color #382728.
61. Image/Add Borders/Add 2px border, Symmetric checked, color #b68e69.
62. Copy! Save your tag as Night Marauders.jpg in your working folder.
63. Open Animation Shop. In empty work space, Paste as New Animation. Duplicate until you have 34 frames.
64. File/Open CricketWingAnimation1. Highlight first frame by left clicking within it. Edit/Select All. Right click on the top border and Copy.
65. Edit Propagate Paste. Important for wings to go into all frames.
66. Highlight first frame of Night Marauders image by left clicking within it. Edit/Select All.
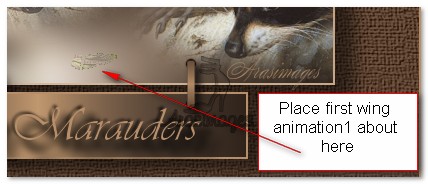
67. Right click in first frame. Left click/Paste/Into Selected Frame, placing the wing just over the "M" as seen in example.
68. File/Open Cricket.pspimage. Copy. Right click within first frame of Night Marauders image and left click/Paste/Into Selected Frame, placing the cricket over the wing animation. (Keep Propagate Paste activated). You may have to undo and redo this several times to get it just right. I know I did!
69. Go back to the CricketWingAnimation 1, Copy. Now go back to Night Marauders image and right click in first frame. Left click/Paste/Into Selection. Paste the wing over the Cricket's wing; matching the lines should make it easier to place. Hint: Scroll out your images so they are larger and easier to work with.
70. Test your animation as you go using the View Animation button at the top tool bar. When all is working well, save your work.
71. File/Save As. When the box opens, browse to where you want to save it (working folder for instance), then in line below, type in file name (Night Marauders). Leave Save as type: (*gif) as is. Click Save.
72. As the boxes come up, click Next, Next, Next and Finish. You are now finished with your work and your .gif file is saved in your working folder.
Big hugs go to Evatexas and PamelaD who test my tutorials for me and are my valued advisors.
If you are going to use this tutorial for stationery, cards or place the tutorial/tag on another site, I would appreciate you contacting me for permission, giving Arasimages credit for the original tutorial and if possible, a link back to my site. Thank you.
Copyright © Arasimages All Rights Reserved