
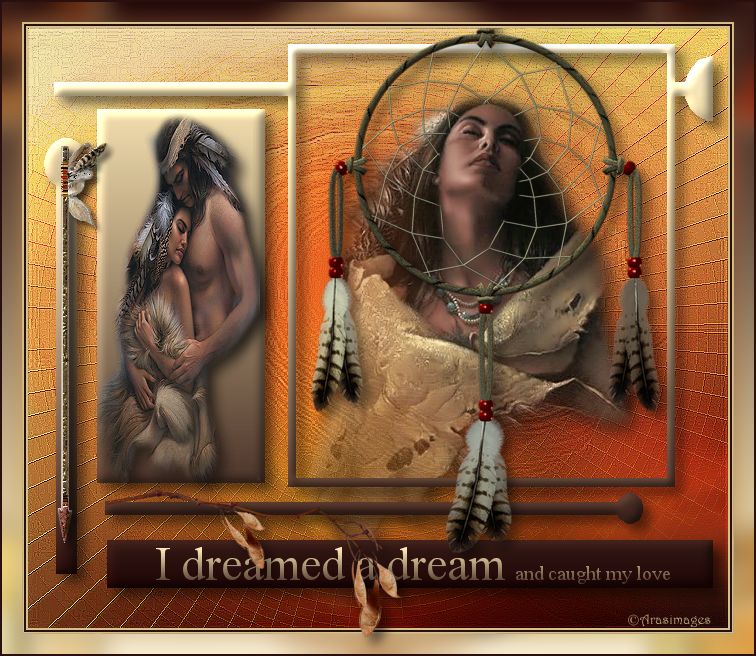
I Dreamed A Dream
For Italian, Danish and French translation, click on the flags.


For this tutorial you will need the materials in the zip file below.

Unzip the materials into a working folder named I dreamed a dream. Open the materials in PSP, copy and close originals. Place the Mask into your PSP Mask folder, ES Chic 01 Gradient in PSP Gradient folder, and Preset Shapes into your PSP Preset Shape folder. (Where your folder is depends on what version of PSP you are using). You will use the plugins AP 02/Distort/Blurs and Distort to do this tutorial. Note: If you do not have the Distort plugin with Turn Your Inside Out, you may find it at http://saturnelladesign.fr/pages/filtres.htm. I have used PSPX5 to create this tutorial but you may use an earlier version. It is assumed you have a working knowledge of PSP to follow these directions.
Thanks go to Evatexas for the lovely misted sunview164E image and to the various unknown owners/tubers of the images used which were found at free sites on the internet; if any of these are yours, let me know and I will be happy to link and give credit to you by name.
Use the bookmark below to mark your place along the way.

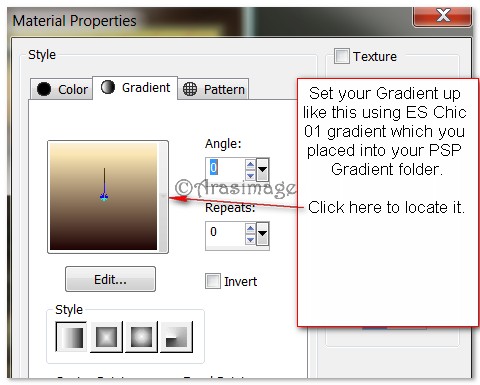
1. In Materials Palette, set Foreground #d4c08d, Background to ES Chic 01 Gradient.
2. Your Gradient should appear like this.
3. New/New Image/700px by 600px. Selections/Select All.
4. Open sunview164E.pspimage (blur layer). Copy/Paste into Selection. Selections/Select None.
5. Layers/New Raster Layer. Flood fill with Gradient.
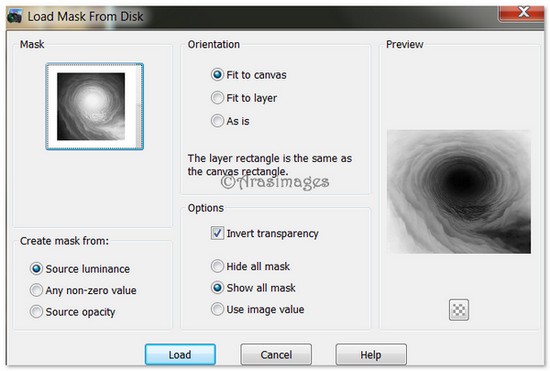
6. Layers/Load/Save Mask/Load Mask from Disk. Choose ts_miscmask.msk. Load.
7. Layers/Merge/Merge Group.
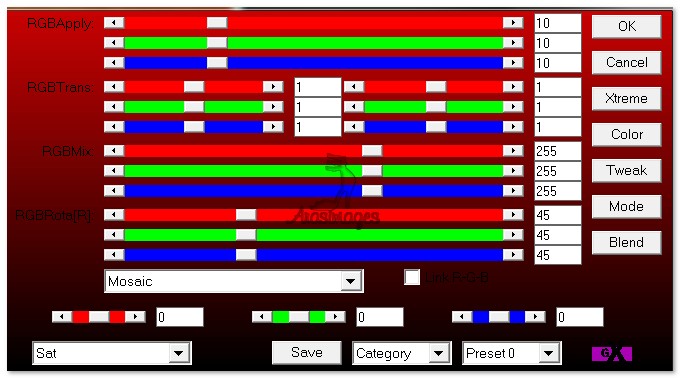
8. Effects/AP 02/Distort/Blurs/Distort _ Rotator. Use settings below. Click Blend to select Sat.
9. Effects/Edge Effects/Enhance. Effects/Edge Effects/Enhance More.
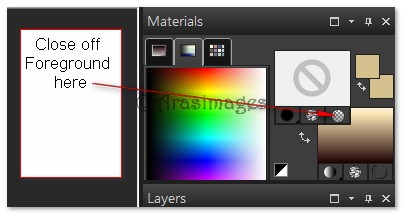
10. In Materials Palette, having Gradient in Background box, close off Foreground. See example.
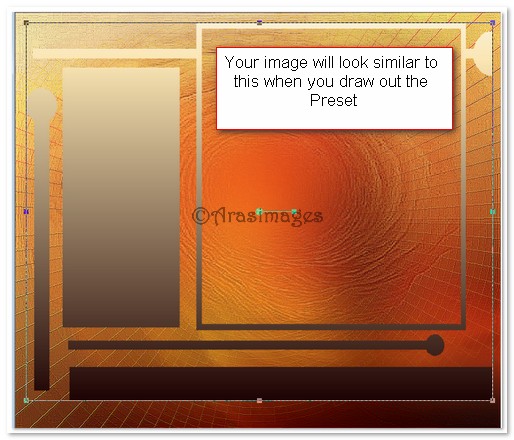
11. From the Tool bar, select Preset Shape. In Shapes list, choose Shape_10 preset. Draw out an image starting near the top left corner to near the bottom right corner. Use the turn nodes of the Vector layer to adjust if needed. Convert to Raster Layer.

12. Activate your Magic Wand, tolerance set to 20. Hold down the Shift key and left click inside the smaller rectangle you have just drawn out to activate it. Click until the entire rectangle is selected.
13. Layers/New Raster Layer.
14. Open AmericanIndianCouple.pspimage. Copy/Paste into Selection.
15. Left click on the couple to activate them, having Mode set to Replace, Tolerance at 20.
16. Effects/3D Effects/Drop Shadow, Vertical 8, Horizontal 8, Opacity 50, Blur 15, color #000000.
17. Selections/Select None. Make sure they fit inside the rectangle nicely.
18. Adjust/Sharpness/Sharpen. Repeat. Duplicate.
19. Highlight Raster layer of Preset Shape. Selections/Select All/Float/Defloat. (Activates Preset).
20. Effects/3D Effects/Inner Bevel.

21. Effects/3D Effects/Drop Shadow, Vertical 8, Horizontal 8, Opacity 50, Blur 15, color #000000.
22. Selections/Select None.
23. Open AmericanIndianWoman.pspimage. Copy/Paste as New Layer.
24. Place her in large Preset Shape Square toward center/bottom. Pull her layer beneath Preset Shape layer.
25. Adjust/Sharpness/Sharpen. Apply Drop Shadow as in Step #22.
26. Highlight top layer to continue.
27. Open Dream_Catcher.pspimage. Copy/Paste as New Layer.
28. Place Dream_Catcher centered over woman's head.
29. Effects/3D Effects/Drop Shadow, Vertical 8, Horizontal 8, Opacity 50, Blur 15, color #000000.
30. Using your Freehand Selection tool or Eraser Tool, eliminate Dream_Catcher off woman's face and neck.
31. Open IndianArrow.Tub. Copy/Paste as New Layer.
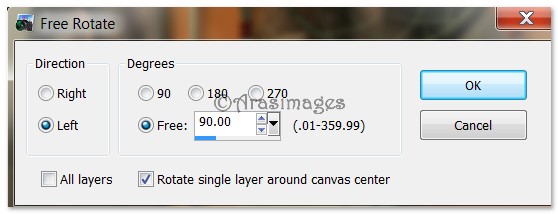
32. Image/Free Rotate. Rotate 90 degrees Left.
33. Place arrow over vertical part of preset on the left of image.
34. Image/Add Borders/Add 2px border, Symmetric checked, color #d4c08d.
35. Image/Add Borders/Add 2px border, Symmetric checked, color #290f0e.
36. Image/Add Borders/Add 2px border, Symmetric checked, color #d4c08d.
37. Image/Add Borders/Add 20px border, Symmetric checked, color #290f0e.
38. Using Magic Wand, click inside 20px border to activate it.
39. Switch Foreground and Background in Materials Palette.
40. Flood fill border with Gradient (foreground).
41. Effects/Distort/Turn Your Inside Out. Use default setting.

42. Adjust/Blur/Gaussian Blur/Radius set to 11.
43. Image/Flip (Vertical). Selections/Select None.
44. Image/Add Borders/Add 2px border, Symmetric checked, color #290f0e.
45. In Materials Palette, make sure ES Chic 01 Gradient is in Background box.
46. From Tool bar, select Text tool. Choose Font FrankRuehl, Size 48, color Gradient. Type out "I dreamed a dream". Drop size to 20 and type "and caught my love".

47. Convert to Raster Layer, Center on bottom dark rectangle of Preset.
48. Open TreeBranch.pspimage. Copy/Paste as New Layer.
49. Place branch near bottom, over the text as I have done.
50. Effects/3D Effects/Drop Shadow, Vertical 8, Horizontal 8, Opacity 50, Blur 15, color #000000.
51. Sign your name or leave your watermark if you wish. Merge/Merge Visible if necessary.
Big hugs go to Evatexas and PamelaD who test my tutorials for me and are my valued advisors.
If you are going to use this tutorial for stationery, cards or place the tutorial/tag on another site, I would appreciate you contacting me for permission, giving Arasimages credit for the original tutorial and if possible, a link back to my site. Thank you.
Copyright © Arasimages All Rights Reserved