
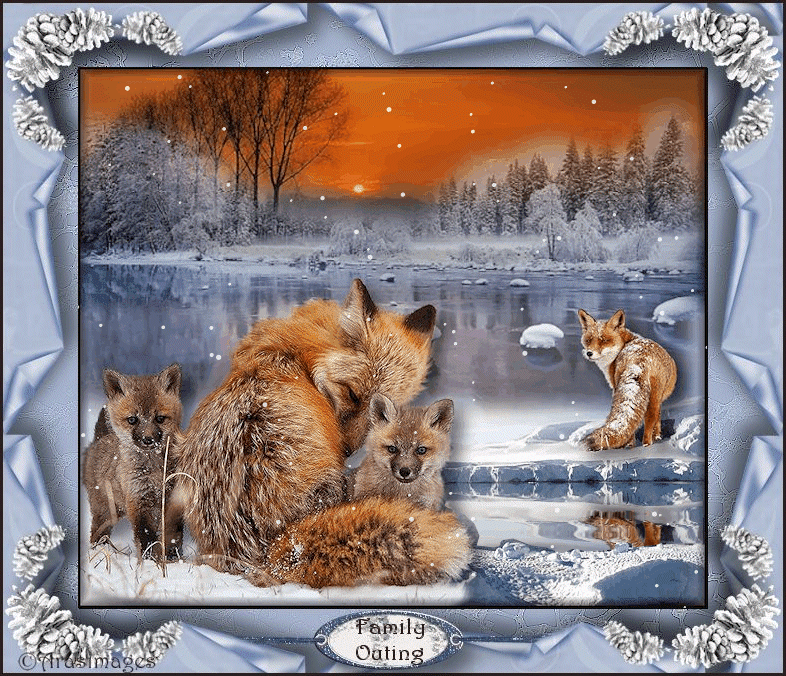
Family Outing
For Italian and Danish translation, click on the flags.


For this tutorial you will need the materials in the zip file below.

Unzip the materials into a working folder named Family Outing. Open the materials in PSP, copy and close originals. Export the @cb-water 1 brush into your PSP/Brush folder. You will use plugin Simple/Top Left Mirror for this tutorial. We will be using the programs Sqirlz and Animation Shop to do the animation. I have used PSPX5 to create this tutorial but you may use an earlier version. It is assumed you have a working knowledge of PSP to follow these directions.
Thanks go to Nikita; Sorensen_Designs; SDT and to the various unknown owners/tubers of the images used which were found at free sites on the internet; if any of these are yours, let me know and I will be happy to link and give credit to you by name.
Use the bookmark below to mark your place along the way.

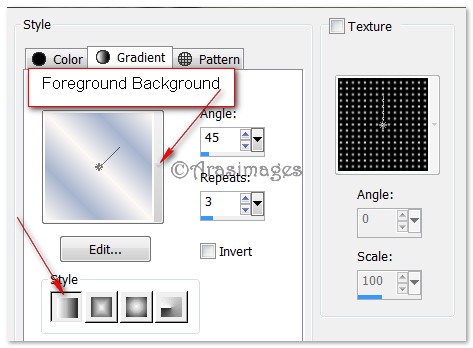
1. In Materials Palette, set Foreground #fdf8f4, Background #a6b4ce.
2. Create a Gradient using the above colors, Style Linear, Angle 45, Repeats 3, Invert unchecked.
3. New/New Image/780px by 670px. Flood fill with Gradient.
4. Adjust/Blur/Gaussian Blur, Radius set at 22.
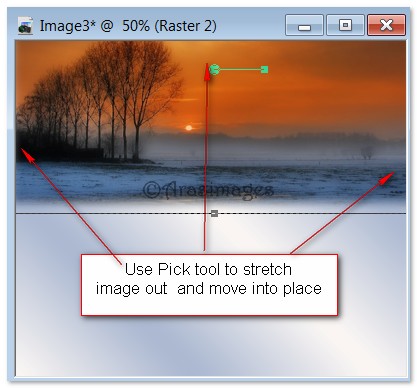
5. Open Tube2085_Scenery_misted_24_12_08.pspimage. Copy/Paste as New Layer.
6. Using Pick tool, stretch image out toward top and sides. Use the center node to place in top half of image. See example.
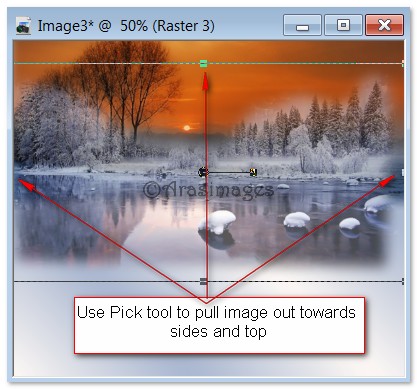
7. Open Sorensen_Designs Tube Jan 213-10.pspimage. Copy/Paste as New Layer.
8. Using Pick tool, stretch image out toward top and sides. Use the center node to place. See example.
9. Blend Mode/Drop Opacity down to 64.
10. Open nikita_reveries_p_44_04.08.pspimage. Copy/Paste as New Layer.
11. Place image in lower right corner. Some of the image will be pulled beyond edge.
12. Open Fox.pspimage. Copy/Paste as New Layer.
13. Image/Resize/Resize by 53%/Resize all layers unchecked.
14. Move Fox to right side of image, placing him on the snow above the open water.
15. Effects/3D Effects/Drop Shadow, Vertical 13, Horizontal 13, Opacity 50, Blur 27, color #000000.
16. Open 12926131151_animaux_nikita.pspimage. Using Selections tool, select around Nikita's watermark and press delete key.
17. Selections/Select None. Copy/Paste as New Layer.
18. Close Nikita's image leaving her watermark intact. (When closing out image, choose No to save changes request).
19. Image/Resize/Resize by 80%/Resize all layers unchecked.
20. Place mother fox and her babies in bottom left corner.
21. Effects/3D Effects/Drop Shadow, Vertical 13, Horizontal 13, Opacity 50, Blur 27, color #000000.
22. Image/Add Borders/Add 3px border, Symmetric checked, color #2c201d.
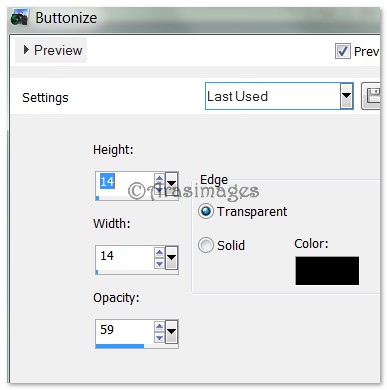
23. Effects/3D Effects/Buttonize. Use settings below.
24. Promote Background layer. Copy/Paste as New Image in empty workspace are. Image resize 80%/Resize all layers ticked and save as .jpg image as we will be using this later for animation.
25. Back to your main working image. Layers/New Raster Layer. Flood fill with background color #a6b4ce.
26. From Tool bar, select the Paint Brush tool. Locate brush @cb-water 1. Using below settings, stamp with foreground gradient using left mouse clicks. Stamp all around the edges.

27. Effects/Edge Effects/Enhance. Enhance More.
28. Pull Raster 1 above (new layer) Raster 2.
29. Image/Resize/Resize by 80%/Resize all layers unchecked.
30. Adjust/Sharpness/Sharpen.
31. Open BorderCurlsWide.pspimage. Copy/Paste as New Layer.
32. Place border at the top as I have mine.
33. Effects/3D Effects/Drop Shadow, Vertical 13, Horizontal 13, Opacity 50, Blur 27, color #000000.
34. Duplicate. Image/Flip (Vertical).
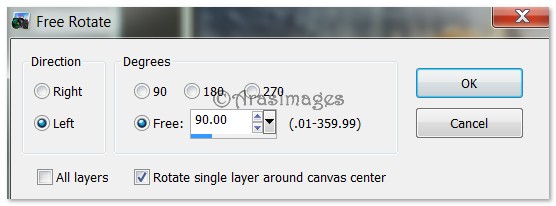
35. Duplicate. Image/Free Rotate/90 degrees Left.
36. Pull border to right side of image as I have mine.
37. Duplicate. Image/Mirror ( Flip Horizontal). Adjust layers if needed making sure the top layer is highlighted to continue.
38. Open TextTag.pspimage. Copy/Paste as New Layer.
39. Place in center bottom, fitting nicely tucked in Copy of Raster 3 BorderCurlsWide.
40. Effects/3D Effects/Drop Shadow, Vertical 13, Horizontal 13, Opacity 50, Blur 27, color #000000.
41. From Tool bar, select Text tool. Select Font Harrington, Size 22 px, Font style: Bold, color #2c201d. See settings below.

42. Type Family, press enter and type Outing. Convert to Raster Layer.
43. Place the text in the center of TextTag.
44. Image/Add Borders/Add 3px border, Symmetric checked, color #2c201d.
45. Open Pinecones.pspimage. Copy/Paste as New Layer.
46. Move Pinecones into upper left corner.
47. Effects/Simple/Top Left Mirror. Click OK.
48. Adjust/Sharpness/Sharpen.
49. Sign your name or leave your watermark if you wish. Merge/Merge Visible. Save as .jpg file.
50. We are now finished with the image without animation. If you wish to have animation, then continue with tutorial as directed.
51. Open the program Sqirlz. File/Open the resized image you have saved in your working folder.
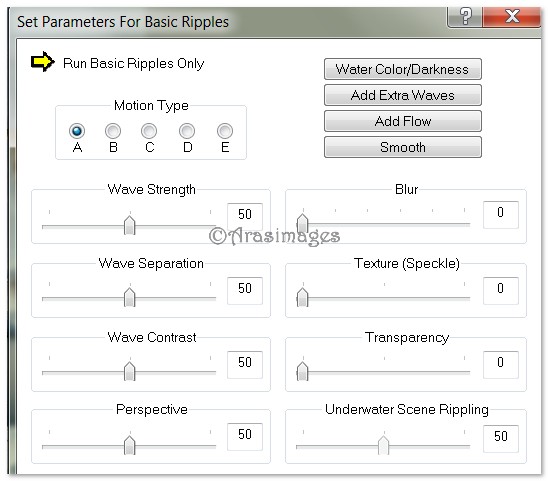
52. Click on Reflect Options/Customize Basic Ripples/Set Parameters For Basic Ripples and set the Motion Type to A. Click on Water Color/Darkness on the right and set to no color. Close. See example for settings.
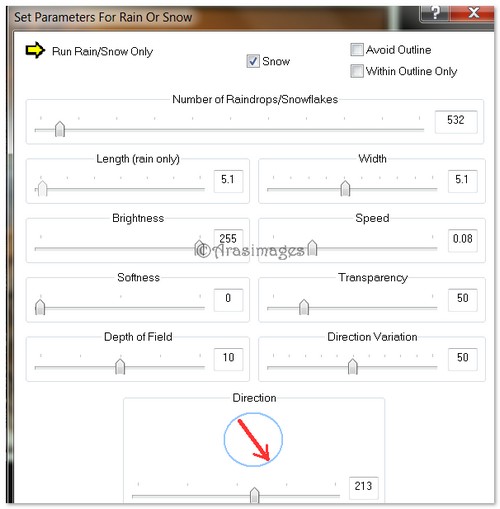
53. Click on Reflect Option again/Customize Rain/Snow/ and select Set Parameters for Rain or Snow. See example for settings.
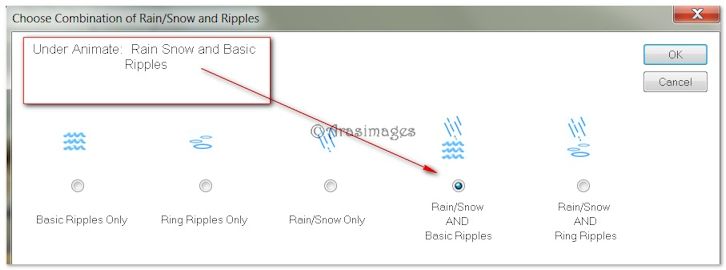
54. Click Animate and Choose Combination of Rain/Snow and Ripples. Set to Rain/Snow AND Basic Ripples. See example below.
55. Click on the Colored Dots to select number of frames. Set to 20.
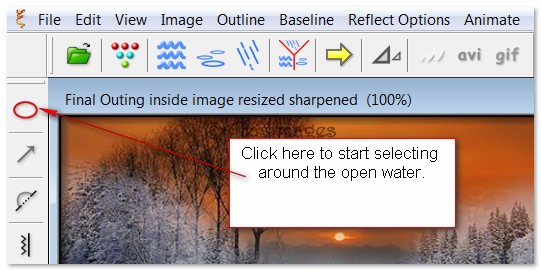
56. From the tool bar on the left, click the first tool.
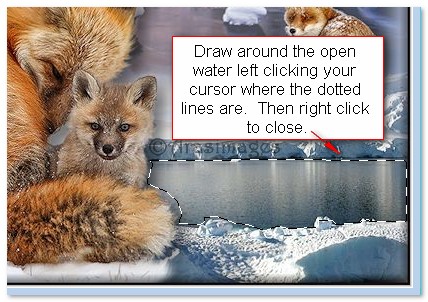
57. Left click with your mouse all around the open water as I have done in the example below. Right click to close the lines around the water.
58. Click the yellow arrow to see/check your animation. If it is what you like, then click on the gif option to save your work as a .gif file. Give your file a name when saving. Leave the frame rate to 15. Wait for the animation to be saved. Sqirlz will tell you when it has been saved.
59. Open Animation Shop. File/Open/Family Outing .gif file.
60. File/Open Family Outing .jpg file. Duplicate until you have 20 frames.
61. Go to the .gif file and highlight the first frame. Edit/Select All. Right click on the top border/Copy.
62. Go to your 20 frames of the .jpg file, highlight the first frame. Edit/Select All.
63. Right click inside the first frame, Paste/Into Selected Frame. Your image should appear where it should be set, right over the original fox scene. Left click to set in place.
64. Animation/set the Frame Properties to 6. A higher number will make the animation slower.
65. Click on View Animation button at the top tool bar and check your animation. If all is as you like it, then we will now save your work.
66. File/Save As. When the box comes up, give your File a name, leave Save as type set to (*gif). Click Save.
67. As the boxes come up, click Next, Next, Next then Finish.
I hope you have enjoyed working this animated tutorial as much as I have enjoyed creating it for you.
Big hugs go to Evatexas and PamelaD who test my tutorials for me and are my valued advisors.
If you are going to use this tutorial for stationery, cards or place the tutorial/tag on another site, I would appreciate you contacting me for permission, giving Arasimages credit for the original tutorial and if possible, a link back to my site. Thank you.
Copyright © Arasimages All Rights Reserved