
Contemplation
For Italian, Danish and French translation, click on the flags.


For this tutorial you will need the materials in the zip file below.

Unzip the materials into a working folder named Contemplation. Open the materials in PSP, copy and close originals. Place the ES_Chic_01 Gradient into your Gradients folder. Place the CFG a-to-b file in the PSP Files/Dragonfly/Sinedots II folder. I have used Plugins Dragonfly/SinedotsII and VM Experimental/TeeWee. You will need the program Sqirlz if you follow the animation instructions. I have used PSPX5 to create this tutorial but you may use an earlier version. It is assumed you have a working knowledge of PSP to follow these directions.
Thanks go to Nikita; and to PamelaD of Arasimages for the lovely tubes used.
Use the bookmark below to mark your place along the way.

1. In Materials Palette, set Foreground #000000, Background use Gradient as seen in next step.
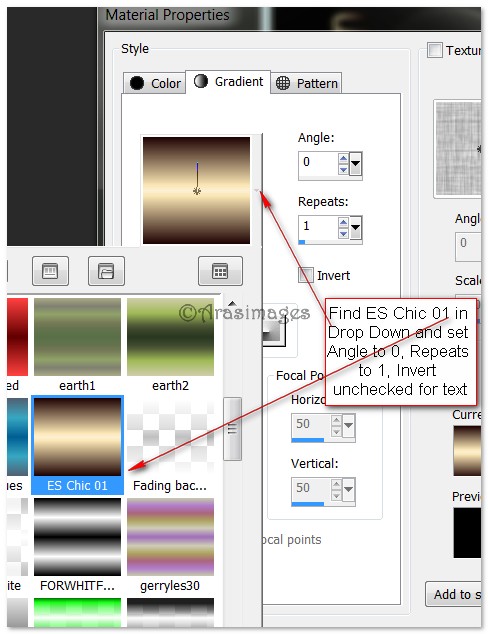
2. Place the ES_Chic_01 Gradient in the Background. Set Angle to 0, Repeats to 1, Style Linear, Invert unchecked.
3. New/New Image of 600px by 700px. Flood fill New Image with Foreground color #000000.
4. Layers/New Raster Layer.
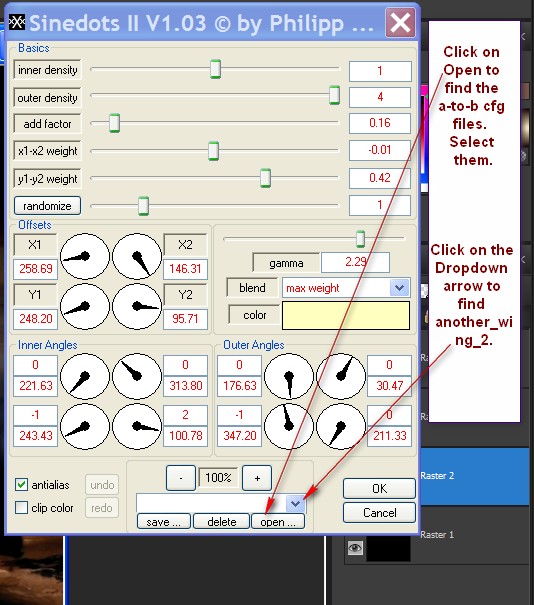
5. Effects/Dragonfly/Sinedots II. Set the Sinedots as in examples below, Using Max Weight and color #ffffbf. Click on Open and find the a-to-b cfg file and click on it. Click on the drop down arrow, find and apply another_wing_2.
6. Lower Opacity to 44. Move a little to the left side.
7. Open nikita_reveries_p_13_04.08.pspimage. Copy/Paste as New Layer.
8. Move water image up a little. Drop Opacity to 70.
9. Open alicia_keys.pspimage. Copy Raster 3 layer/Paste as New Layer.
10. Image/Resize/Resize by 80%/Resize all layers unchecked.
11. Move alicia down a little.
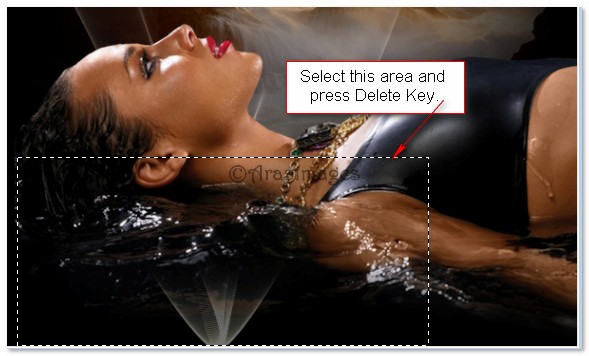
12. Highlight Raster 2. Using Selections tool set to Rectangle/Replace, Feather 0, select the bottom left corner to middle and press Delete key. This removes the excess Sinedot from below lady.
13. Selections/Select None. Highlight the top layer to continue.
14. From Tool bar, Select Font TootsExtended, Size 72, color Gradient. Type out the word Contemplation.

15. Using the turn node in the selected text, turn so word is Vertically placed. Convert to Raster Layer. Move into place on the left side of image.
16. Using the eraser tool, erase the "o" from the word Contemplation.

17. Again using Font TootsExtended, Size 72, color Gradient, type out the word Contemplation as you did in Step #14.
18. Convert to Raster Layer.
19. Move into place over first word Contemplation so the "o" lines up to where it should be in both words.
20. Image/Add Borders/Add 3px border, Symmetric checked, color #eedaab.
21. Image/Add Borders/Add 45px border, Symmetric checked, color #000000.
22. With Magic Wand, select inside the 45px border.
23. Flood fill with Gradient.
24. Effects/VM Experimental/TeeWee. Both settings on 0.
25. Selections/Select None.
26. Image/Add Borders/Add 3px border, Symmetric checked, color #eedaab.
27. Sign your name or leave your watermark if you wish. Merge/Merge Visible if needed. Save as .jpg file.
28. For animation, use instructions as follows.
29. Open Sqirlz program. File/Open Contemplation.jpg.
30. View/set to view 100% for easier work.
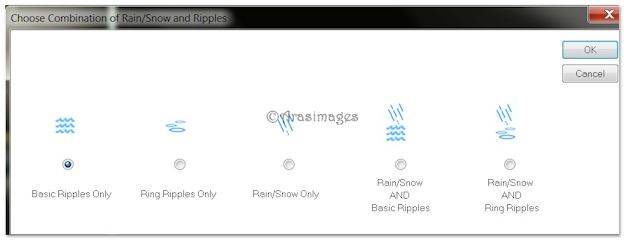
31. Click on the red Y in the top tool bar. Choose Basic Ripples Only/OK.
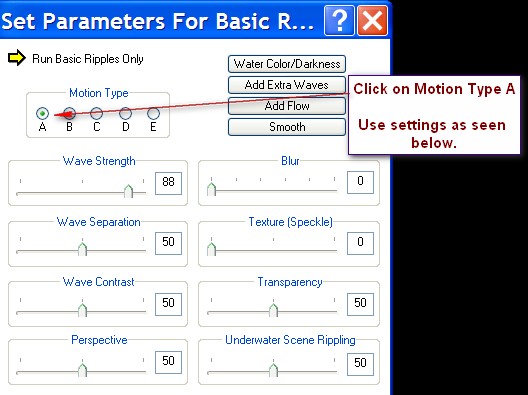
32. Click on the three blue waves in the top tool bar (Customize Basic Ripples) and use settings as seen below.
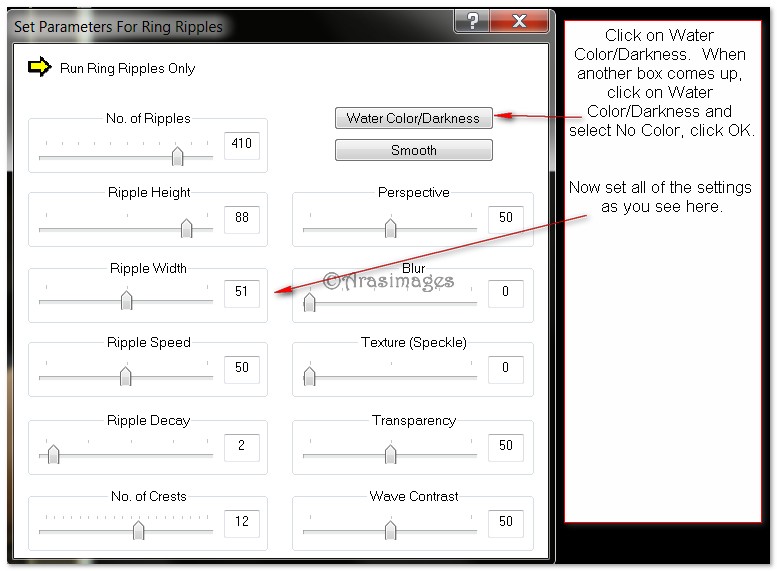
33. Click on the three ring ripples (Customize Ring Ripples) at the top of the tool bar. Click on Water Color/Darkness. When a box comes up, choose No Color and click OK. Set all of the settings as seen below.
34. Click on the top red Oval Tool in tool bar on left and start drawing a line by left clicking around the water you want to animate, right click to close.
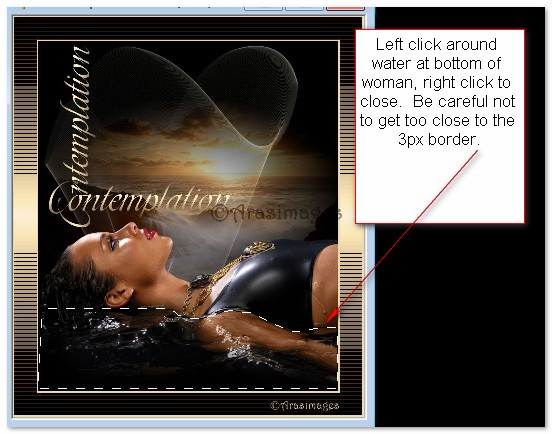
35. Check your animation by clicking on the Yellow Arrow in tool bar. If your animation doesn't please you, click on the big red O at the top of the tool bar on the left and try again. Repeat as many times as you need to in order to get it right. The key is to get as much of the water as possible selected without going into the border.
36. When all appears satisfactory to you, click on the red "gif" at the top tool bar. A box will come up telling you what you are saving as. Click OK. Now Save in: Your Contemplation folder/File name: Contemplation. Click Save.
37. Frame Rate will be left set to 15. Click OK. Now watch your "build".....a box comes up telling you how large the sequence has been saved as. Click OK.
38. You are now finished with your animated tag. Congratulations if this is the first time you have used Sqirlz.
Big hugs go to Evatexas and PamelaD who test my tutorials for me and are my valued advisors.
If you are going to use this tutorial for stationery, cards or place the tutorial/tag on another site, I would appreciate you contacting me for permission, giving Arasimages credit for the original tutorial and if possible, a link back to my site. Thank you.
Copyright © Arasimages All Rights Reserved