
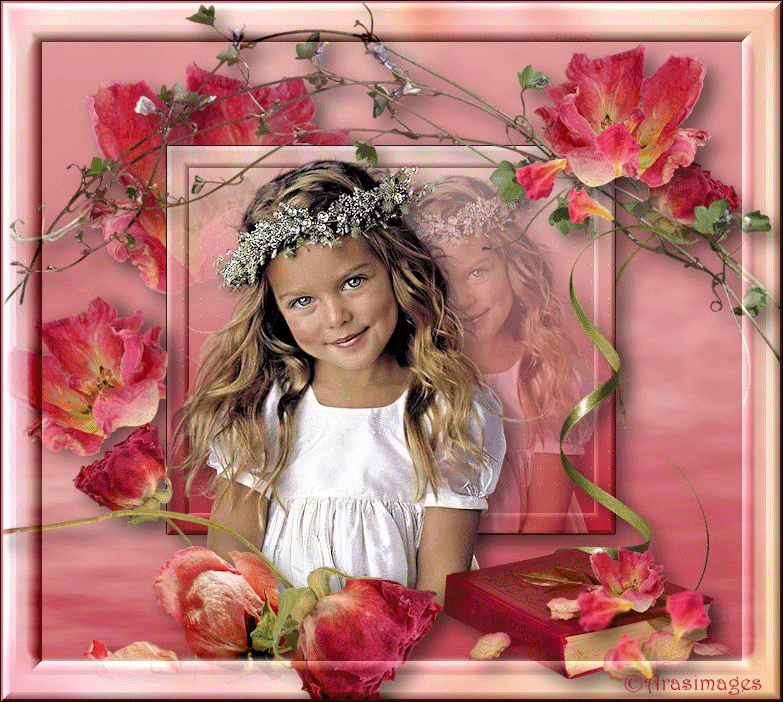
Pretty Petals
For Italian and Danish translation, click on the flags.


For this tutorial you will need the materials in the zip file below.

Unzip the materials into a working folder named Pretty Petals. Open the materials in PSP, copy and close originals. I have used Plugins AlienSkin Xenofex II, Penta and Bordermania. You will need the program Animation Shop if you follow the animation instructions. Check to see if you already have the frame Albumen...if not, place in your PSP/Frames folder. I have used PSPX5 to create this tutorial but you may use an earlier version. It is assumed you have a working knowledge of PSP to follow these directions.
Thanks go to Roby for the little girl image and to the unknown tubers for the other lovely tubes used. If any of these are yours, let me know and I'll be happy to give you credit.
Use the bookmark below to mark your place along the way.

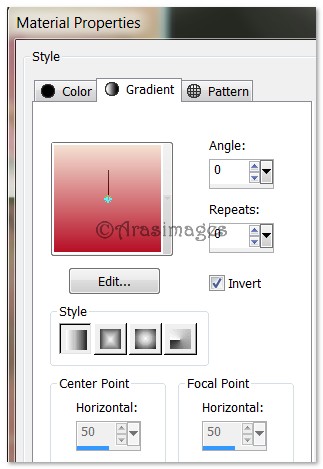
1. In Materials Palette, set Foreground #f4e1d3, Background #b61026. Create Gradient using Style Linear, Angle 0, Repeats 0, Invert checked.
2. New/New Image of 750px by 650px. Flood fill with Gradient.
3. Layers/New Raster Layer. Flood fill with Gradient.
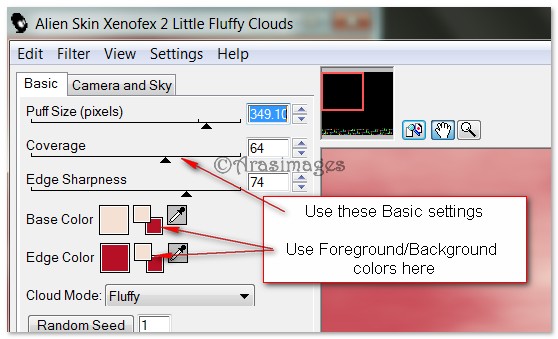
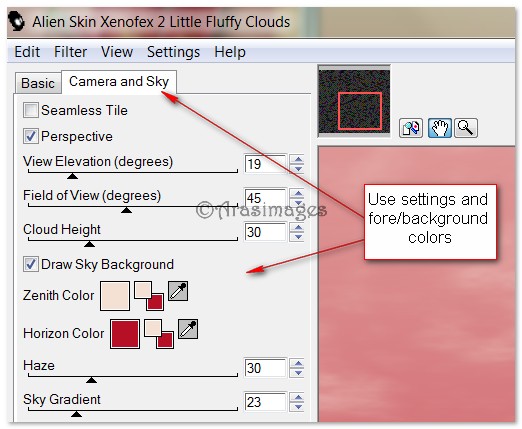
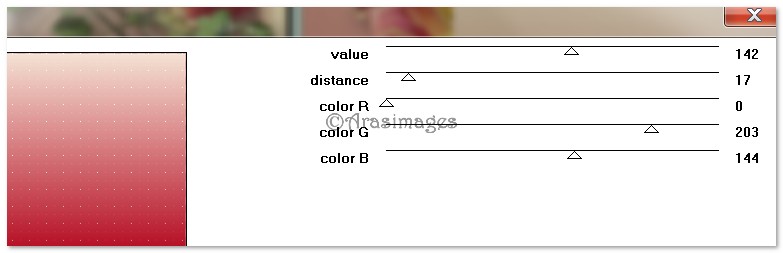
4. Effects/AlienSkin Xenofex II/Fluffy Little Clouds. Use settings as seen in both examples below.
5. Drop Opacity to 75.
6. Adjust/Sharpness/High Pass Sharpen.

7. Open Tulip1.pspimage. Copy/Paste as New Layer.
8. Image/Resize/Resize by 60%/Resize all layers unchecked.
9. Place Tulip1 in upper left corner.
10. Effects/3D Effects/Drop Shadow, Vertical 10, Horizontal 10, Opacity 50, Blur 25, color #000000.
11. Open TallRose.pspimage. Copy/Paste as New Layer.
12. Image/Image Mirror (Flip Horizontal).
13. Image/Resize/Resize by 60%/Resize all layers unchecked.
14. Place TallRose in upper right corner.
15. Effects/3D Effects/Drop Shadow, Vertical 10, Horizontal 10, Opacity 50, Blur 25, color #000000.
16. Layers/New Raster Layer. Flood fill with Gradient.
17. Image/Resize/Resize by 60%/Resize all layers unchecked.
18. Selections/Select All. Float/Defloat.
19. Effects/Penta/Color Dot. Use settings below.
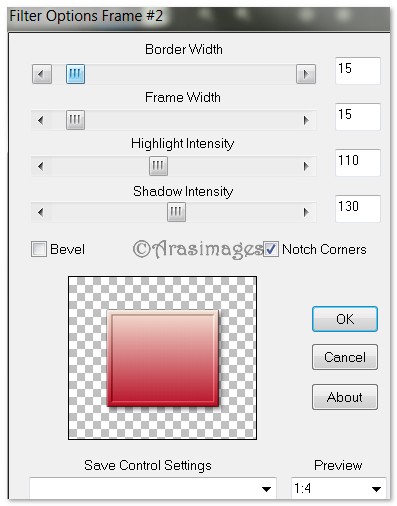
20. Effects/Bordermania/Frame #2. Use settings below.
21. Effects/3D Effects/Drop Shadow, Vertical 10, Horizontal 10, Opacity 50, Blur 25, color #000000.
22. Selections/Select None. Drop Opacity to 80.
23. Open 3-2013 baby by Roby2765.pspimage. Copy/Paste as New Layer.
24. Image/Resize/Resize by 60%/Resize all layers unchecked.
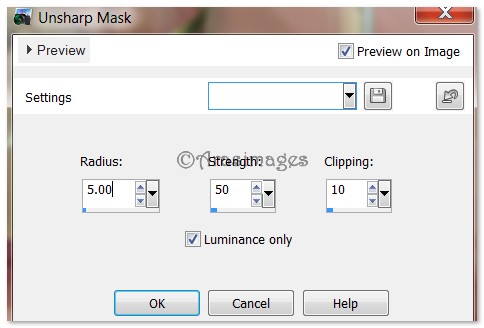
25. Adjust/Shapness/Unsharpen Mask. See settings below.
26. Effects/3D Effects/Drop Shadow, Vertical 10, Horizontal 10, Opacity 50, Blur 25, color #000000.
27. Move a little to the left and down. Duplicate.
28. Image/Resize (little girl duplication)/Resize by 80%, Resize all layers unchecked.
29. Pull duplicated layer beneath the original little girl layer. Drop Opacity to 38.
30. Move little girl to the right, fitting inside the inner rectangle (see my finished tag).
31. Highlight top layer to continue.
32. Open Tulip1.pspimage. Copy/Paste as New Layer.
33. Image/Resize/Resize by 37%, Resize all layers unchecked.
34. Image/Free Rotate/Rotate 30 degrees, Left.
35. Move to left center of image and apply drop shadow as in Step #26.
36. Open TallRose.pspimage. Copy/Paste as New Layer.
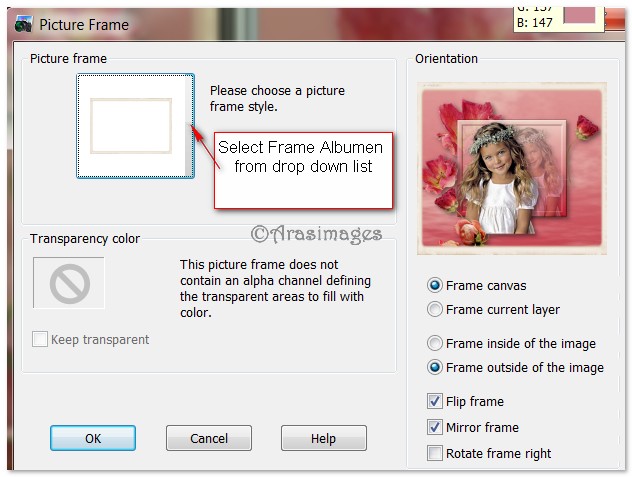
37. Image/Resize/Resize by 60%/Resize all layers unchecked.
38. Apply drop shadow as in Step #26. Move to left side of image near her arm.
39. Open PeachRose.pspimage. Copy/Paste as New Layer.
40. Image/Resize/Resize by 60%/Resize all layers unchecked.
41. Move to left bottom area. Apply drop shadow as in Step #26.
42. Image/Picture Frame. From the drop down, select the frame Albumen. Use settings below.
43. Selections/Select All. Float/Defloat.
44. Open Netting.pspimage. Copy/Paste into Selection.
45. Adjust/Blur/Gaussian Blur, Radial set to 15. Selections/Select None.
46. Open Vines.pspimage. Copy/Paste as New Layer.
47. Apply drop shadow as in Step #26. Place vines at the top of the image.
48. Open Tulip1.pspimage. Copy/Paste as New Layer.
49. Image/Resize/Resize by 37%, Resize all layers unchecked.
50. Image/Image Mirror (Flip Horizontal). Place Tulip1 in upper right corner. Apply drop shadow as in Step #26.
51. Open GreenRibbon.pspimage. Copy/Paste as New Layer.
52. Move ribbon to right side of image. Apply drop shadow as in Step #26.
53. Open BookandFlowers.pspimage. Copy/Paste as New Layer.
54. Image/Resize/Resize by 37%, Resize all layers unchecked.
55. Move book to bottom right corner. Apply drop shadow as in Step #26.
56. Open FallingPetals.pspimage. Copy/Paste as New Layer.
57. Place FallingPetals over the book with petals.
58. Open TallRose.pspimage. Copy/Paste as New Layer.
59. Image/Free Rotate. Rotate Right by 90 degrees.
60. Image/Image Flip. (Flip Vertical). Place at bottom of image.
61. Apply drop Shadow as in Step #26.
62. Image/Add Borders/Add 3px border, Symmetric checked, color #b61026.
63. Effects/Bordermania/Frame #2.

64. Sign your image if you wish. Convert to Raster Layer if necessary and Merge Visible. Save as .jpg file named Pretty Petals in your working folder.
65. Open Animation Shop. File/Open the Pretty Flowers.jpg file. Duplicate image till you have 23 frames.
66. Highlight the first frame, Edit/Select All.
67. File/Open the Pretty Petals Animation file. Highlight the first frame. Edit/Select All. Copy.
68. In First frame of Pretty Flowers .jpg image, right click/Paste into Selected Frame. Place the petals over the ones on the book but just a tiny bit higher or animation will jump when the petals land. I had to repeat this step several times to get them to land nicely.
69. Animation/Reverse Frames. Animation/Frame Properties set at 15.
70. Click on View Animation button to see if all appears to your liking. If so, File/SaveAs. When the box comes up, give your animation the name Pretty Petals and fill in where to save your work. Click Save. When the boxes comes up, click on Next, Next, Next then Finish. Your work is now complete.
Big hugs go to Evatexas and PamelaD who test my tutorials for me and are my valued advisors.
If you are going to use this tutorial for stationery, cards or place the tutorial/tag on another site, I would appreciate you contacting me for permission, giving Arasimages credit for the original tutorial and if possible, a link back to my site. Thank you.
Copyright © Arasimages All Rights Reserved