
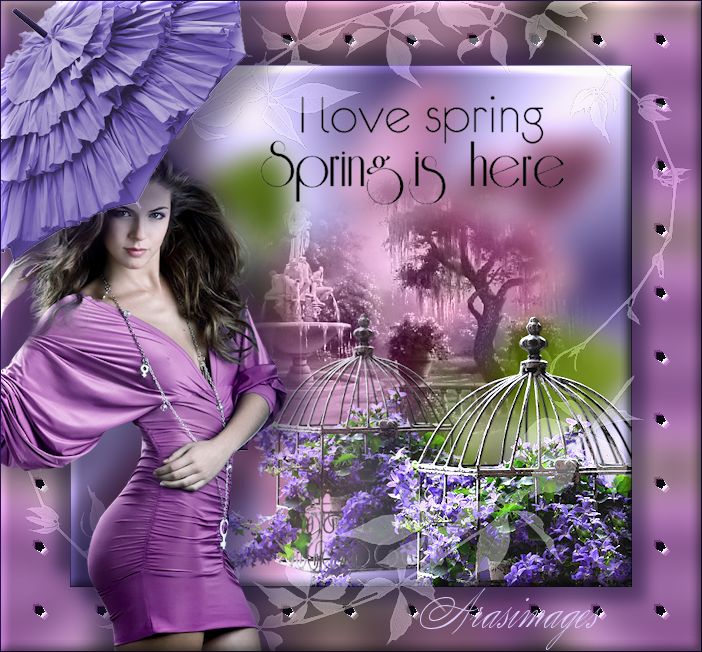
I Love Spring
For Italian, Spanish, French, Danish and German translation, click on the flags.
For this tutorial you will need the materials in the zip file below.
Unzip the materials into a working folder named I Love Spring. Open the materials in PSP, copy and close originals. I have used PSPX4 to create this tutorial but you may use an earlier version. No Plugins are used. It is assumed you have a working knowledge of PSP to follow these directions.
Thanks go to JHanna; SDT and to Silvie for the lovely tubes used.
Use the bookmark below to mark your place along the way.

1. In Materials Palette, set Foreground to #dcd5ff, Background to #392c5b. To create Foreground Gradient, set Style to Radial, Angle 45, Repeats 9, Invert 0.

2. New/New Image of 700px by 650px. Flood fill New Image with Gradient.
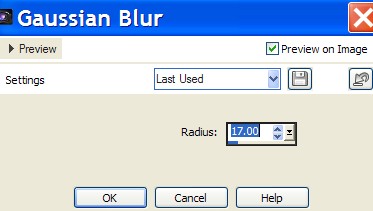
3. Adjust/Blur/Gaussian Blur. Set Radius to 17.
4. Open LilacStems.pspimage. Copy/Paste as New Layer.
5. Image/Resize/Resize by 80%/Resize all layers unchecked.
6. Place to right side of image. Duplicate.
7. Image/Mirror. Image/Flip. Pull into place if needed so Lilacs are as seen below.
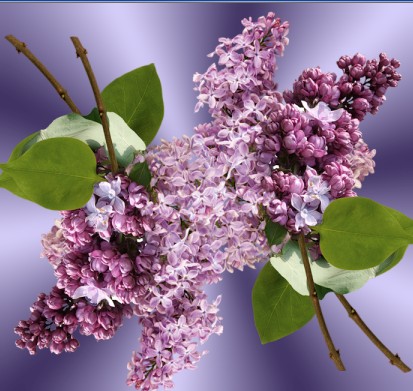
8. Merge/Merge Down.
9. Adjust/Blur/Gaussian Blur. Set Radius to 17.
10. Open FloralGarden_7.11.2007.pspimage. Copy/Paste as New Layer.
11. Move a bit to right in image. Set Blend Mode to Luminance (L).
12. Open JHanna_593 tube.pspimage. Copy/Paste as New Layer.
13. Image/Resize/Resize by 60%, Resize all layers unchecked.
14. Place birdcage in center of image along bottom.
15. Drop Opacity down to 73.
16. Paste birdcage once again as New Layer.
17. Image/Resize/Resize by 80%, Resize all layers unchecked.
18. Move into right bottom corner.
19. Adjust/Sharpness/Sharpen.
20. Open I love spring Text.png image. Copy/Paste as New Layer.
21. Move into position in top right of image.
22. Open Spring is here Text.png image. Copy/Paste as New Layer.
23. Move into position below first text in upper right of image.
24. Image/Add Borders/Add 1px border, Symmetric checked, color #191133. COPY!
25. Open Background.jpg. Paste the copied layer as New Layer on the Background image.
26. Image/Resize/Resize by 80%/Resize all layers unchecked.
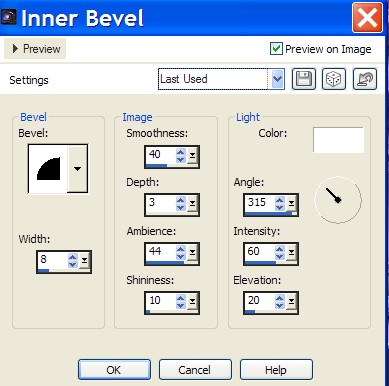
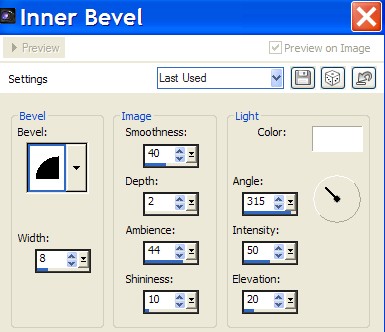
27. Effects/Inner Bevel. Apply Inner Bevel as seen below.
28. Effects/3D Effects/Drop Shadow, Vertical 15, Horizontal 15, Opacity 50, Blur 20, color #191133.
29. Effects/3D Effects/Drop Shadow, Vertical -15, Horizontal -15, Opacity 50, Blur 20, color #191133.
30. Open WhiteVine.pspimage. Copy/Paste as New Layer.
31. Resize/Resize by 80%/Resize all layers unchecked.
32. Set Blend Mode to Luminance (L). Drop Opacity to 40.
33. Move WhiteVine to upper/right side.
34. Duplicate. Image/Mirror. Image/Flip.
35. Open Tube1877_Femme_18_11_08_sdt.pspimage. Copy/Paste as New Layer.
36. Place Femme on left bottom edge of image.
37. Adjust/Sharpness/Sharpen.
38. Effects/3D Effects/Drop Shadow, Vertical -12, Horizontal -24, Opacity 50, Blur 35, color #191133.
39. Effects/3D Effects/Drop Shadow, Vertical 12, Horizontal 24, Opacity 50, Blur 35, color #191133.
40. Open Umbrella.pspimage. Copy/Paste as New Layer.
41. Image/Resize/Resize by 70%/Resize all layers unchecked.
42. Move Umbrella into upper left corner, covering part of the Femme's head.
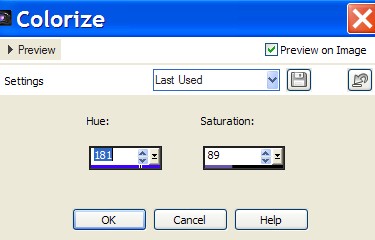
43. Adjust/Hue and Saturation/Colorize. Use settings below.
44. Using Freehand Selection Tool set Point to Point, select around umbrella handle and press Delete Key. Deselect.

45. Effects/3D Effects/Drop Shadow, Vertical 12, Horizontal 24, Opacity 50, Blur 35, color #191133.
46. Image/Add Borders/Add 1px border, Symmetric checked, color #191133.
47. Effects/Inner Bevel. Apply Inner Bevel as seen below.
48. Sign your name or leave your watermark if you wish. Convert to Raster Layer and Merge/Merge Visible if needed.
Big hugs go to Evatexas and PamelaD who test my tutorials for me and are my valued advisors.
If you are going to use this tutorial for stationery, cards or place the tutorial/tag on another site, I would appreciate you contacting me for permission, giving Arasimages credit for the original tutorial and if possible, a link back to my site. Thank you.
Copyright © Arasimages All Rights Reserved


