
Zebra
For Italian and Danish translation, click on the flags.


For this tutorial you will need the materials in the zip file below.

Unzip the materials into a working folder named Zebra. Open the materials in PSP, copy and close originals. I have used PSPX5 to create this tutorial but you may use an earlier version. I have used the Plugin Alien Skin Xenofex2/Burnt Edges. It is assumed you have a working knowledge of PSP to follow these directions.
Thanks go to Silvie, also to Dieter and Marion for their permission to use their lovely tubes, and to our own PamelaD for the baby zebra used.
Use the bookmark below to mark your place along the way.

1. In Materials Palette, set Foreground to #ffffff, Background to #000000.
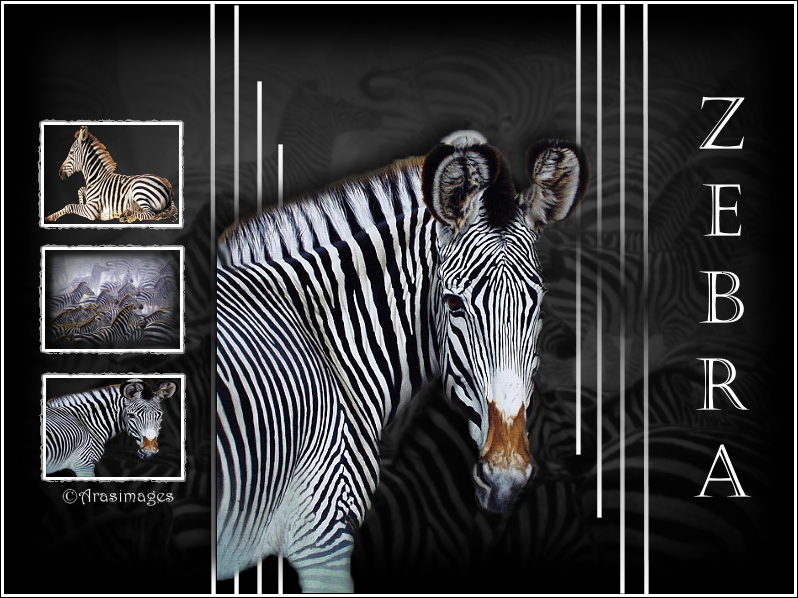
2. New/New Image of 790px by 590px.
3. Flood fill New Image with Background #000000.
4. Layers/New Raster Layer. Selections/Select All.
5. Open mds2255 Zebras.pspimage. Copy/Paste into Selection. Selections/Select None.
6. Set Blend Mode to Luminance (L). Drop Opacity to 28.
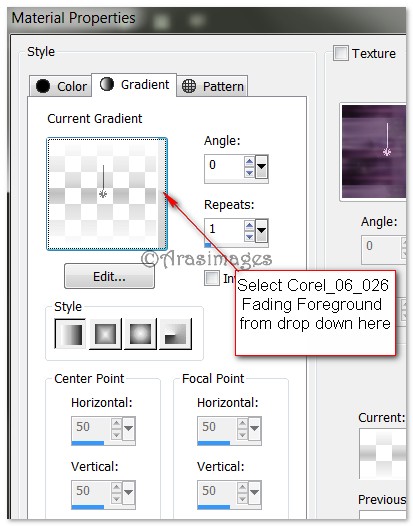
7. In Materials Palette, Set to Foreground to Gradient. From dropdown, choose Corel_06_026 fading foreground.PspGradient. Style Linear/Angle 0/Repeats 1/Invert unchecked.
8. From Tool bar, select the Pen Tool. Use settings as seen below, Line Style/Solid and draw lines as I have done. (Refer to main image). Try to make the lines straight from top to bottom. These can be adjusted using the Pick tool to stretch vertically and move horizontally if necessary.

9. Convert to Raster Layer after each line has been drawn.
10. Merge/Merge Down. Repeat so Raster Layers 3 through 6 are merged together.
11. Duplicate. Image/Image/Mirror/(Flip Horizontal). Image/Image Flip/(Flip Vertical).
12. Pull the left side bars to the right a little.
13. Open Zebra_22.5.2008.pspimage. Copy/Paste as New Layer.
14. Place Zebra to the right of the outer left line, along bottom edge of image.
15. Adjust/Sharpness/Sharpen.
16. Effects/3D Effects/Drop Shadow. Vertical -10, Horizontal -10, Opacity 75, Blur 25, color #000000.
17. Layers/New Raster Layer.
18. Using Selections Tool, Rectangle, Draw a rectangle on the left side of image.

19. Flood fill with Foreground color #ffffff.
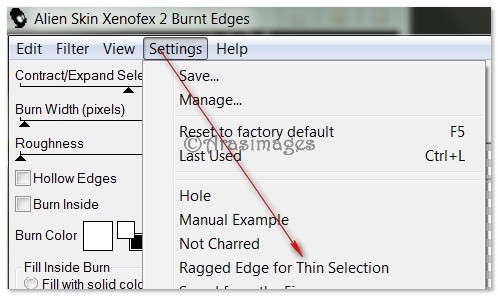
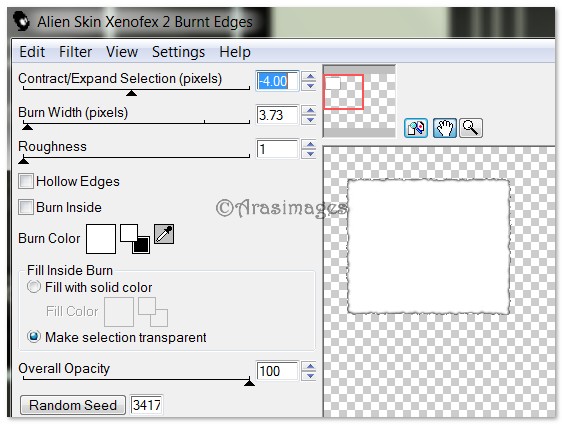
20. Effects/Alien Skin Xenofex 2/Burnt Edges. Apply using settings below.
21. Selections/Modify/Contract. Contract by 3px. Press Delete key. Selections/Select None.
22. Duplicate 2 times. Place the rectangles in left side of image, spacing evenly. (Hint: To get them to be centered, click on the middle rectangle. Go to Objects at the top tool bar/Align/Vertical Center. Then place the top and bottom rectangles above and below equidistantly from center rectangle.)
23. Using Magic Wand, click inside Raster 5 (bottom rectangle).
24. Open Zebra_22.5.2008.pspimage. Copy/Paste into Selection.
25. Selections/Select None.
26. Adjust/Sharpness/Sharpen.
27. Move to Copy of Raster 5 layer. Click inside with Magic Wand.
28. Open mds2255 Zebras.pspimage. Copy/Paste into Selection.
29. Selections/Select None.
30. Adjust/Sharpness/Sharpen.
31. Move to (Copy (2) of Raster 5 layer. Click inside with Magic Wand.
32. Open Zebra_resting_other.pspimage. Copy Tubed layer/Paste into Selection.
33. Selections/Select None.
34. Adjust/Sharpness/Sharpen.
35. From Tool bar, select Text tool. Locate font Castellar. Use Size 72, set Direction to center arrow, color #ffffff. (See example.) Using settings below, type out the word "Zebra".

36. Objects/Align/Vertical Center. Move to center between lines and image edge. Convert to Raster Layer.
37. Image/Add Borders/Add 3px border, Symmetric checked, color #ffffff.
38. Image/Add Borders/add 1px border, Symmetric checked, color #000000.
39. Sign your name or leave your watermark if you wish. Convert to Raster Layer and Merge/Merge Visible if needed.
Big hugs go to Evatexas and PamelaD who test my tutorials for me and are my valued advisors.
If you are going to use this tutorial for stationery, cards or place the tutorial/tag on another site, I would appreciate you contacting me for permission, giving Arasimages credit for the original tutorial and if possible, a link back to my site. Thank you.
Copyright © Arasimages All Rights Reserved