
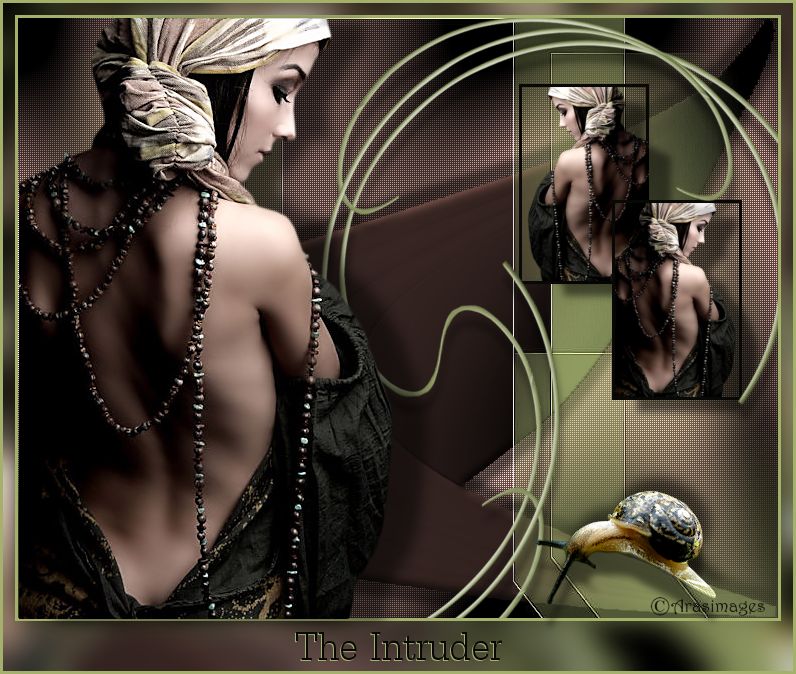
The Intruder
For Italian and Danish translation, click on the flags.


For this tutorial you will need the materials in the zip file below.

Unzip the materials into a working folder named The Intruder. Open the materials in PSP, copy and close originals. I have used the Plugins Graphics Plus and Penta. It is assumed you have a working knowledge of PSP to follow these directions. I have used PSPX5 to create this tutorial but you may use an earlier version.
Thanks go to "Pascale" for her lovely lady tube and to the unknown tubers for use of their tubes used.
Use the bookmark below to mark your place along the way.

1. In Materials Palette, set Foreground to #f9f0dd, Background to #3d2a26.
2. New/New Image of 760px by 600px. Selections/Select All.
3. Open DoorwayBG.jpg. Copy/Paste into Selection. Selections/Select None.
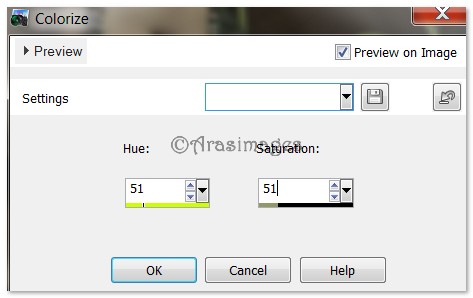
4. Adjust/Hue and Saturation/Colorize. Hue set to 51, Saturation set to 51.
5. Enhance/Edge Effects/Enhance.
6. Layers/New Raster Layer. Flood fill with Background #3d2a26.
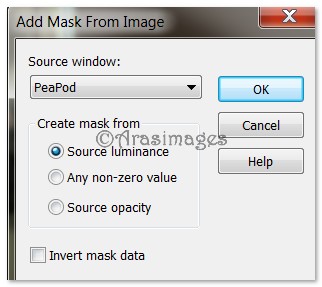
7. Open Peapod.psp and minimize on your work space. Go back to your working Image. Layers/New Mask Layer/From Image. Choose Peapod, click OK.
8. Merge/Merge Group.
9. Selections/Select All. Float/Defloat. Invert.
10 With Magic Wand, click in brown section of image at the top. Keep selected for the next two steps using these settings.

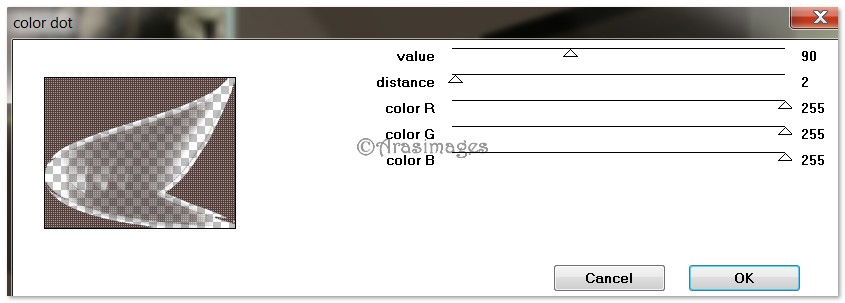
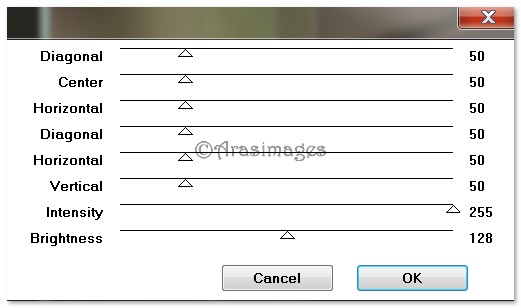
11. Effects/Penta/Color Dot. Apply as shown below.
12. Effects/Graphics Plus/Cross Shadow. Apply as shown below.
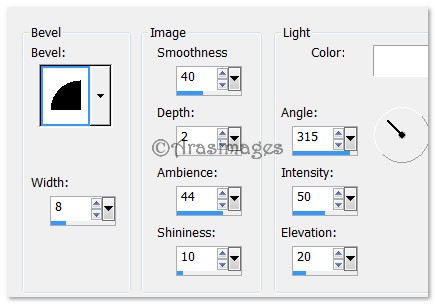
13. Selections/Invert. Apply Inner Bevel twice using settings below.
14. Effects/3D Effects/Drop Shadow. Vertical 15, Horizontal 2, Opacity 50, Blur 11, color #000000.
15. Effects/3D Effects/Drop Shadow. Vertical -15, Horizontal -2, Opacity 50, Blur 11, color #000000.
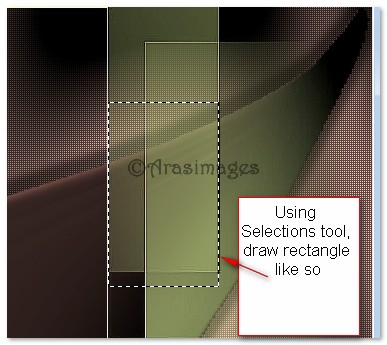
16. Selections/Select None.
17. Layers/New Raster Layer. Flood fill with color #a3b16c.
18. Open DoorwayBG.jpg and minimize on your workspace. Back to your working image. Layers/New Mask Layer/From Image. Choose DoorwayBG, click OK.
19. Merge/Merge Group.
20. Effects/Edge Effects/Enhance.
21. Layers/New Raster Layer. Using Selections tool, draw out a rectangle similar to what I have done. It does not have to be exact as it can be moved to where you like it later. See example below.
22. Keep new Rectangle active. Flood fill with color #080806.
23. Selections/Modify/Contract by 3px. Press Delete key once.
24. Layers/New Raster Layer.
25. Open PPT20_12_-7_Dreaming.pspimage. Image/Mirror (or Flip Horizontal depending on which PSP you are using). Copy/Paste into Selection. Selections/Select None.
26. The woman should be in the box facing left.
27. Effects/3D Effects/Drop shadow of Vertical 15, Horizontal 22, Opacity 50, Blur 11, color #000000.
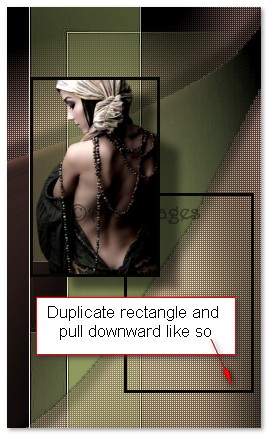
28. Duplicate Raster 2 of Rectangle. Using Move tool, pull duplicated rectangle downward like so.
29. Using Magic Wand (with default settings), click inside the duplicated Rectangle to activate it.
30. Layers/New Raster Layer. Again Paste the woman into Selection. Leave her facing right. Deselect.
31. Apply a drop shadow of Vertical 15, Horizontal 22, Opacity 50, Blur 11, color #000000.
32. Open GreenSwirl.pspimage. Copy/Paste as New Layer.
33. Adjust/Hue and Saturize/Colorize. Hue at 51, Saturation at 51.
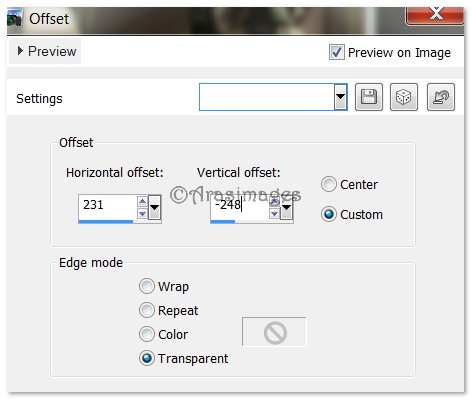
34. Effects/Image Effects/Offset. Use settings below.
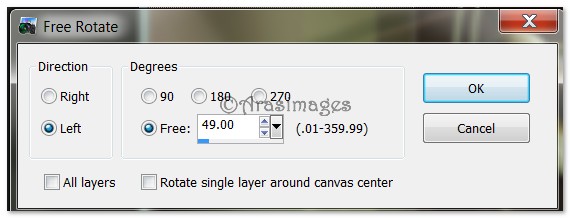
![]()
35. Duplicate. Image/Flip (Image Vertical). Image/Mirror (Image Horizontal).
36. Effects/Image Effects/Offset. Use settings below.
![]()
37. Merge/Merge Down. Apply Drop Shadow, Vertical 15, Horizontal 2, Opacity 50 Blur 11, color #000000.
38. Open Snail.pspimage. Copy/Paste as New Layer.
39. Image/Resize/Resize by 50%, Resize all layers unchecked.
40. Image/Free Rotate. See example below.
41. Effects/Image Effects/Offset. Use settings below.
42. Effects/3D Effects/Drop Shadow. Vertical -15, Horizontal 8, Opacity 50, Blur 17, color #000000.
43. Effects/3D Effects/Drop Shadow. Vertical 24, Horizonal 0, Opacity 50, Blur 10, color #000000.
44. Open PPT20_12_07_Dreaming.pspimage. Copy/Paste as New Layer.
45. Pull lady to fit in right side of image.
46. Effects/3D Effects/Drop Shadow, Vertical 3, Horizontal 35, Opacity 50, Blur 20, color #000000.
47. Image/Add Borders/Add 3px border, Symmetric Checked, color #a3b16c.
48. Image/Add Borders/Add border 12px top and sides, bottom of 50px, Symmetric unchecked, color #000000.
49. Select with Magic Wand to activate large border. Layers/New Layer.
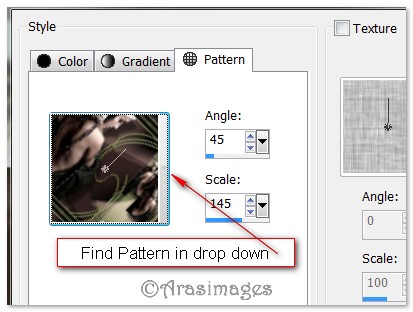
50. In Background of Materials Palette, set to Pattern. Use dropdown to find your working image. See below.
51. Flood fill border with Pattern.
52. Adjust/Blur/Gaussian Blur, Radial set to 14. Selections/Select None.
53. Image/Add Borders/Add 3px border, Symmetric checked, color #a3b16c.
54. From Tool bar, select the Text tool. Choose DilleniaUPC (upcdl.ttf), Size 60, color #080806.

55. Type the words "The Intruder".
56. Objects/Align/Center Horizontal/(in border bottom.) Convert to Raster Layer.
57. Repeat Steps #54, #55 and #56 with color #a3b16c, and move a pixel or two to the left of first text for shadow effect. Use the arrow keys for ease of placement before Converting to Raster Layer.
58. Layers/Arrange/Move Down.
59. Sign your name or leave your watermark if you wish. Convert to Raster Layer and Merge/Merge Visible if needed.
Big hugs go to Evatexas and PamelaD who test my tutorials for me and are my valued advisors.
If you are going to use this tutorial for stationery, cards or place the tutorial/tag on another site, I would appreciate you contacting me for permission, giving Arasimages credit for the original tutorial and if possible, a link back to my site. Thank you.
Copyright © Arasimages All Rights Reserved