
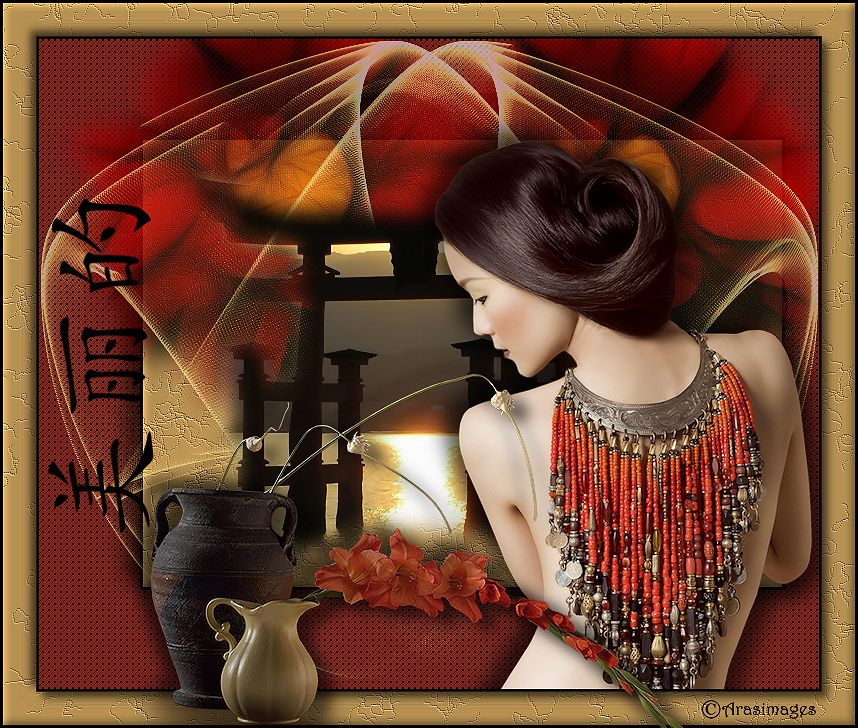
Beautiful
For Italian, French, Dutch and Danish translations, click on the flags.


For this tutorial you will need the materials in the zip file below.

Unzip the materials into a working folder named Beautiful. Open the materials in PSP, copy and close originals. Place Selection ArasimagesBeautiful in your Selectins folder, CFG file into your Dragonfly/SinedotsII folder and export the Chinese Symbol for Beautiful as a Brush. I have used PSPX5 to create this tutorial but you may use an earlier version. Plugins used are Dragonfly/SinedotsII, Redfield/Fractalius and VM Experimental. It is assumed you have a working knowledge of PSP to follow these directions. NOTE: Image/Mirror is now Image Horizontal in PSPX4 and PSPX5) and will flip your image in place so you will have to move it using the move tool or arrow keys. Older versions of PSP will mirror the image for you.
Thanks go to K@rine_Dre@ms , Sorensen_Designs and to Maryse for the lovely tubes used.
Use the bookmark below to mark your place along the way.

1. In Materials Palette, set Foreground to #ba9455, Background to #7c2219.
2. New/New Image 780px by 650px. Flood fill with Background color #7c2219.
3. Effects/VM Experimental/Magnetic Detection.
4. Layers/New Raster Layer.
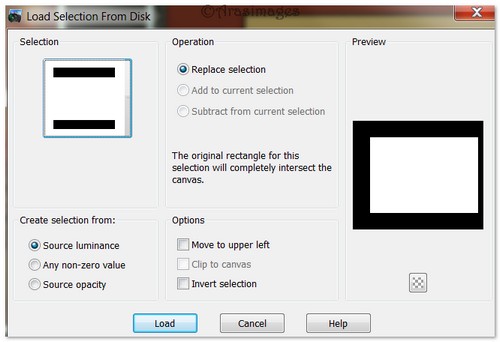
5. Selections/Load/Save Selection/Load Selection from Disk. Choose Selection ArasimagesBeautiful. Load.
6. Flood fill Selection with Foreground color #ba9455. Keep selected.
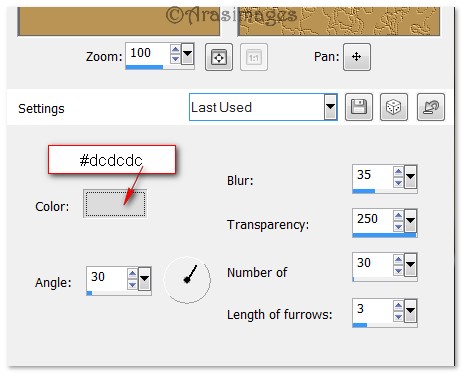
7. Effects/Texture Effects/Fine Leather. Color #dcdcdc.
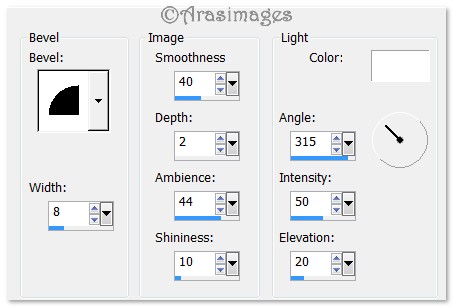
8. Effects/3D Effects/Inner Bevel.
9. Layers/New Raster Layer. Flood fill with #000000.
10. Selections/Modify/Contract by 3px. Press Delete key once.
11. Selections/Select None. Merge/Merge Down.
12. Effects/3D Effects/Drop Shadow. Vertical 12, Horizontal 15, Opacity 60, Blur 28, color #000000.
13. Effects/3D Effects/Drop Shadow. Vertical -12, Horizontal -15, Opacity 60, Blur 28, color #000000.
14. Open Misted_By_Sorensen_Designs_Bright_Red_Flower_April 140-08.pspimage. Copy/Paste as New Layer.
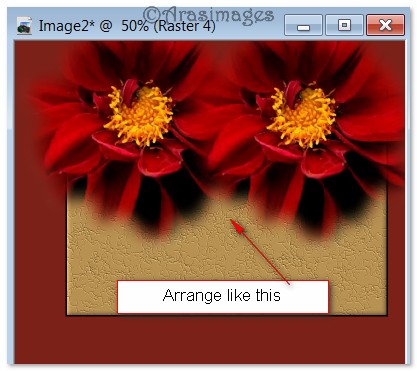
15. Duplicate and arrange flowers evenly across top of Selection. Layers/Merge/Merge Down.
16. Effects/Redfield/Fractalius.
17. Drop Opacity down to 85%.
18. Layers/New Raster Layer.
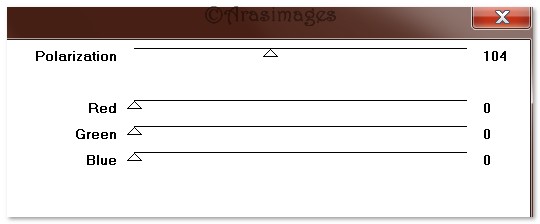
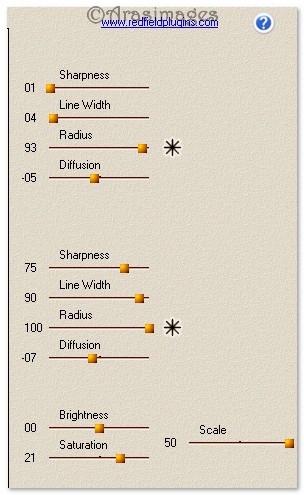
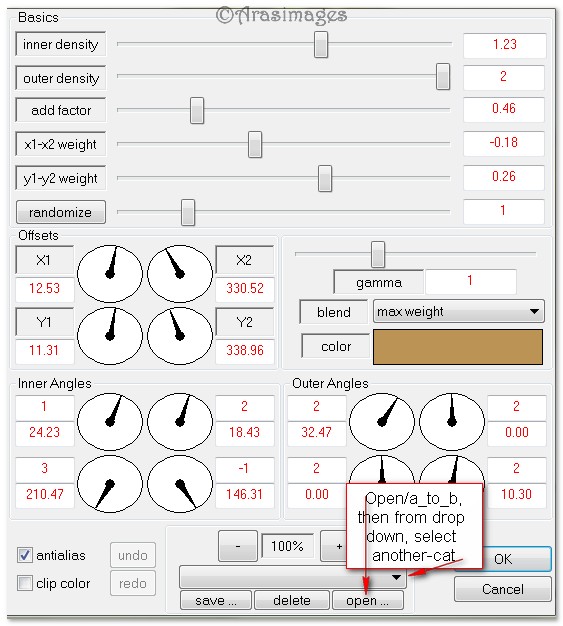
19. Effects/Dragonfly/SinedotsII. Click on "open" at the bottom and select a_to_b CFG file. Click on drop down and choose "another-cat". Set color to #ba9455 and use settings below. Click OK.
20. Drop Opacity of Sinedots down to 60.
21. Open Misted By Sorensen_Designs Japan One April 160-08.pspimage. Copy/Paste as New Layer.
22. Open k@rine_dreams_Asiatique_Woman_1312_Novembre_2012.pspimage. Copy/Paste as New Layer.
23. Image/Resize/Resize by 80%/Resize all layers unchecked.
24. Image/Mirror. Place woman to right side of image.
25. Adjust/Sharpness/Sharpen.
26. Effects/3D Effects/Drop Shadow. Vertical 12, Horizontal 15, Opacity 60, Blur 28, color #000000.
27. Effects/3D Effects/Drop Shadow. Vertical -12, Horizontal -15, Opacity 60, Blur 28, color #000000.
28. Layers/New Raster Layer.
29. From Tool bar, select the Paint Brush tool. From drop down, choose the Brush Chinese Symbol for "Beautiful" . Using the settings below, color #000000, stamp on left side of your image.

30. Image/Add Borders/Add 3px border, Symmetric checked, color #000000.
31. Image/Add Borders/Add 33px border, Symmetric checked, color #ba9455.
32. Select 33px border with Magic Wand to activate it.
33. Effects/Texture Effects/Fine Leather using settings as in Step #7.
34. Selections/Invert.
35. Effects/3D Effects/Drop Shadow, Vertical 6, Horizontal 6, Opacity 60, Blur 12, color #000000.
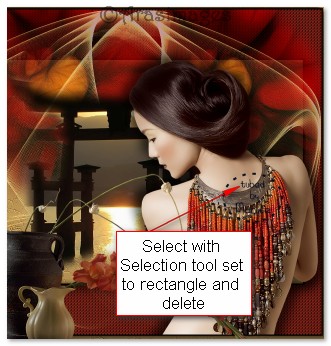
36. Effects/3D Effects/Drop Shadow, Vertical -6, Horizontal -6, Opacity 60, Blur 12, color #000000.
37. Selections/Select None.
38. Image/Add Borders/Add 3px border, Symmetric checked, color #000000.
39. Image/3D Effects/Inner Bevel as in Step #8.
40. Open MR_Glaieuls.pspimage. Copy/Paste as New Layer.
41. Using Selection tool set to Rectangle, select the "tubed by Maryse" and delete it off your image. Deselect.
42. Image/Resize/Resize by 90%/Resize all layers unchecked.
43. Move vases to bottom as I have done in my image.
44. Effects/3D Effects/Drop Shadow, Vertical 10, Horizontal 15, Opacity 60, Blur 20, color #000000.
45. Effects/3D Effects/Drop Shadow, Vertical -10, Horizontal -15, Opacity 60, Blur 20, color #000000.
46. Adjust/Sharpness/Sharpen.
47. Sign your name if you wish. Merge/Merge Visible.
48. Adjust/Sharpness/Sharpen.
49. File/Save As/.jpg file or file of your choice.
Thank you Evatexas and PamelaD for testing my tutorials and being my valued advisors.
If you are going to use this tutorial for stationery, cards or place the tutorial/tag on another site, I would appreciate you contacting me for permission, giving Arasimages credit for the original tutorial and if possible, a link back to my site. Thank you.
Copyright © Arasimages All Rights Reserved