
Not My Style
For Italian, Danish, Dutch and French translation, click on the flags.


For this tutorial you will need the materials in the zip file below.

Unzip the materials into a working folder named "Not my Style". Open the materials in PSP, copy and close originals. Place the Brushes included in materials into your PSP Brushes folder and the 8-cmv texture into your PSP Texture folder. I have used PSPX5 to create this tutorial but you may use an earlier version. Plugin Simple is used in this tutorial. For the animation you will need Animation Shop. It is assumed you have a working knowledge of PSP to follow these directions. NOTE: Image/Mirror is now Image Horizontal in PSPX4 and PSPX5 and will flip your image in place so you will have to move it using the move tool or arrow keys. Older versions of PSP will mirror the image for you.
Thanks go to Silvie and to the unknown tubers of scraps for the lovely tubes used.
Use the bookmark below to mark your place along the way.

1. In Materials Palette, set Foreground to #eaf4fa, Background to #6f0000.
2. New/New Image 700px by 536px. Flood fill with Background color #6f0000.
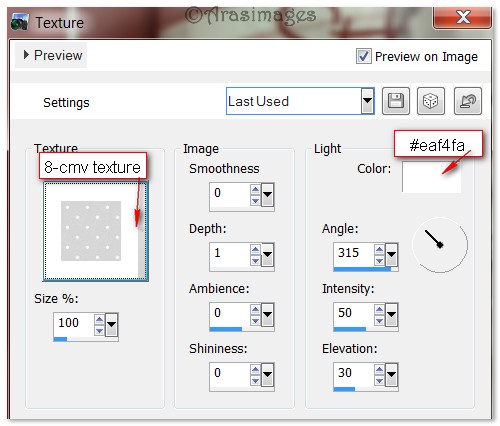
3. Effects/Texture Effects/Texture. Select Texture 8-cmv from drop down and use settings below.
4. Effects/Edge Effects/Enhance. Repeat.
5. Layers/New Raster Layer. Flood fill with Foreground #eaf4fa.
6. Open mask edith 29.jpg image. Leave open on the work space.
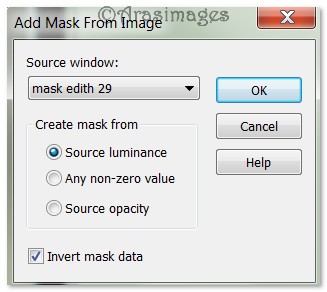
7. Layers/New Mask Layer/from Image. Select the mask edith 29 Mask from the drop down. Merge/Merge Group.
8. Image/Resize/Resize by 90%/Resize all layers unchecked.
9. Effects/Edge Effects/Enhance. Repeat.
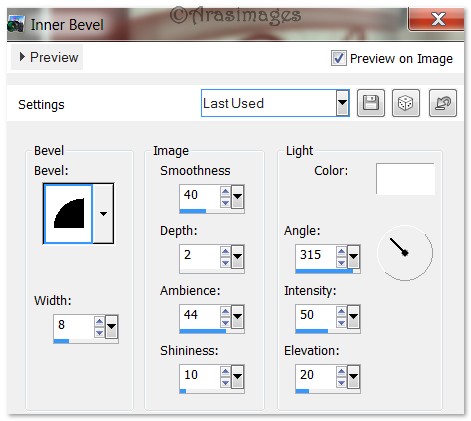
10. Effects/3D Effects/Inner Bevel. Use settings below.
11. Effects/3D Effects/Drop Shadow. Vertical -10, Horizontal -20, Opacity 50, Blur 15, color #000000.
12. Layers/New Raster Layer.
13. From Tool bar, select Paint Brush. From the brush drop down, select Vector Blue Background eps brush. Use settings seen below.

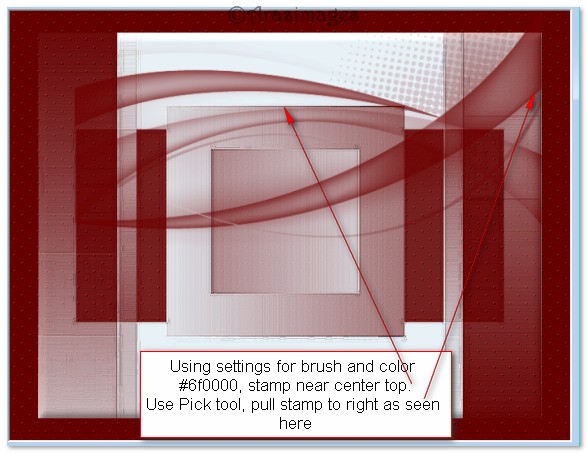
14. Using Background color #6f0000, right click/stamp as shown below. Using Move tool, pull stamped Vector Blue BG eps into place.
15. Layers/New Raster Layer.
16. From Tool bar, select Paint Brush. From the brush drop down, select agi_wb_Style brush. Using settings as seen below, using Background color #ef0000, right click/stamp where I have placed mine. Use Move tool to place if necessary.

17. Open Lady1.pspimage. Copy/Paste as New Layer.
18. Pull Lady1 a little to the right side of image.
19. Effects/3D Effects/Drop Shadow. Vertical -10, Horizontal -20, Opacity 50, Blur 24, color #000000.
20. Image/Add Borders/Add 3px border, color #eaf4fa, Symmetric checked.
21. Image/Add Borders/Add 50px border, color #6f0000, Symmetric checked.
22. Activate 50px border with Magic Wand.
23. Effects/Texture Effects/Texture. Use settings as in Step #3.
24. Effects/Edge Effects/Enhance. Repeat.
25. Effects/3D Effects/Drop Shadow. Vertical 10, Horizontal 10, Opacity 50, Blur 15, color #000000.
26. Effects/3D Effects/Drop Shadow. Vertical -10, Horizontal -10, Opacity 50, Blur 15, color #000000.
27. Selections/Invert. Layers/New Raster Layer. Flood fill with Foreground color #eaf4fa.
28. Selections/Modify/Contract by 3. Press Delete key once. Deselect.
29. Image/Add Borders/Add 3px border, Symmetric checked, color #eaf4fa.
30. Open pearls_in_row.pspimage. Copy/Paste as New Layer.
31. Image/Resize/Resize by 50%/Resize all layers unchecked.
32. Place in upper left corner. Duplicate.
33. Image/Free Rotate. Rotate Left by 90 degrees. Adjust in top left corner, equidistant between 3px borders.

34. Merge/Merge Down. Apply Drop Shadow of Vertical 10, Horizontal 10, Opacity 50, Blur 15, color #000000.
35. Effects/Simple/Top Left Mirror.
36. Sign your name or leave your watermark if you wish. Merge/Merge Visible.
37. Adjust/Sharpness/Sharpen. Save your work as a .jpg or .png file named Not my Style.
ANIMATION
1. In Animation Shop, open your Not my Style file. Using the Duplicate icon in the tool bar, duplicate your image so you have 23 frames.

2. File/Open Pearls.gif file. Highlight first frame by left clicking on it. Edit/Select All. Right click on blue bar at the top and Copy.
3. On your main image, left click within the first frame, highlight and Edit/Select All.
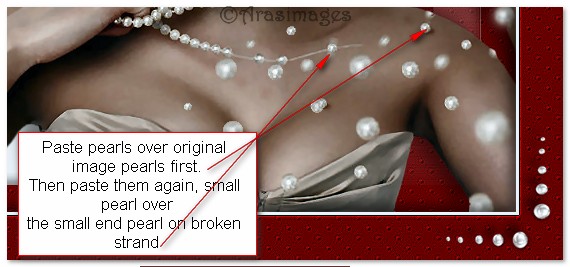
4. Right click in first frame of main image, Paste/Into Selected Frame, placing pearls in animation (matching) on top of the pearls in image, Left click to set in place.
5. Right click in first frame of main image again, placing pearls so top little pearl in the animation file is over the end pearl of the broken strand as shown in example below. OR...you might want to play with the setting of the pearls into place to get a different effect.
6. Set Animation/Frame Properties speed at default 10.
7. Click on the Animation icon to animate your image to check your work. If all is as you like, then we will now save your work.
8. File/Save As. When the box comes up, under Save in, have your working folder showing, under File name put Not my Style and Save as Type will show saving as a .gif file. Click Save. As the boxes come up, click Next three times, then Finish. Your animated file is now saved in your working folder as Not my Style.
I hope you have had fun with this tutorial. You are now finished!
Thank you Evatexas and PamelaD for testing my tutorials and being my valued advisors.
If you are going to use this tutorial for stationery, cards or place the tutorial/tag on another site, I would appreciate you contacting me for permission, giving Arasimages credit for the original tutorial and if possible, a link back to my site. Thank you.
Copyright © Arasimages All Rights Reserved