
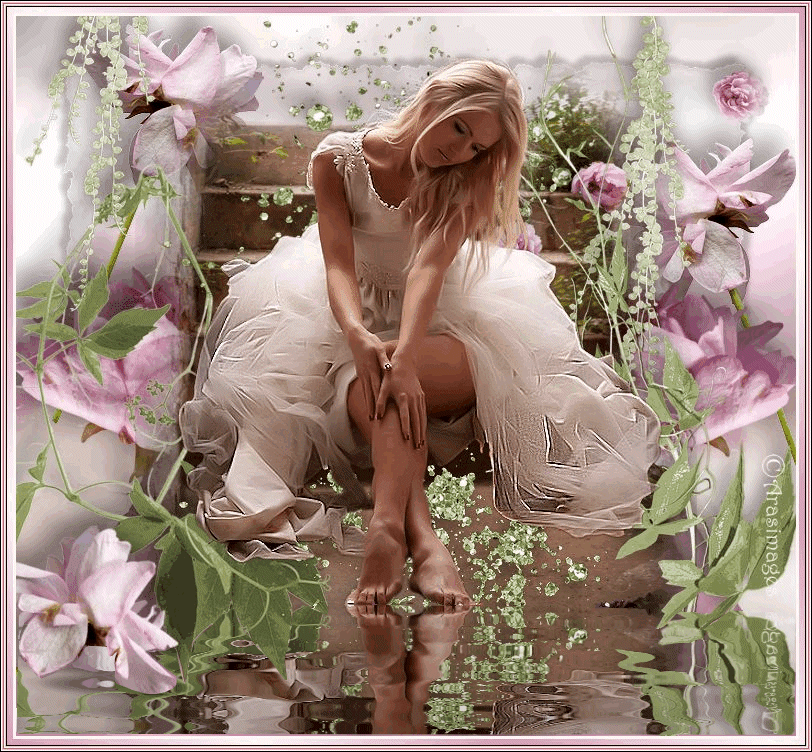
My Secret Place
For Italian, Danish and French translation, click on the flags.


For this tutorial you will need the materials in the zip file below.

Unzip the materials into a working folder named "My Secret Place". Open the materials in PSP, copy and close originals. I have used PSPX5 to create this tutorial but you may use an earlier version. Plugins AlienSkin Xenofex 2/Burnt Edges, Graphics Plus/Cross Shadow, AAA Frames/Frame Works, Mura's Meister/Perspective Tiling and Flaming Pear/Hue and Cry are used in this tutorial. For the animation you will need Sqirlz Water Reflection program which you may find here: http://janaly.com/Filtres/Filtre.html. It is assumed you have a working knowledge of PSP to follow these directions. NOTE: Image/Mirror is now Image Horizontal in PSPX4 and PSPX5 and will flip your image in place so you will have to move it using the move tool or arrow keys. Older versions of PSP will mirror the image for you.
Thanks go to Roby2765 for the girl tube and to the unknown tubers of scraps for their lovely tubes used.
Use the bookmark below to mark your place along the way.

1. In Materials Palette, set Foreground to #fef8f7, Background to #dd98b4.
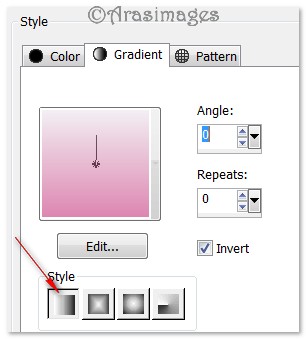
2. Create a Gradient using the Foreground/Background colors, Style Linear, Angle 0, Repeats 0, Invert checked.
3. New/New Image 780px by 720px. Flood fill with Gradient.
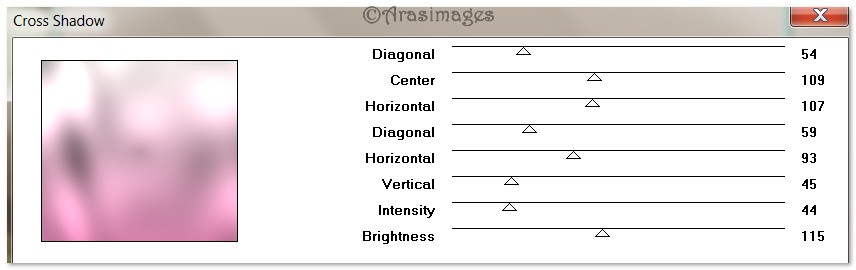
4. Effects/Graphic Plus/Cross Shadow. Use settings below.
5. Layers/New Raster Layer. Flood fill with Gradient.
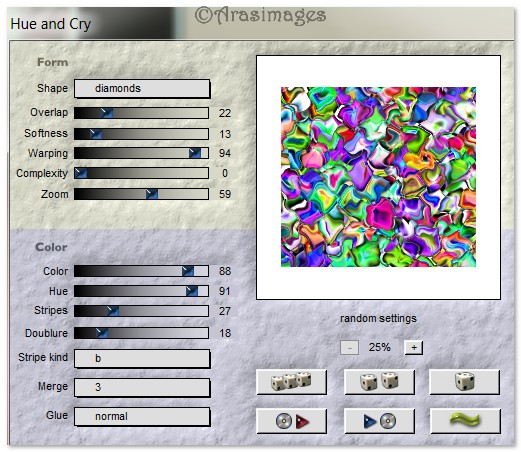
6. Effects/Flaming Pear/Hue and Cry. Use settings below.
7. Set Opacity to 22, Blend Mode to Luminance (Legacy).
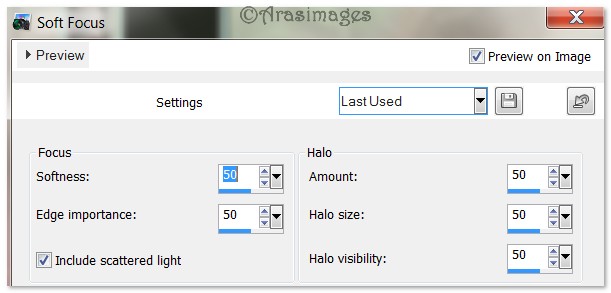
8. Adjust/Sofness/Soft Focus. Use settings below.
9. Adjust/Blur/Gaussian blur, Radius set to 6.
10. Effects/AlienSkin Xenofex 2/Burnt Edges. Use settings below.

11. Image/Resize/Resize by 90%/Resize all layers unchecked.
12. Effects/3D Effects/Drop Shadow, Vertical 7, Horizontal 7, Opacity 100, Blur 7, color #000000.
13. Effects/3D Effects/Drop Shadow, Vertical -7, Horizontal -7, Opacity 100, Blur 7, color #000000.
14. Effects/Edge Effects/Enhance.
15. Open RoughPaper.pspimage. Copy/Paste as New Layer.
16. Apply a Drop Shadow of V -15, H -15, O 40, B 35, color #000000. Repeat with V 15, H 15, all others the same.
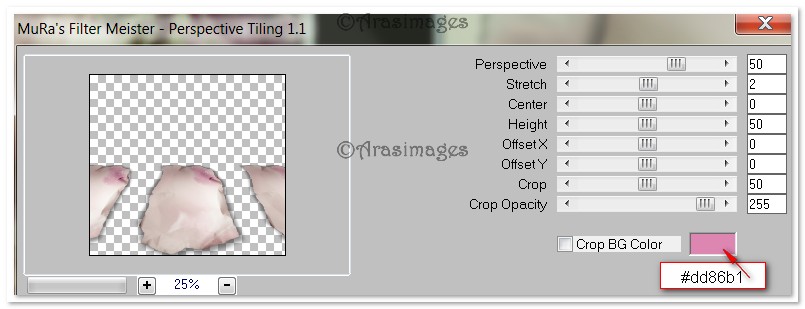
17. Effects/MuRa's Filter Meister-Perspective Tiling. Use settings below.
18. Open RoseOnStem.pspimage. Copy/Paste as New Layer.
19. Move to upper left corner. Apply Drop Shadow V -15, H -15, O 40, B 35, color #000000.
20. Paste again as New Layer. Image/Mirror. Place on right side a little lower than the first RoseOnStem.
21. Apply Drop Shadow V -15, H -15, O 40, B 35, color #000000.
22. Open Rose.pspimage. Copy/Paste as New Layer.
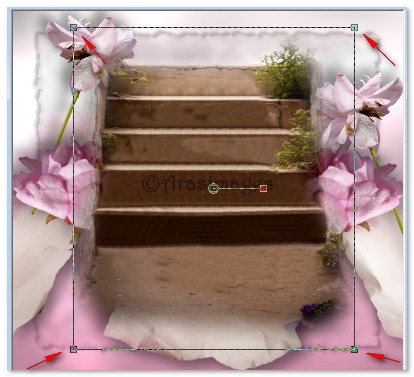
23. Image/Resize/Resize by 50%, Resize all layers unchecked.
24. Move to center right side of image.
25. Apply Drop Shadow V -15, H -15, O 40, B 35, color #000000.
26. Paste again as New Layer. Repeat steps #23 and 25.
27. Image/Miror. Move to center left side of image.
28. Open 73-2013 woman by Roby2765.pspimage. Copy Raster 2 (steps). Paste as New Layer.
29. Using Pick tool, pull upward on steps to resize them as seen in example below.
30. Open CascadingLeaves.pspimage. Copy/Paste as New Layer.
31. Adjust/Hue and Saturation/Colorize. Hue set to 51, Saturation to 67.
32. Image/Resize/Resize by 90%/Resize all layers unchecked.
33. Move leaves to left side of image. Apply Drop Shadow as in Step #25, changing Blur to 30.
34. Open RoseOnStem.pspimage. Copy/Paste as New Layer.
35. Image/Mirror.
36. Image/Free Rotate Right by 75 degrees, all layers unchecked.
37. Place RoseOnStem in bottom left corner. Apply Drop Shadow V 15, H 15, O 40, B 30, color #000000.
38. Apply Drop Shadow again, changing only V to -15, H to -15.
39. Open GreenSplash.pspimage. Copy/Paste as New Layer.
40. Image/Resize/Resize by 80%/Resize all layers unchecked.
41. Apply Drop Shadow V -11, H -7, O 40, B 25, color #000000.
42. Place GreenSplash upward toward top of image. Duplicate.
43. Image/Flip. Adjust/Sharpness/Sharpen.
44. Open SmallRoses.pspimage. Copy/Paste as New Layer.
45. Place in upper right quadrant. Apply Drop Shadow as in Step #41.
46. Open GreenVine.pspimage. Copy/Paste as New Layer.
47. Place in right side of image. Adjust/Hue and Saturation/Colorize. Set Hue to 51, Saturation to 67.
48. Apply Drop Shadow as in Step #41.
49. Open CascadingBuds.pspimage. Copy/Paste as New Layer.
50. Place in upper right side of image. Apply Drop Shadow as in Step #41.
51. Paste again as New Layer. Apply Drop Shadow as above. Place in upper left corner. See my finished tutorial as example.
52. Open 73-2013 woman by Roby2765.pspimage. Copy Raster 3/Paste as New Layer.
53. Image/Resize/Resize by 110%/Resize all layers unchecked.
54. Adjust/Sharpness/Sharpen. Place woman in center of image.
55. Image/Add Borders/Add 3px border, Symmetric checked, color #fef8f7.
56. Image/Add Borders/Add 10px border, Symmetric checked, color #dd86b1.
57. Select the 10px border with Magic Wand to activate it.
58. In Materials Palette, change the Gradient to Angle 45, Repeats 5. Flood fill 10px border with new Gradient.
59. Selections/Select None. Image/Add Borders/3px border, Symmetric checked, color #fef8f7.
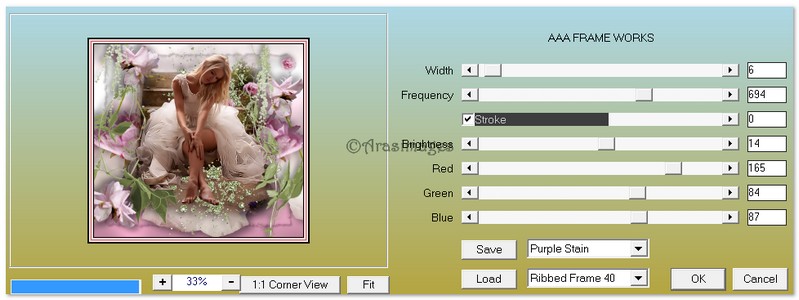
60. Effects/AAA Frames/Frame Works. Use settings below.
61. Sign your name or leave your watermark if you wish. Merge/Merge Visible if needed. Save as .jpg file named My Secret Place.
ANIMATION
1. Open Sqirlz Water Reflections. File/Open My Secret Place .jpg file.
2. From the Tool bar on the left, select the red Circle to begin outlining the portion of the image we want animated. Using the left click of the mouse, click all around the area you wish to have animated. Right click to close.
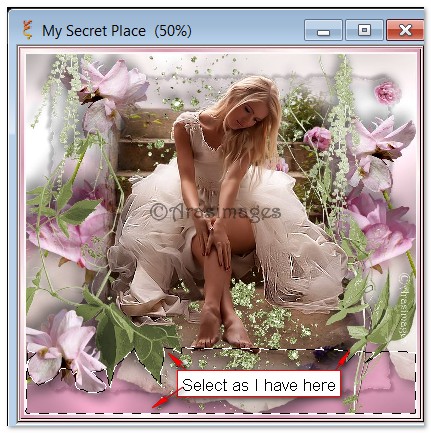
3. Click on the 7 colored dots along top to set frame animation to 20.
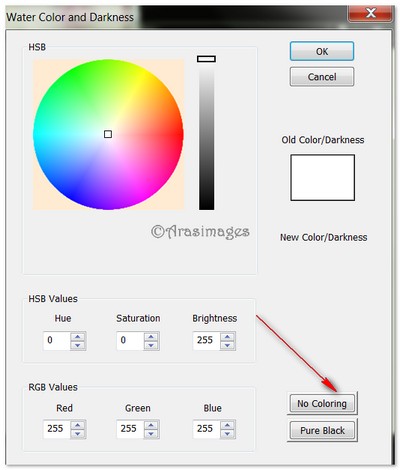
4. Click on the blue waves to set Motion Type to A. To change your settings for the way the ripples will appear (use example shown) then click on Water Color/Darkness. When the next box appears, select No Coloring. Click OK.
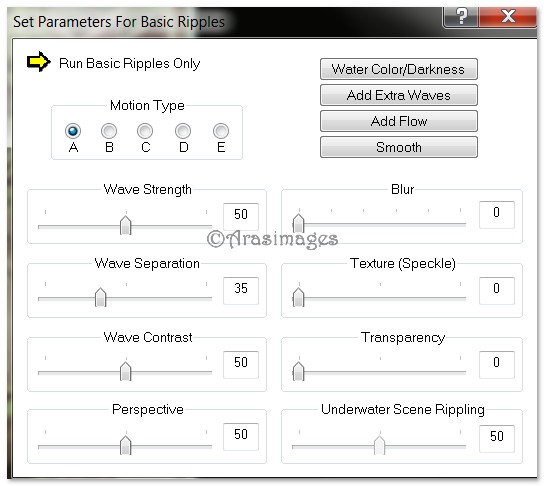
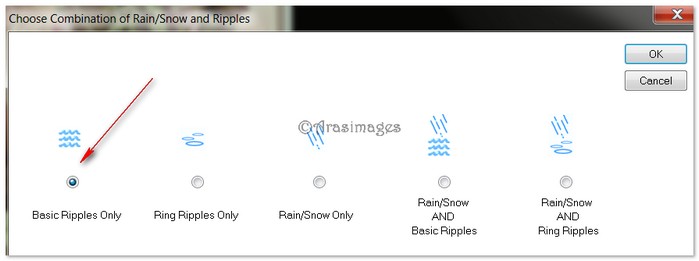
5. Click on the red Y and choose Basic Ripples Only.
6. Click on the Yellow arrow at the top to check your animation. If it is as you like it, click on the red GIF and watch your animation be saved.
7. When the Save As box appears, give your file the name My Secret Place and leave Save as type set to GIF. Click Save.
8. The next box that comes up allows you to select a frame rate. I chose to leave mine set to 15. click OK.
9. Now you can watch your Animation build saving. Click OK on the Information box that comes up next.
10. Your animated tutorial is now finished and saved in your working folder.
Thank you Evatexas and PamelaD for testing my tutorials and being my valued advisors.
If you are going to use this tutorial for stationery, cards or place the tutorial/tag on another site, I would appreciate you contacting me for permission, giving Arasimages credit for the original tutorial and if possible, a link back to my site. Thank you.
Copyright © Arasimages All Rights Reserved