
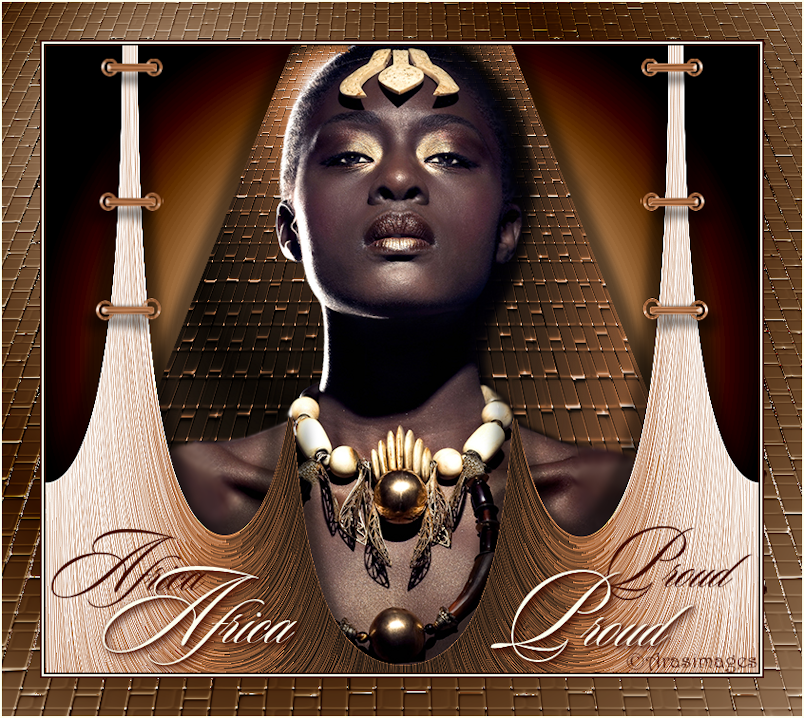
Africa Proud
For Italian, Dutch and Danish translation, click on the flags.


For this tutorial you will need the materials in the zip file below.

Unzip the materials into a working folder. Open the materials in PSP, copy and close originals. Place the Gradient cg_colors_brown into your PSP/Gradient folder. Place the font Sloop Script One in your Fonts Folder. Plugins used in this tutorial are Redfield/Craquelure 3D, Crescent Moon/FadeOut and Mura's Meister/Pole Transform. It is assumed you have a working knowledge of PSP to follow these directions.
Thanks go to Silvie for the lovely woman tube used.
Use the bookmark below to mark your place along the way.

1. In Materials Palette, set Foreground to #f7f7f5, Background to #410d00.
2. New/New Raster Layer 750px by 660px. Flood fill with Foreground.
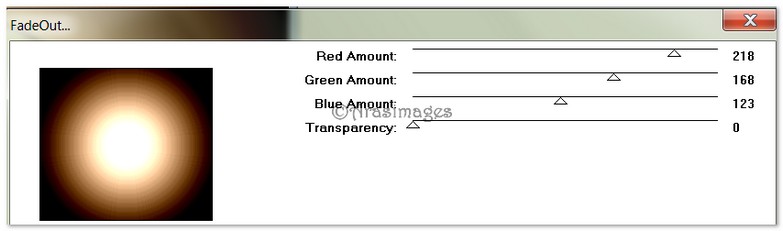
3. Effects/CrescentMoon/FadeOut.
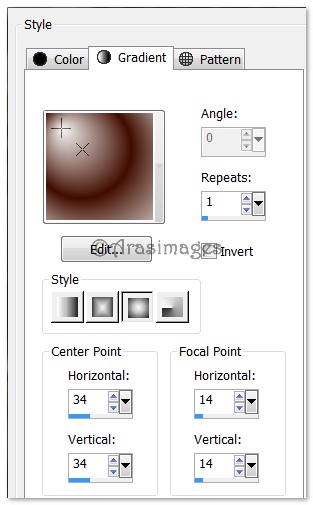
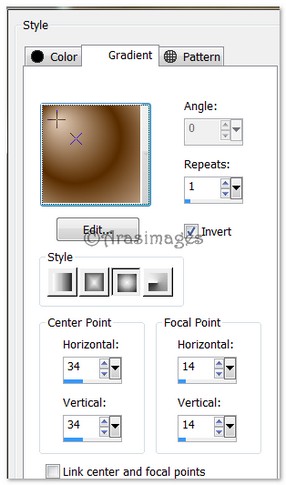
4. Create a Gradient from the Foreground/Background colors, Style Sunburst Angle 0, Repeats 1, Invert unchecked. Set Center points to 34, Focal points to 14.
5. Layers/New Raster Layer. Flood fill with Gradient.
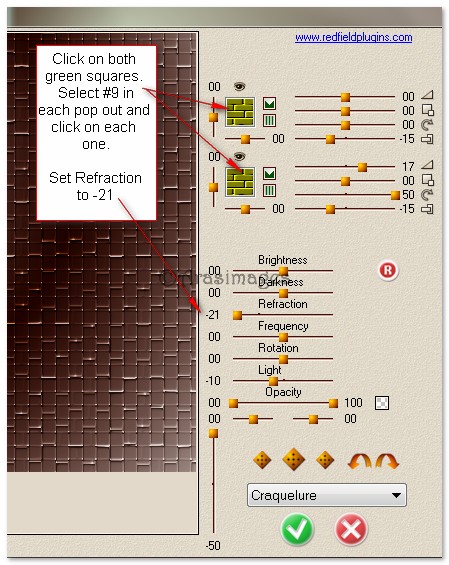
6. Effects/Redfield/Craquelure.
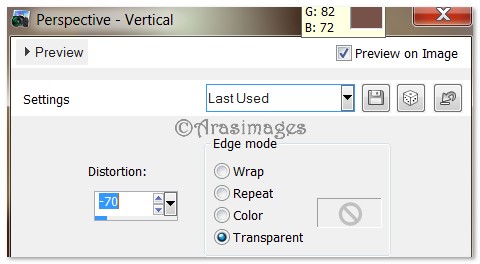
7. Effects/Geometric Effects/Perspective-Vertical.
8. Adjust/Hue and Saturation/Colorize. Set Hue to 18, Saturation to 113.
9. Adjust/Sharpeness. Sharpen.
10. Effects/3D Effects/Drop Shadow. Vertical 0, Horizontal 15, Opacity 50, Blur 15, color #000000.
11. Effects/3D Effects/Drop Shadow. Vertical 0, Horizontal -15, Opacity 50, Blur 15, color #000000.
12. Open BlackLady1_13.02.2012.pspimage. Copy/Paste as New Layer. Select Move tool/move upward by clicking Up Arrow Key 6 times.
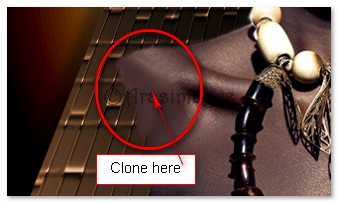
13. From Tool bar select the Clone tool. Have settings as seen below, Align mode checked.

14. We are going to extend both of her shoulders outward by right clicking on each shoulder near its edge, left drag mouse to draw outward until each shoulder is extended about 7 or 8 px. (Extend both shoulders). See example below.
15. Select the Soften tool and with these settings, soften the areas where you have cloned.

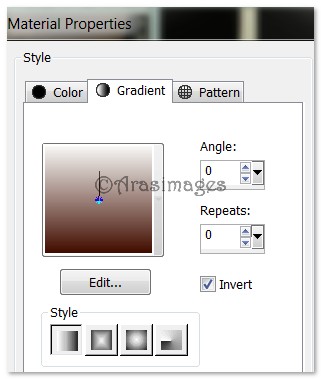
16. In Materials Palette, change the Gradient Style to Linear, Angle 0, Repeats to 0 and check Invert.
17. Layers/New Raster Layer. Flood fill with new Gradient.
18. Effects/Texture Effects/Fur.
![]()
19. Effects/MuRa's Meister/Pole Transform.
![]()
20. Adjust/Hue and Saturation/Colorize. Hue set to 18, Saturation to 113.
21. Effects/Edge Effects/Enhance.
22. Image/Flip.
23. Effects/3D Effects/Drop Shadow. Vertical 15, Horizontal 15, Opacity 50, Blur 15, color #000000.
24. Effects/3D Effects/Drop Shadow. Vertical -15, Horizontal -15, Opacity 50, Blur 15, color #000000.
25. Select Eraser tool from Tool bar. Set size to 20 and erase the inner tips of the Raster 4 away from woman's necklace.
26. From Tool bar, select Text tool. Choose font Sloop Script One, Size 120, color #410d00. Type the letter "A". Change size to 80 and type "frica". Convert to Raster Layer.

27. Using same settings, color and size 120, type the letter "P". Change to size 80 and type "roud". Convert to Raster Layer.
28. Image/Resize/Resize by 80%/Resize all layers unchecked on each text layer. Move text as needed so they are like mine in finished tag. Merge/Merge Down.
28a. Repeat all of the text steps except the resize using color #fcfdef. See my finished tag for placement. Merge/Merge Down.
29. Effects/3D Effects/Drop Shadow. Vertical 2, Horizontal 2, Opacity 100, Blur 10, color #410d00. Repeat drop shadow with Blur set to 2, all other settings the same.
30. Image/Add Borders/Add 2px border, Symmetric checked, color #410d00.
31. Image/Add Borders/Add 2px border, Symmetric checked, color #fcfdef
32. Image/Add Borders, Add 2px border, Symmetric checked, color #410d00.
33. Image/Add Borders/Add 40px border, Symmetric checked, color #fcfdef
34. With Magic Wand, click inside 40px border to activate it. Flood fill with cg_colors_brown Gradient set to below settings.
35. Apply Redfield/Craqueluer. Click both green boxes and set to #9 like you did in Step #19. Set the Slider at the bottom to the middle (it will read 00). Selections/Select None.

36. Image/Add Borders/Add 2px border, Symmetric checked, color #fcfdef.
37. Open oeillets.png file. Copy/Paste as New Layer.
38. Adjust/Hue and Saturation/Colorize. Set Hue to 18, Saturation to 113.
39. Effects/3D Effects/Drop Shadow. Vertical 15, Horizontal -15, Opacity 50, Blur 15, color #000000.
40. Image/Resize/Resize by 80%/Resize all layers unchecked.
41. Move the oeillets over the left side of the Pole Transforms as seen in the finished tag. Duplicate. Image/Mirror.
42. Sign your name or leave your watermark if you wish. Merge/Merge Visible if necessary.
43. Image/Resize/Resize by 95%/Resize all layers checked. Save as .png or .jpg file.
Last but not least, I give my wonderful testers, PamelaD and Evatexas, much credit for their testing of this tutorial.
If you are going to use this tutorial for stationery, cards or place the tutorial/tag on another site, I would appreciate you contacting me for permission, giving Arasimages credit for the original tutorial and if possible, a link back to my site. Thank you.
Copyright © Arasimages All Rights Reserved