
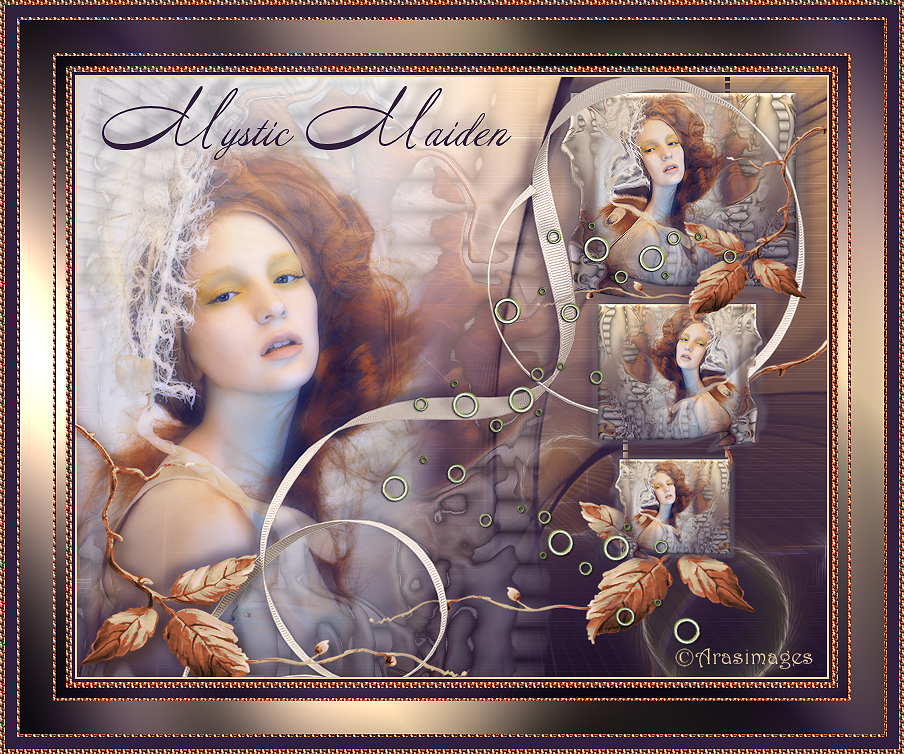
Mystic Maiden
For Italian, Dutch and Danish translation, click on the flags.


For this tutorial you will need the materials in the zip file below.

Unzip the materials into a working folder. Open the materials in PSP, copy and close originals. Place the Pattern Copper Beads into your PSP/Pattern. Place the font AnnabelleJF into your PSP/Fonts folder and place the Mask into your PSP/Masks folder. Plugins used in this tutorial are Xero/Porcelain, Redfield/Lattice Composer, Redfield/Fractalius, Graphics Plus/Cross Shadow and Rendu/Halo.
Thanks go to Gina for the lovely woman tube used.
Use the bookmark below to mark your place along the way.

1. In Materials Palette, set Foreground to #E8CCA5, Background to #31203D.
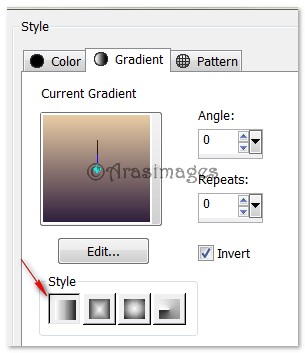
2. Create a Gradient using Foreground/Background colors, Style Linear, Angle 0, Repeats 0, Invert checked, all other settings not applicable.
3. New/New Raster Layer 750px by 600px. Flood fill with Gradient.
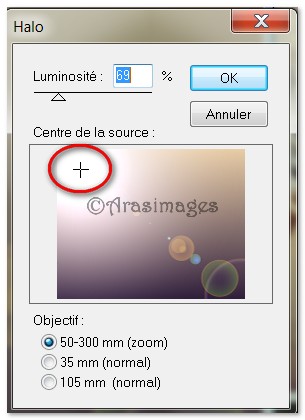
4. Effects/Rendu/Halo. Use Luminosity set to 187. Repeat using Luminosity at 69.
5. Effects/Edge Effects/Enhance.
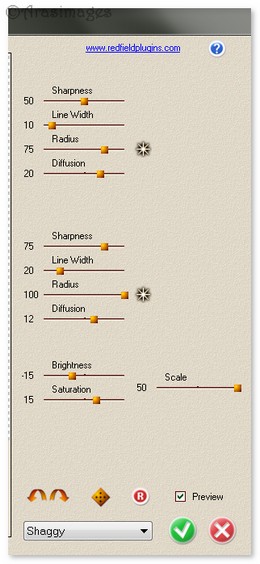
6. Effects/Redfield/Fractalius. Use settings as seen below.
7. Layers/New Raster Layer. Flood fill with Background #31203d.
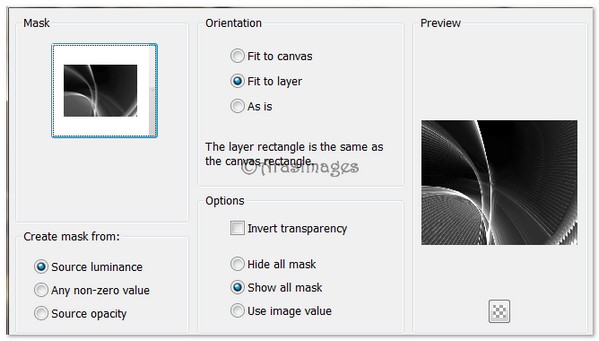
8. Layers/Load/Save Mask/Load Mask from Disk. Select Nara-Mask-0428. Load.
9. Layers/Merge/Merge Group. Image/Image/Mirror.
10. From Tool bar, select the Pen Tool. Set the Line Style to Diamond, Width at 4.00. See settings below.

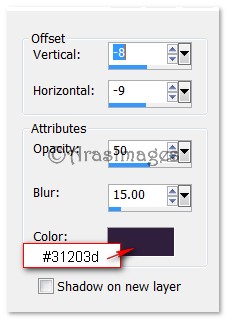
11. In Materials Palette, uncheck the Invert of the Gradient.
12. Starting at the top of working image, draw a line approximately from 650px at the top down to the ball in the bottom right corner. Convert to Raster Layer.
13. Draw another line 100px to the left of first line, 4 diamond dots shorter than first line. Convert to Raster Layer.
14. Layers/Merge Down.
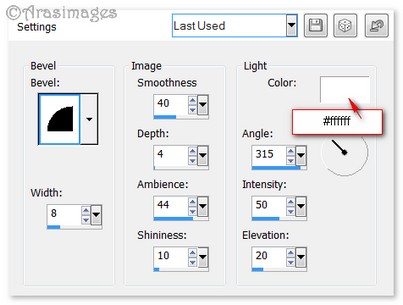
15. Effects/3D Effects/Inner Bevel. Use settings below.
16. Effects/3D Effects/Drop Shadow. Vertical -8, Horizontal -9, Opacity 50, Blur 15, color #31203d.
17. Open FEMME MISTED GINA 2388.pspimage. Copy/Paste as New Layer.
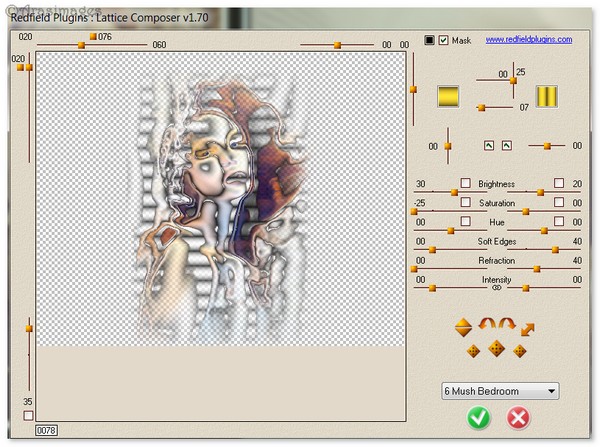
18. Effects/Redfield/Lattice Composer. Use settings as seen below.
19. Drop Opacity down to 40. Move to left of image center and down a little.
20. Again paste as New Layer the FEMME MISTED lady.
21. Image/Resize/Resize by 70%/Resize all layers unchecked.
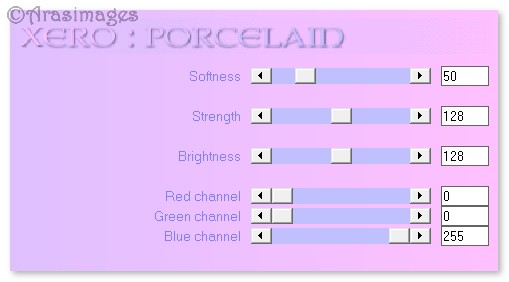
22. Effects/Xero/Porcelain. Use settings below. Move to left. View finished image for placement.
23. Highlight the layer containing the first FEMME MISTED lady. With eraser tool set to 25, all other settings at Default, carefully erase over her face, neck and shoulder. Highlight the top layer to continue.
24. Open Leaves.Png image. Copy/Paste as New Layer.
25. Move into bottom left corner.
26. Adjust/Hue and Saturation/Colorize. Set Hue to 13, Saturation to 124.
27. Using Color Changer (by Flood fill tool), left click in a light spot on a leaf using color #e8cca5.
28. Effects/3D Effects/Drop Shadow. Vertical -8, Horizontal -9, Opacity 50, Blur 15, color #31203d.
29. Duplicate. Image/Mirror. Move into right bottom corner, up a little higher than first leaf.
30. Apply Drop Shadow as in Step #28.
31. Open Small Image 1.Png file. Copy/Paste as New Layer.
32. Move into upper right corner, centering over diamond lines.
33. Adjust/Sharpness/Sharpen.
34. Duplicate. Image/Mirror.
35. Image/Resize/Resize by 70%/Resize all layers unchecked.
36. Place below the first Small Image 1 over diamond lines.
37. Duplicate. Image/Mirror.
38. Resize by 70%, place below the second Small Image 1 over diamond lines.
39. Open Ribbon.Png file. Copy/Paste as New Layer.
40. Move to right side and down over Small images.
41. Apply a Drop Shadow as in Step #28.
42. Adjust/Sharpness/Sharpen.
43. Using the Selection tool, select the ribbon as seen in example. Selection type set to Freehand Selection, Mode set to Replace, Feather 1, Anti-alias checked. Press Delete key. Deselect.
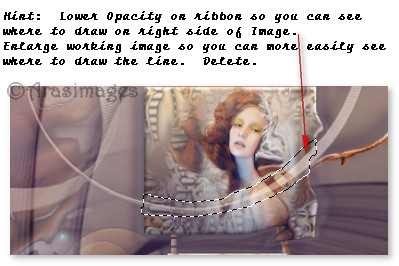
Hint: Enlarging the working image helps with detailed work. Lower the Opacity of the ribbon so you can better see where to draw the freehand selection, then delete. Be sure to raise Opacity back to 100% before continuing.
44. Find layer containing bottom left leaf and move it to the top of Layers Palette.
45. Open Leaves.Png file. Copy/Paste as New Layer. Image/Resize/Resize by 70%/Resize all layers unchecked.
46. Image/Mirror. Adjust/Hue and Saturation/Colorize. Set Hue to 13, Saturation to 124.
47. Using Color Changer (by Flood fill tool), left click in a light spot on a leaf, color #e8cca5.
48. Move leaf to upper right corner so tendril is between first two small images.
49. Effects/3D Effects/Drop Shadow. Vertical -8, Horizontal -9, Opacity 50, Blur 15, color #31203d.
50. Open Eyelets.Png file. Copy/Paste as New Layer.
51. Place in upper right corner as I have done in finished image.
52. Paste again as New Layer. (Eyelets are still in memory).
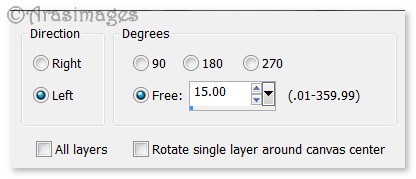
53. Image/Free Rotate, Rotate Left by 15 degrees. Move to about center of image.
54. Duplicate. Image/Mirror. Move down into right bottom corner. (See my finished image for placement of all eyelets).
55. Layers/Merge/Merge Down. Repeat so all eyelet layers are now in one layer.
56. Effects/3D Effects/Drop Shadow. Vertical -8, Horizontal -9, Opacity 50, Blur 15, color #31203d.
57. From Tool bar, find the Text tool. Set Font to AnnabelJF, Size 72, see below for other settings, color #31203d.

58. Type out the letter "M". Change font size to 40 and type out the letters "ystic". Space. Change font size back to 72 and type out the letter "M", change font to 40 and type out the letters "aiden". Convert to Raster Layer.
59. Place words "Mystic Maiden" in upper left corner.
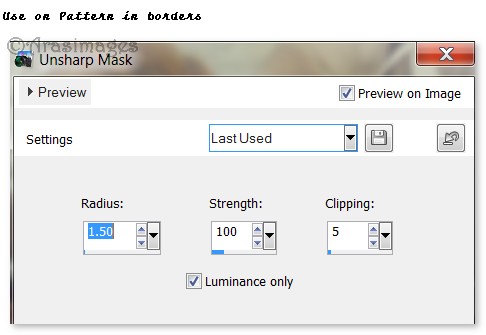
60. Effects/3D Effects/Drop Shadow. Vertical -8, Horizontal -9, Opacity 50, Blur 15, color #31203d.
61. Image/Add Borders/Add 2px border, Symmetric checked, color #e8cca5.
62. Image/Add Borders/Add 3px border, Symmetric checked, color #31203d.
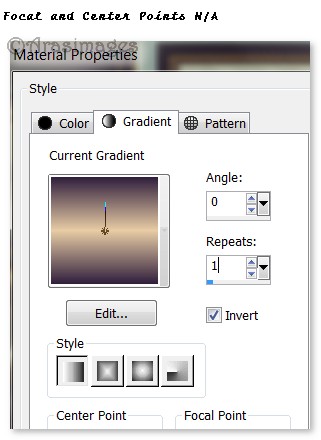
63. Image/Add Borders/Add 6px border, Symmetric checked, color #e8cca5.
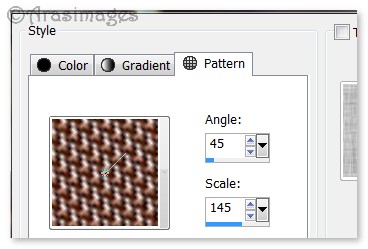
64. Using Magic Wand, Tolerance and Feather set to 0, highlight the 6px border. Flood fill with Pattern Copper Beads. See settings below.
65. Adjust/Hue and Saturation/Colorize. Set Hue to 13, Saturation to 124.
66. Adjust/Sharpness/Unsharp Mask. Use settings below.
67. Selections/Select None.
Note: All border layers on which you use the Pattern Copper Beads, you will do Step #65 (colorize), Step #66 (Unsharp Mask) and Step #67 (Selections/Select None).
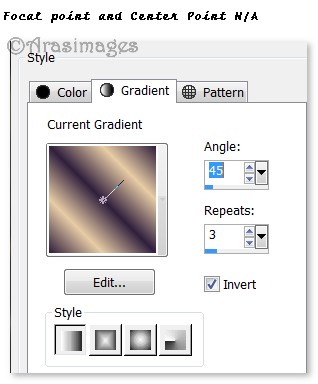
68. Image/Add Borders/Add 12px border, Symmetric checked, color #31203d.
69. Activate using Magic Wand. Flood fill with Gradient set as seen below.
70. Effects/Graphics Plus/Cross Shadow set to default settings. Selections/Select None.
71. Image/Add Borders/Add 3px border, Symmetric checked, color #e8cca5.
72. Using Magic Wand, highlight the 3px border. Flood fill with Pattern Copper Beads.
73. As noted above, repeat Steps #65, #66 and #67.
74. Image/Add Borders/Add 33px border, Symmetric checked, color #31203d.
75. Activate the 33px border with Magic Wand. Flood fill with Gradient as seen below.
76. Effects/Graphics Plus/Cross Shadow set to default settings. Selections/Select None.
77. Image/Add Borders/Add 3px border, Symmetric checked, color #e8cca5.
78. Using Magic Wand, highlight the 3px border. Flood fill with Pattern Copper Beads.
79. As noted above, repeat Steps #65, #66 and #67.
80. Image/Add Borders/Add 12px border, Symmetric checked, color #31203d.
81. Image/Add Borders/Add 6px border, Symmetric checked, color #e8cca5.
82. Using Magic Wand, hightlight the 6px border. Flood fill with Pattern Copper Beads.
83. As noted above, repeat Steps #65, #66 and #67.
84. Add your name or watermark if you wish. Adjust/Sharpeness/Sharpen. Save as .jpg or .png file named Mystic Maiden.
Thanks go to my wonderful testers, PamelaD and Evatexas, for their testing of my tutorials.
If you are going to use this tutorial for stationery, cards or place the tutorial/tag on another site, I would appreciate you contacting me for permission, giving Arasimages credit for the original tutorial and if possible, a link back to my site. Thank you.
Copyright © Arasimages All Rights Reserved