
A Fairie Unexpected Encounter
For Italian, Dutch and Danish translation, click on the flags.


For this tutorial you will need the materials in the zip file below.

Unzip the materials into a working folder. Open the materials in PSP, copy and close originals. Place the font Annie BTN into your PSP/Fonts folder. Plugins used in this tutorial are Xero/Softmood.
Thanks go to JHanna, to Nikita and to the unknown creators of the scrap tubes which were used in this tutorial.
Use the bookmark below to mark your place along the way.
1. In Materials Palette, set Foreground to #f5f2c9, Background to #bd4933.
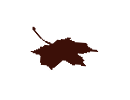
2. Create a Gradient using Foreground/Background colors, Style Linear, Angle 0, Repeats 1, Invert checked, all other settings not applicable.
3. New/New Raster Layer 750px by 600px. Flood fill with Gradient.
4. Adjust/Blur/Gaussian Blur. Radius set to 31.
5. Open BackgroundBerries.pspimage. Copy/Paste as New Layer.
6. With Move tool, pull down to bottom half of working image. Adjust/Blur/Gaussian Blur. Set Radius to 13.
7. Open BrickPath.pspimage. Copy/Paste as New Layer.
8. Move to bottom right corner.
9. Effects/3D Effects/Drop Shadow. Vertical -7, Horizontal -26, Opacity 50, Blur 31, color #000000.
10. Duplicate. Image/Mirror.
11. Open 1250147529_paysages.pspimage. Copy calque layer/Paste as New Layer. Pull upward so large rock is in center of working image.
12. Using Pick tool, stretch horizontally by pulling each side node so paysages meet sides of working image.
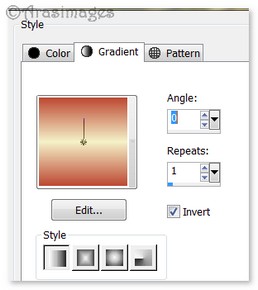
13. Effects/Xero/Softmood. Use settings below.
14. Open Fairie Toadstools.pspimage. Copy/Paste as New Layer. Move to bottom left side of image.
15. Effects/3D Effects/Drop Shadow. Vertical -7, Horizontal -17, Opacity 50, Blur 21, color #000000.
16. Open DroopingLeaf.pspimage. Copy/Paste as New Layer. Move into upper left corner.
17. Adjust/Blur/Gaussian Blur. Radius set to 5.
18. Apply Drop Shadow as in Step #15. Duplicate. Image/Mirror.
19. Again Paste the DroopingLeaf as New Layer. (still in memory). Move to upper left corner as before but to the right just a little so blurred DroopingLeaf is showing.
20. Apply Drop Shadow as in Step #15. Duplicate. Image/Mirror.
21. In the upper right corner, pull the blurred layer of the DroopingLeaf toward the left a little so it shows beneath the mirrored leaf that rests on it. Adjust as necessary.
22. With each layer of the DroopingLeaves highlighted, using the Eraser tool, erase each stem away. When finished erasing, make sure you highlight and are on the top layer to continue.

23. Open FernLeaves.pspimage. Copy/Paste as New Layer.
24. Move into upper left corner. Apply Drop Shadow as in Step #15.
25. Duplicate. Image/Flip. Duplicate Flipped image. Image/Mirror. Image/flip. A copy of the FernLeaves are now in upper right corner.
26. Pull Copy (2) of Raster 8 (FernLeaves mirrored and flipped) below Copy of Raster 7 DroopingLeaves in upper right corner. Highlight the top layer to continue.
27. Open JHanna_685 tube.pspimage. Copy/Paste as New Layer.
28. Image/Resize/Resize by 85%, Resize all layers unchecked.
29. Adjust/Sharpness/Sharpen. Move to left side of image.
30. Effects/3D Effects/Drop Shadow. Vertical -7, Horizontal -17, Opacity 50, Blur 21, color #000000.
31. Open FairieFence.pspimage. Copy/Paste as New Layer.
32. Move to bottom right corner area. See finished tag for placement.
33. Effects/3D Effects/Drop Shadow. Vertical -7, Horizontal -10, Opacity 50, Blur 21, color #000000.
34. Open LargeLeaf.pspimage. Copy/Paste as New Layer.
35. Image/Resize/Resize by 75%/Resize all layers unchecked. Move into bottom right corner.
36. Adjust/Sharpness/Sharpen. Apply Drop Shadow as in Step #33.
37. Open FairiePumpkins.pspimage. Copy/Paste as New Layer.
38. Image/Resize/Resize by 65%/Resize all layers unchecked.
39. Effects/3D Effects/Drop Shadow. Vertical 7, Horizontal -10, Opacity 50, Blur 21, color #000000.
40. Image/Mirror. Move into bottom right corner over leaf.
41. Open BranchOfBerries.pspimage. Copy/Paste as New Layer.
42. Image/Free Rotate. Free rotate to Left, 25 degrees.
43. Apply Drop Shadow as in Step #39.
44. Duplicate. Resize by 70%. Move toward top, attaching to the tree on the right. (See finished tag for placement).
45. Open FairieRabbit.pspimage. Copy/Paste as New Layer.
46. Image/Resize by 45%. Adjust/Sharpenss/Sharpen. Place in front of fence at bottom of image.
47. Apply Drop Shadow as in Step #30.
48. Open FairieUmbrella.pspimage. Copy/Paste as New Layer.
49. Place Umbrella over rabbit as if he were holding it. Adjust/Sharpness/Sharpen.
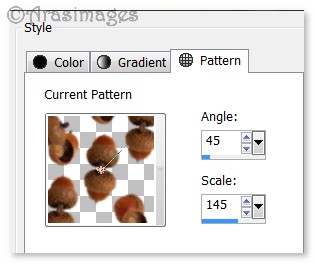
50. Using the Eraser tool, erase the umbrella handle away from rabbit's face.
51. Apply Drop Shadow as in Step #30.
52. Image/Add Borders/Add 3px border, Symmetric checked, color #5c1c10.
53. Image/Add borders/Add 20px borders to top and both sides, 80px at bottom, Symmetric unchecked, color #f5f2c9.
54. Using Magic Wand, select inside the large border.
55. Open NutsPattern.png image. Leave open on work space. In Materials Palette, select Pattern, choose NutsPattern.
56. Layers/New Raster Layer. Flood fill large border with NutsPattern.
57. Adjust/Blur/Gaussian Blur/Radius set to 31.
58. Effects/3D Effects/Drop Shadow. Vertical -7, Horizontal -17, Opacity 50, Blur 21, color #000000. Repeat using Vertical at 7, Horizontal at 17, all other settings the same. Deselect.
59. Image/Add Borders/Add 3px border, Symmetric checked, color #5c1c10.
60. In Materials Palette, change Background color to #5c1c10. From Tool bar, select Text tool, Font Annie BTN, Size 58, Line Style Solid. Type out the words "A Fairie unexpected encounter". Convert to Raster Layer.

61. Center text in the 80px bottom border.
62. Open FairieBorderCorners.pspimage. Copy/Paste as New Layer.
63. Place in lower left corner. Apply a Drop Shadow of Vertical -6, Horizontal -4, Opacity 50, Blur 13, color #f5f2c9.
64. Duplicate. Image/Mirror.
65. Sign your name or leave your watermark if you wish. Merge/Merge Visible.
Thanks go to my wonderful testers, PamelaD and Evatexas, for their testing of my tutorials.
If you are going to use this tutorial for stationery, cards or place the tutorial/tag on another site, I would appreciate you contacting me for permission, giving Arasimages credit for the original tutorial and if possible, a link back to my site. Thank you.
Copyright © Arasimages All Rights Reserved