
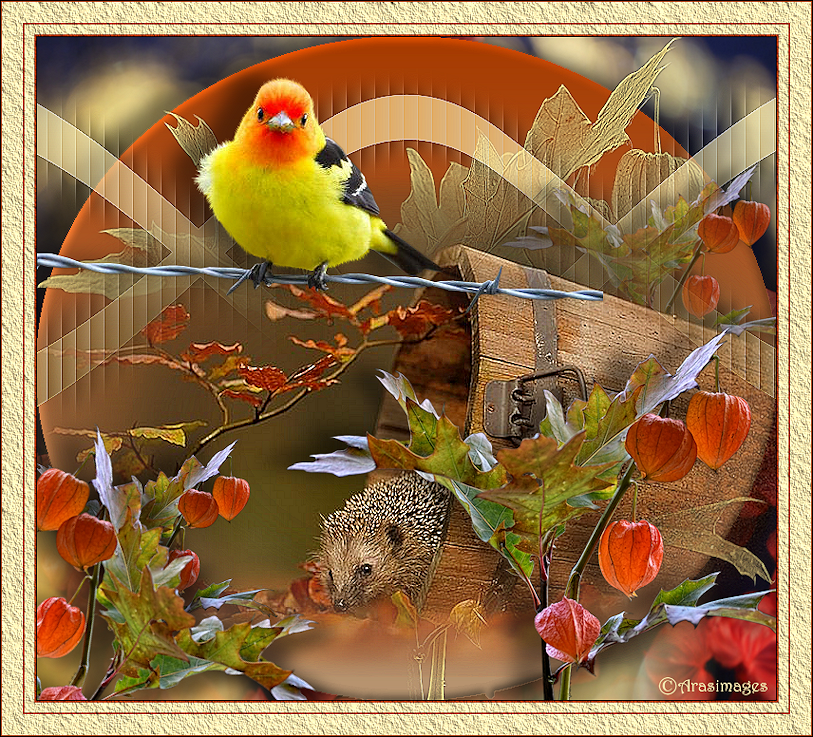
Fall Feathers and Fur
For Italian, Dutch and Danish translation, click on the flags.


For this tutorial you will need the materials in the zip file below.

Unzip the materials into a working folder. Open the materials in PSP, copy and close originals. Place the basisvormen2.PspShape Preset Shape (all26) in your PSP Files/Preset Shapes folder. Plugins used in this tutorial are AAA Frames/Texture, Unplugged Shapes/Auto Ellipse and Unplugged Shapes/45 Degree Angle.
Thanks go to Gerry, to K@rine_Dre@ms, and to JHanna for the beautiful tubes used.
Use the bookmark below to mark your place along the way.

1. In Materials Palette, set Foreground to #ba9874, Background to #a93b00.
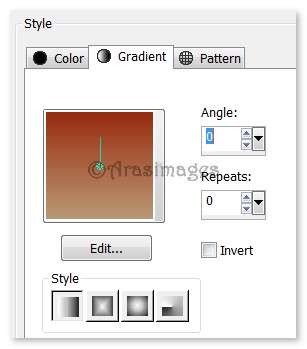
2. In Materials Palette, create a Gradient using the Foreground and Background colors, Style Linear, Angle 0, Repeats 0, Invert unchecked. All other settings not applicable.
3. New/New Image/ 780px by 700px. Selections/Select All.
4. Open Leaves Background.jpg file. Copy/Paste into Selection.
5. Selections/Select None.
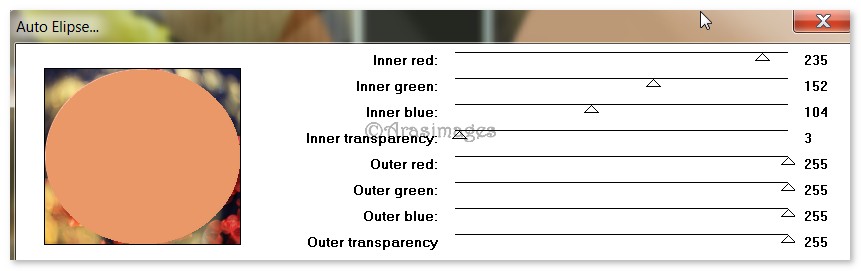
6. Effects/Unplugged Shapes/Auto Elipse. Use settings below.
7. From Selections, choose the Magic Wand, Tolerance set to 5, Feather set to 0. Click in center of Ellipse to activate it.
8. Layers/New Raster Layer. Flood fill the new Raster Layer with Gradient. Keep selected.
9. Effects/3D Effects/Drop Shadow. Vertical 5, Horizontal 30, Opacity 50, Blur 30, color #000000.
10. Effects/3D Effects/Drop Shadow. Vertical -5, Horizontal -30, Opacity 50, Blur 30, color #000000.
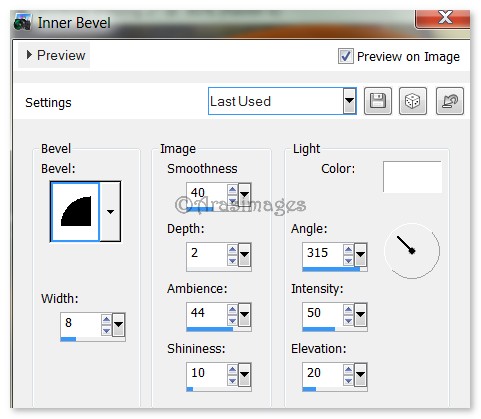
11. Effects/3D Effects/Inner Bevel. Use settings as seen below.
12. Selections/Select None.
13. Open JHanna_539.png. Leave open on workspace.
14. Layers/New Raster Layer. Flood fill with color #bcaa6a.
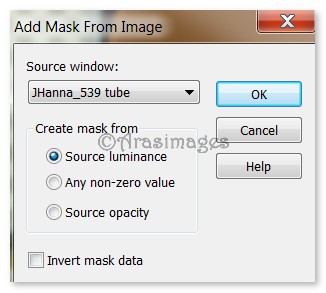
15. Layers/New Mask Layer/From Image. From Source window, choose the JHanna_539 tube. OK. Merge/Merge Group.
16. Effects/Edge Effects/Enhance. Duplicate. Merge/Merge Down.
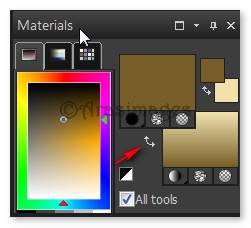
17. In Materials Palette, change Foreground color to #f0e2ac, Background color to #775e29 creating a new Gradient using Style Linear, Angle 0, Repeats 0, Invert unchecked. All other settings not applicable. Using double arrows by the Foreground/Background boxes, switch Foreground with Background.
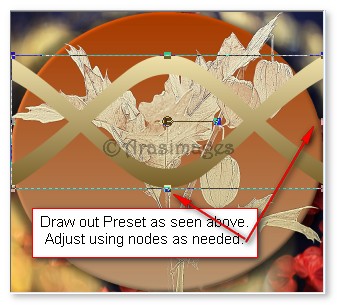
18. From Tool bar, select the Preset Shape tools. In Presets, find all26 (basisvormen2.PspPreset Shape).

19. Starting from left side toward the top, draw out a Preset shape as I have done. See example below.
20. Convert to Raster Layer.
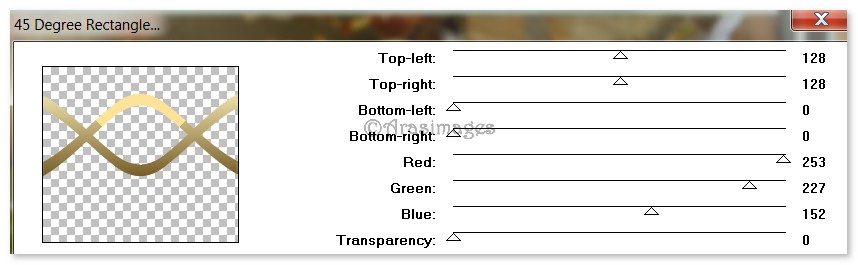
21. Effects/Unplugged Shapes/45 Degree Angle.
22. Effects/3D Effects/Drop Shadow. Vertical 5, Horizontal 30, Opacity 50, Blur 30, color #000000.
23. Effects/3D Effects/Drop Shadow. Vertical -5, Horizontal -30, Opacity 50, Blur 30, color #000000.
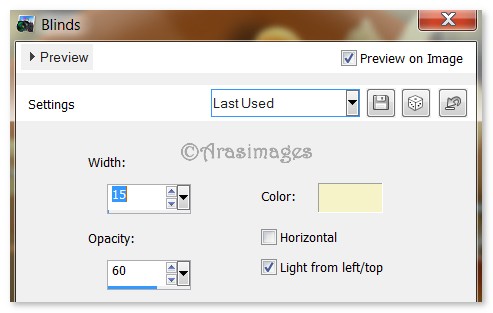
24. Effects/Texture Effects/Blinds. Use settings below, color #f6f3c8.
25. Effects/Edge Effects/Enhance. Drop Opacity to 66. Move upward a little.
26. Open k@rine_dreams_Misted_Automne_2595_Otobre_2013.pspimage. Copy/Paste as New Layer.
27. Image/Mirror. Move down toward bottom.
28. Adjust/Sharpness/Sharpen. Adjust/Sharpness/Sharpen More.
29. Open Gerry-Dieren 78-Vogel - 28 juli 2010.pspimage. Copy/Paste as New Layer. Move to left center of image toward the top.
30. Effects/3D Effects/Drop Shadow. Vertical -5, Horizontal -30, Opacity 50, Blur 30, color #000000.
31. Adjust/Sharpness/Sharpen.
32. Open JHanna_539 tube.pspimage. Copy/Paste as New Layer.
33. Image/Resize/Resize by 40%/resize all layers unchecked.
34. Apply Drop Shadow as in Step #30. Move below leaves near left lower side.
35. JHanna_539 image will still be in memory; Paste as New Layer.
36. Image/Resize/Resize by 70%/Resize all layers unchecked.
37. Move to bottom right corner.
38. Effects/3D Effects/Drop Shadow. Vertical -5, Horizontal -30, Opacity 50, Blur 30, color #000000.
39. Duplicate. Image/Resize/Resize by 83%/Resize all layers unchecked. Image/Mirror.
40. Image/Free Rotate. Rotate the image Right by 35 degrees.
41. Move into bottom left corner. Apply Drop Shadow as in Step #38.
42. Duplicate bottom right corner layer. Image/Resize/Resize by 60%/Resize all layers unchecked.
43. Move toward upper right corner above barrel. Lower Opacity to 75.
44. Pull the Step #42 duplicated/resized copy layer below the Hedgehog and barrel image layer.
45. Using the Selections tool, Freehand Selection set to Point to Point, select any of the orange cluster that is on top of the barrel. Press Delete key. Selections/Select None.
46. Check your image and layers to make sure they are all correctly placed. File/Save As Fall Feathers and Fur.pspimage in case you have to rework them.
47. Image/Add Borders/Add 2px border, Symmetric checked, color #a93b00.
48. Image/Add Borders/Add 10px border, Symmetric checked, color #f0e2ac.
49. Image/Add Borders/Add 2px border, Symmetric checked, color #a93b00.
50. Image/Add Borders/Add 22px border, Symmetric checked, color #f0e2ac.
51. Image/Add Borders/Add 2px border, Symmetric checked, color #a93b00.
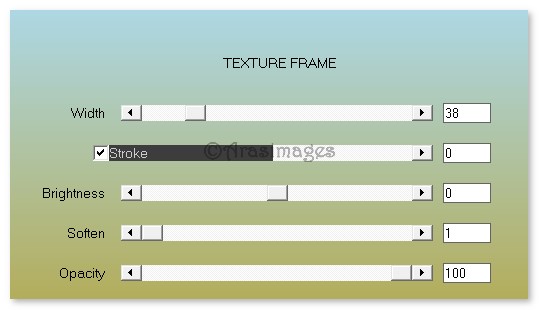
52. Effects/AAA Frames/Texture Frame. Use settings below.
53. Sign your name or leave your watermark if you wish. Merge/Merge Visible if needed.
Thanks go to my wonderful testers, PamelaD and Evatexas, for their testing of my tutorials.
If you are going to use this tutorial for stationery, cards or place the tutorial/tag on another site, I would appreciate you contacting me for permission, giving Arasimages credit for the original tutorial and if possible, a link back to my site. Thank you.
Copyright © Arasimages All Rights Reserved