
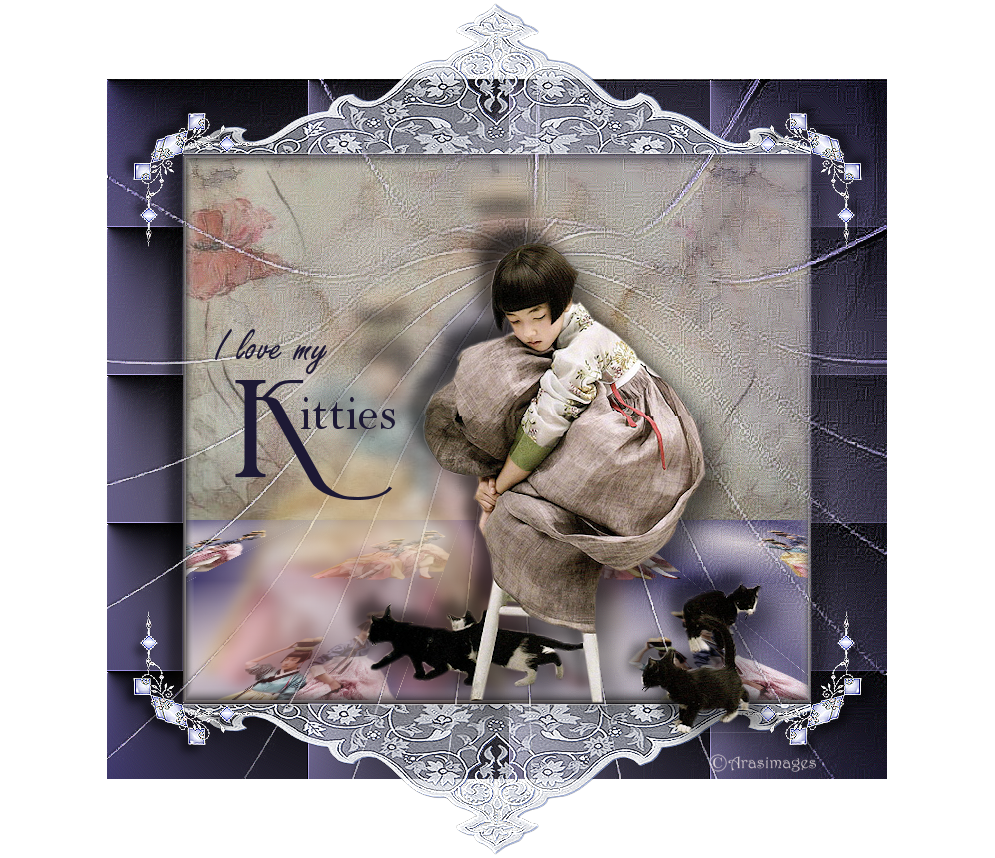
I love my Kitties
For Italian, Dutch and Danish translation, click on the flags.


For this tutorial you will need the materials in the zip file below.

Unzip the materials into a working folder. Open the materials in PSP, copy and close originals. Plugins used in this tutorial are AAA Frames/Fotoframes, MuraMeister/Perspective, Simple/Top Left Mirror and VM Instant Art/Origami Folder.
Thanks go to Colorel, to Irene, to JHanna and to Narah for the beautiful tubes used.
Use the bookmark below to mark your place along the way.

1. In Materials Palette, set Foreground to #ddd4d7, Background to #3e386c.
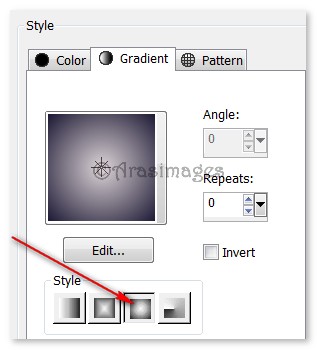
2. Create a Gradient using the Foreground and Background colors, Style Sunburst Angle 0, Repeats 0, Invert unchecked. Center and Focal point all settings at 50. All other settings not applicable.
3. New/New Image/ 780px by 700px.
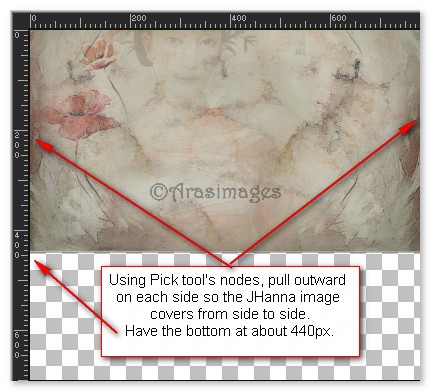
4. Open JHanna_604.jpg. Copy/Paste as Transparent Selection. Selections/Select None.
5. Move image toward the top, having bottom at about 440px. Use Pick tool nodes to pull sides out to each side edge.
6. Layers/New Raster Layer. Flood fill with Gradient.
7. Open CI_TubeKorea5.pspimage. Copy/Paste as New Layer.
8. Move ladies to right side in the bottom corner. Merge/Merge Down.
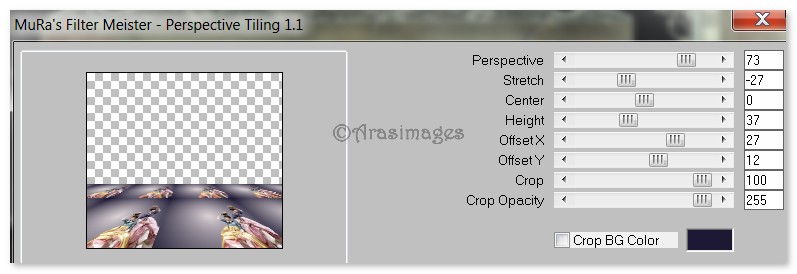
9. Effects/MuraMeister/Perspective Tiling. Use settings below.
10. Merge/Merge Visible.
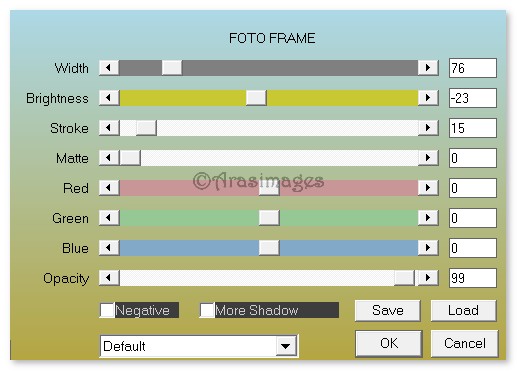
11. Effects/AAA Frames/Foto Frame. Use settings below.
12. Selections/Select All. Selections/Modify/Contract by 76. Selections/Invert.
13. Layers/New Raster Layer. Flood fill selection with Gradient.
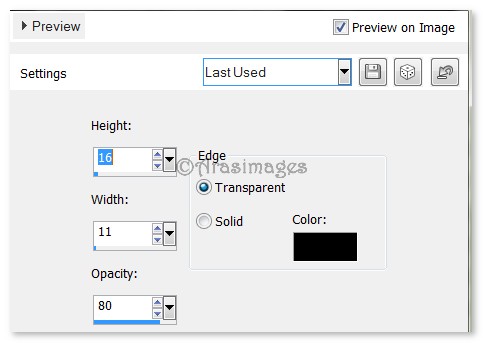
14. Effects/VM Instant Art/Origami Folder. Use settings below.

15. Effects/Edge Effects/Enhance.
16. Selections/Invert.
17. Effects/3D Effects/Drop Shadow. Vertical -15, Horizontal -15, Opacity 50, Blur 16, color #000000.
18. Effects/3D Effects/Drop Shadow. Vertical 15, Horizontal 15, Opacity 50, Blur 16, color #000000.
19. Layers/New Raster Layer. Click inside the square to activate it. Flood fill with Foreground color #ddd4d7.
20. Selections/Modify/Contract by 3px. Press Delete key once.
21. Image/3D Effects/Buttonize. Color #000000. Use settings below.
22. Merge/Merge Down. Selections/Selections None.
23. Layers/New Raster Layer. Flood fill with Gradient.
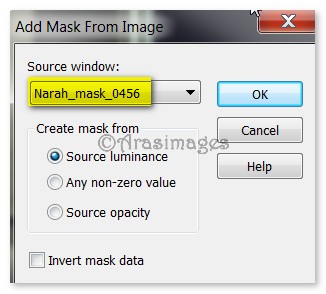
24. Open Narah-mask-0456.jpg. Layers/New Mask Layer/From Image. Select Narah-mask-0456. Merge/Merge Group.
25. Effects/Edge Effects/Enhance. Repeat Enhance.
26. Open CI_TubeKorea5.pspimage. Copy/Paste as New Layer.
27. Move Korean ladies to the left a little.
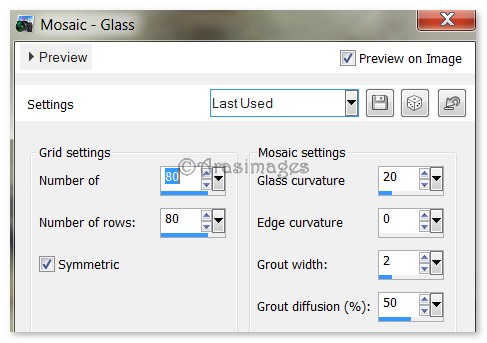
28. Effects/Texture Effects/Mosiac Glass. Use settings below.
29. Adjust/Blur/Gaussian Blur, Radius set to 6. Drop Opacity down to 70.
30. From Tool bar, select Text tool. Choose Freestyle Script, Size 48, Line Style Solid,color #1d1934, using settings below, type out the words "I love my". Convert to Raster Layer.

31. Change font to Backspace, Size 120, Line Style Solid, color #1d1934 using settings below and type out the letter "K". Convert to Raster Layer.

32. Change font to BellMT, Size 48, Line Style Solid, color #1d1934, using settings below and type out the letters "itties". Convert to Raster Layer.

33. Using Move tool, place all of the text as I have mine in finished image.
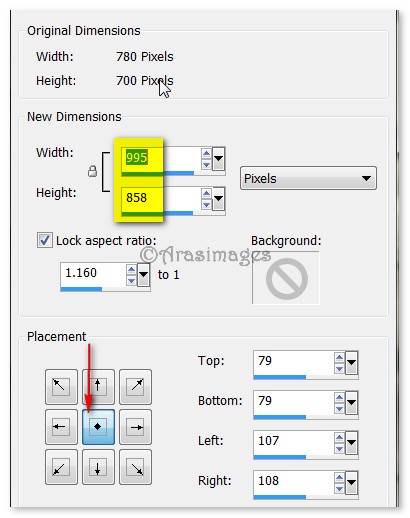
34. Image/Canvas Resize. Set new Dimensions to Width at 995, Height at 858. See example below.
35. Open dentelle-colombe.pspimage. Copy/Paste as New Layer.
36. Image/Resize/Resize by 86%/Resize all layers unchecked.
37. Move lace to bottom of center square. (I use the keyboard arrows to adjust to be more accurate).
38. Effects/Edge Effects/Enhance.
39. Duplicate. Image/Flip.
40. Open F1227412.pspimage of corner. Copy/Paste as New Layer.
41. Image/Resize/Resize by 76%/Resize all layers unchecked.
42. Place in upper left corner. Effects/Edge Effects/Enhance.
43. Effects/3D Effects/Drop Shadow. Vertical -7, Horizontal -7, Opacity 50, Blur 12, color #000000.
44. Effects/Simple/Top Left Mirror. Merge/Merge Visible.
45. Open DI_tubeKorea6.pspimage. Copy/Paste as New Layer.
46. Move little girl and kitties so the stool is sitting at the top of the lace at the bottom.
47. Effects/3D Effects/Drop Shadow. Vertical -15, Horizontal -15, Opacity 50, Blur 16, color #000000.
47. Effects/3D Effects/Drop Shadow. Vertical 15, Horizontal 15, Opacity 50, Blur 32, color #000000.
48. Adjust/Sharpness/Sharpen.
49. Sign your name or leave your watermark if you wish. Merge/Merge Visible.50. File/Save As I love my Kitties.png in your working folder.
Thanks go to my wonderful testers, PamelaD and Evatexas, for their testing of my tutorials.
If you are going to use this tutorial for stationery, cards or place the tutorial/tag on another site, I would appreciate you contacting me for permission, giving Arasimages credit for the original tutorial and if possible, a link back to my site. Thank you.
Copyright © Arasimages All Rights Reserved