
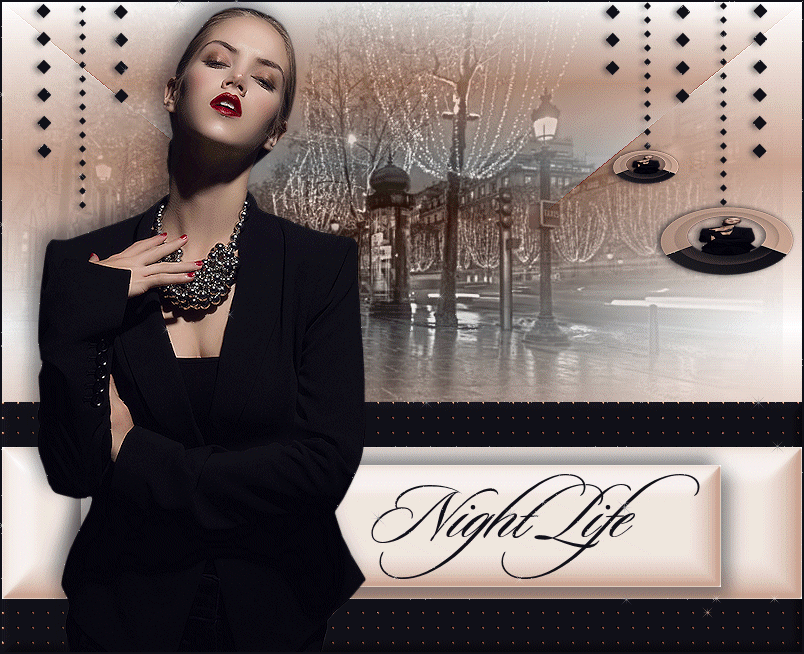
Night Life
For Italian, Dutch and Danish translation, click on the flags.


For this tutorial you will need the materials in the zip file below.

Unzip the materials into a working folder. Open the materials in PSP, copy and close originals. Place Font Sloop Script Three in your PSP Fonts folder. Place ArasimagesBar.fls in your working folder. Double click on it to auto import into your Eye Candy/Impact/Bevel settings. Plugins used in this tutorial are Andromeda/Perspective (place the Preset ArasimagesPresetFloor in Plugins/Andromeda-serie portable/Perspective-Presets/Andromeda folder/02 full Canvas/20Floors),(I have included a snapshot of the file path to use to insert the Preset into Andromeda in the Materials), AFS IMPORT/MIRRBEVL, Penta/Color Dot and Mura's Meister/Prospective Tiling and Eye Candy/Impact/Bevel. It is assumed you have a working knowledge of PSP to follow these directions.
Thanks go to K@rine_Dre@ms and Nikita for the lovely tubes used.
Use the bookmark below to mark your place along the way.

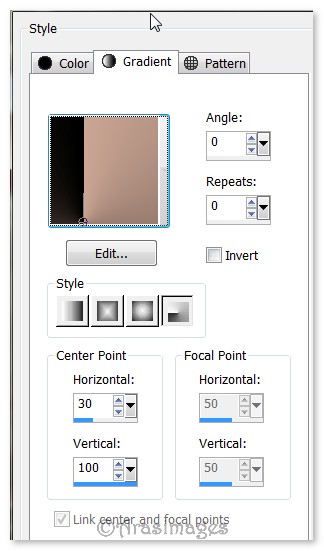
1. In Materials Palette, set Foreground to #cba694, Background to #121119.
2. Create a Gradient from the Foreground/Background colors, Style Radial, Angle 0, Repeats 0, Invert unchecked. Center Point: Horizontal at 30, Vertical at 100. All other settings not applicable.
3. New/New Raster Layer 800px by 650px. Flood fill with Gradient.
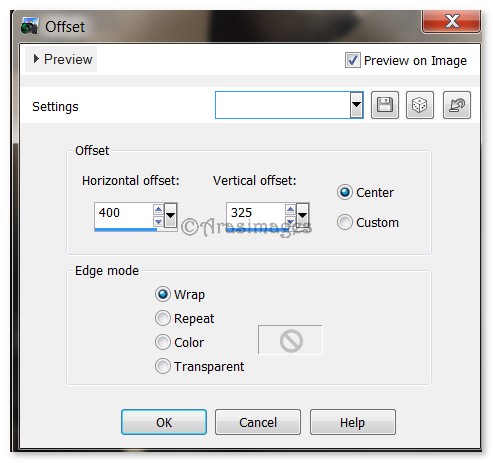
4. Effects/Image Effects/Offset. Use settings below.
5. Effects/Edge Effects/Enhance.
6. Effects/Mura's Meister/Pole Transform. Use settings below.
![]()
7. With Magic Wand, click inside the circle. Layers/New Raster Layer.
8. Open K@rine_dreams_Pretty_Lady_2583_Septembre_2013.pspimage. Copy/Paste into Selection.
9. Selections/Select None. Move Pretty Lady down a little so no white is showing between her skirt and circle. Merge/Merge Down.
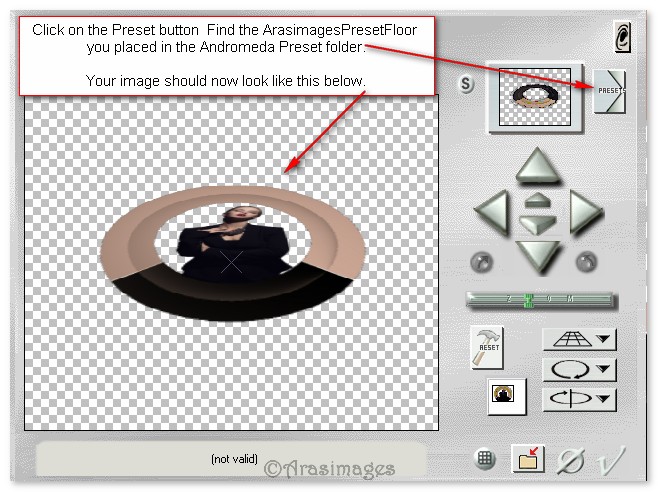
10. Effects/Andromeda/Perspective. Click on the folder at the bottom to find ArasimagesPresetFloor. If it is there, click the Preset folder at the top right- choosing the ArasimagesPresetFloor. Apply.
11. Effects/3D Effects/Drop Shadow, Vertical -4, Horizontal -4, Opacity 45, Blur 24, color #000000.
12. Image/Resize/Resize by 26%/Resize all layers checked.
13. Adjust/Sharpness/Sharpen.
14. Copy the resized image/Paste as New Image.
15. Image/Resize/Resize by 50%/Resize all layers checked.
16. Adjust/Sharpness/Sharpen.
17. Save both of these oval images with the Pretty Lady in them in your working folder as .pspimages, giving each a name such as Larger Oval and Smaller Oval. We will be using these later in the tutorial.
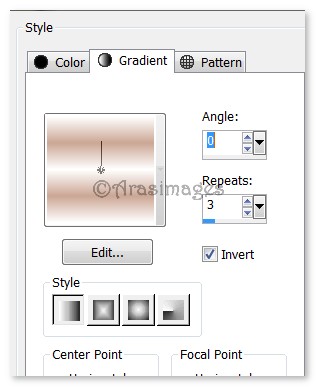
18. In Materials Palette, change Background color to #ffffff. Change the Gradient to Linear, Repeats 3, leave all other settings as they are; they are not applicable.
19. New/New Image 800px by 650px. Flood fill with new Gradient.
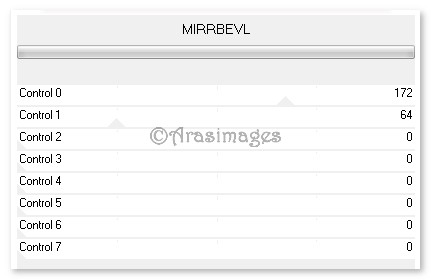
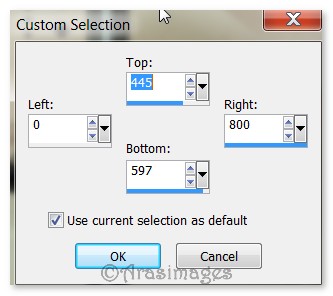
20. Effects/Filters Unlimited/AFS IMPORT/MIRRORBEVL. Use settings below.
21. Effects/Edge Effects/Enhance.
22. Open 1293040236_paysages_nikita.pspimage. Copy paysage-nikita layer/Paste as New Layer.
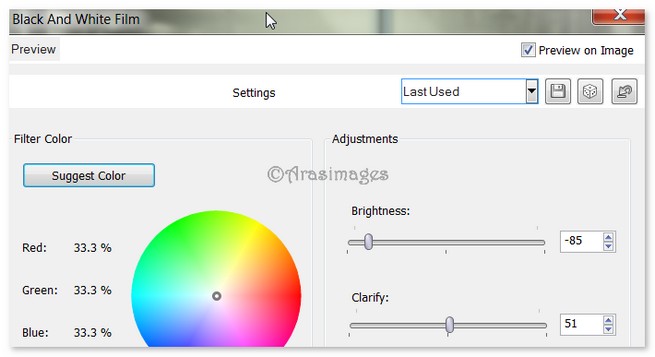
23. Effects/Photo Effects/Black and White film. Use settings below.
24. Set Blend Mode to Luminance (L). Move street scene upward toward top of working image.
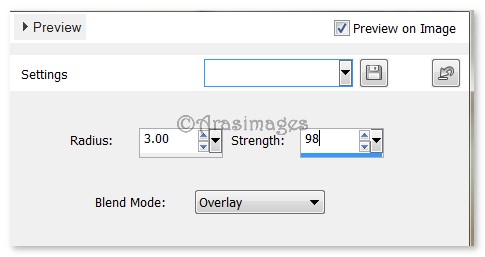
25. Adjust/Sharpness/High Pass Sharpen. Use settings below.
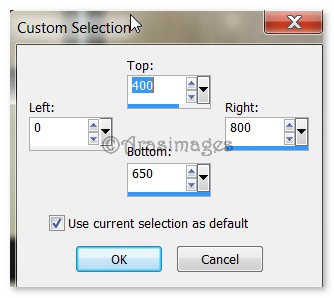
26. Using Selections tool set to Rectangle, Mode/Replace, Feather 0, Anti-alias checked, click on Custom Selection and use settings as seen below.
27. Layers/New Raster Layer. Flood with color #121119.
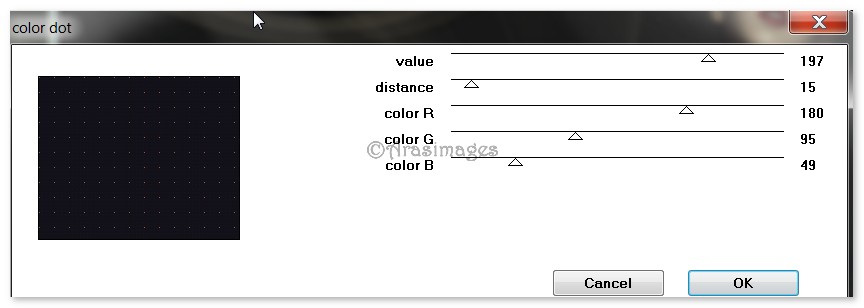
28. Effects/Penta/Color Dot. Use settings below.
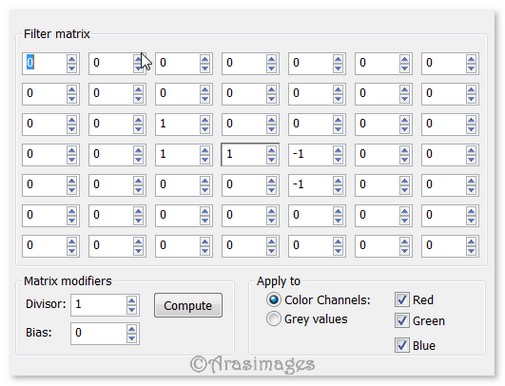
29. Effects/User Defined Filter. Use settings below.
30. Effects/Inner Bevel. Use settings below. Selections/Select None.
31. Layers/New Raster Layer. Using Selection tool, click on Custom Selection and use settings as seen below.
32. Flood fill layer with #ffffff.
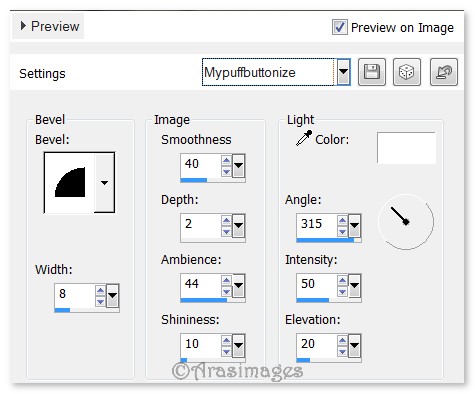
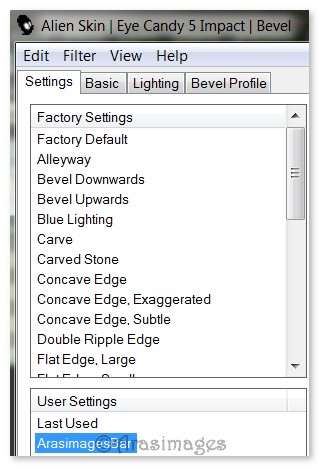
33. Effects/Eye Candy/Impact/Bevel. Use settings as seen below. (ArasimagesBar).
34. Selections/Select None.
35. Duplicate. Image/Resize/Resize by 80%/Resize all layers unchecked.
36. Effects/3D Effects/Drop Shadow. Vertical -9, Horizontal -9, Opacity 45, Blur 24, color #121119.
37. Effects/3D Effects/Drop Shadow. Vertical 9, Horizontal 9, Opacity 45, Blur 24, color #121119.
38. Center resized bar on top of larger bar.
39. Open k@rine_dreams-Pretty_Lady_2583_Septembre_2013.pspimage. Copy/Paste as New Layer.
40. Image/Resize/Resize by 80%/Resize all layers unchecked.
41. Adjust/Sharpness/Sharpen. Move to left side of working image.
42. Effects/3D Effects/Drop Shadow. Vertical -9, Horizontal -9, Opacity 45, Blur 24, color #121119.
43. Adjust/Sharpness/Sharpen again.
44. Change Background color in Materials Palette to #121119.
45. From Tool bar, select Text tool, Font Sloop Script Three, Size 80, settings below, type the words Night Life. Convert to Raster Layer.

46. Center on smaller bar to the right of Pretty Lady.
47. In Materials Palette, swap Foreground with Background using double arrows.
48. From Tool bar, select Pen tool. Have settings as seen below, Line style Diamond, Width 7.00, Anti-alias checked. Start at the top at about x:720, draw downward to y:200 or until there are about 14 diamonds. Right click and Apply. Convert to Raster Layer.

49. Duplicate Raster 7. Move to left to x;645, y:40 so 11 diamonds are showing.
50. Duplicate Raster 7 again. Image/Mirror placing at x:80, y:203.
51. Change size of Diamond line to Width of 14. From top at x:759, draw down to y:149. Right click and Apply. Convert to Raster Layer.
52. Duplicate. Image/Mirror (6 diamonds). Duplicate Raster 8. Move duplicated larger diamonds to the left and up; x:680 so 4 diamonds are showing.
53. Duplicate the larger 4 diamonds on the right. (Copy of Raster 8). Image/Mirror.
54. Duplicate the larger 4 diamonds once more. (Raster 8). Move to x:610. Move upward so only 3 diamonds are showing.
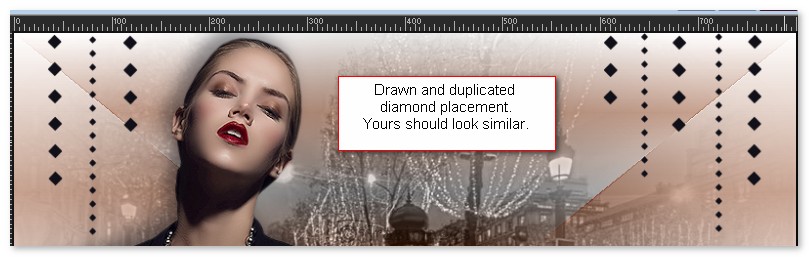
55. (See my snapshot above for placement of all diamond rows.) Layers/Merge/Merge Down all of the diamond layers.
56. Effects/3D Effects/Drop Shadow. Vertical 1, Horizontal -4, Opacity 45, Blur 8, color #121119.
57. File/Open Large Oval.pspimage. Copy/Paste as New Layer.
58. Place Large Oval at the bottom of the smaller diamonds at x:720 on the right. Try to center the oval at the end of the diamonds.
59. Effects/3D Effects/Drop Shadow. Vertical 1, Horizontal -4, Opacity 45, Blur 8, color #121119.
60. File/Open Smaller Oval.pspimage. Copy/Paste as New Layer.
61. Place the Smaller Oval at the end of the 11 diamond row. Center at the end of the diamonds.
62. Effects/3D Effects/Drop Shadow. Vertical 1, Horizontal -4, Opacity 45, Blur 8, color #121119.
63. Image/Add Borders/Add 2px border, Symmetric checked, color #121119.
64. Sign your name or leave your watermark if you wish. Merge/Merge Visible if necessary. Save as .png or .jpg file.
ANIMATION: OPTIONAL.
65. Duplicate the merged image 3 times, having 4 layers in all.
66. Close off all but the top layer. (Copy (3) of Background). Hightlight the top layer.
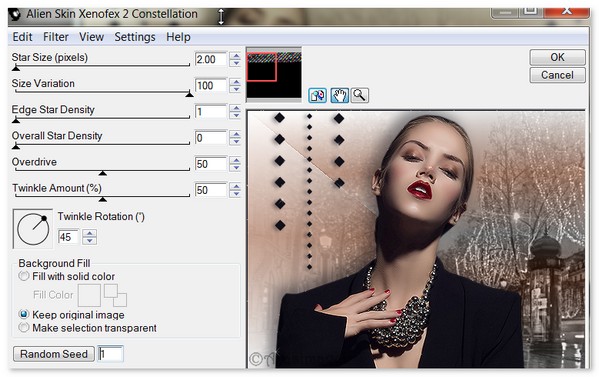
67. Effects/Alien Skin Xenofex 2/Constellation. Have Random Seed set to one, click OK. See settings below.
68. Close off top layer. Open and highlight next layer down. (Copy (2) of Background.
69. Click on Random Seed setting of Constellation. Click OK. Close off layer.
70. Move down to the next layer. (Copy of Background). Open and highlight it.
71. Click on Random Seed setting of Constellation. Click OK. Close layer.
72. Move to bottom layer, open and highlight it.
73. Click on Random Seed setting of Constellation. Click OK. Open all other layers.
74. File/Save As PSP Animation Shop (*psp) image. File name: Night Life. Save in your working folder.
75. In Animation Shop, File/Open Night Life (*psp) file. Click on View Animation button in the top tool bar to check your animation. If you are pleased with it, click File/Save As. A box will come up where you can direct where to save it-(save in your working folder), give it a file name, (Night Life) and let it auto save as a .gif file. Click Save. As the boxes change, click Next, Next, Next and Finish. Your image is now saved as a gif file named Night Life in your working folder.
I give my testers, PamelaD and Evatexas, much credit for their testing of this tutorial. My site would not be the same without their constant assistance.
If you are going to use this tutorial for stationery, cards or place the tutorial/tag on another site, I would appreciate you contacting me for permission, giving Arasimages credit for the original tutorial and if possible, a link back to my site. Thank you.
Copyright © Arasimages All Rights Reserved