
Steampunk Space Travelers
For Italian, Dutch, Danish, Spanish and French translation, click on the flags.


For this tutorial you will need the materials in the zip file below.

Unzip the materials into a working folder. Open the materials in PSP, copy and close originals with watermarks intact, using the copies in the tutorial. Place Corel 04_002 Displacement Map Plasma flame in your Displacement Map folder. The plugin used in this tutorial are Unplugged Shapes/45 degree angle and you will need Animation Shop for the animation. It is assumed you have a working knowledge of PSP to follow these directions.
For the lovely woman tube, thanks go to JHanna and thanks also to Krys the creator of the wonderful Steampunk images used.
Use the bookmark below to mark your place along the way.

1. In Materials Palette, set Foreground to #fcf6e0, Background to #5e3a16.
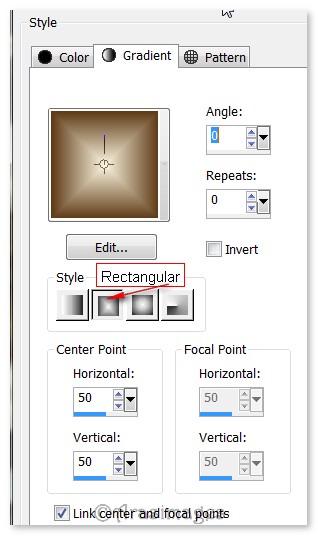
2. Create a Gradient from the Foreground/Background colors, Style Rectangular, Angle 0, Repeats 0, Invert unchecked. Horizontal and Vertical Center Points at 50, Link center and focal points checked. All other settings not applicable.
3. New/New Raster Layer 800px by 650px. Flood fill with Gradient.
4. Layers/New Raster Layer. Selections/Select All.
5. Open Narah_maks_0511.jpg. Copy/Paste into Selection.
6. Selections/Select None. Drop Opacity to 44.
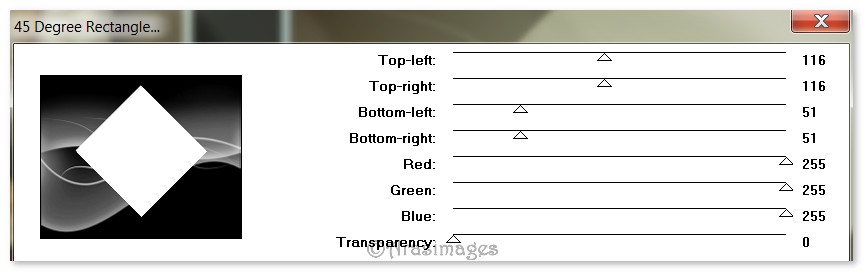
7. Effects/Unplugged Shapes/45 degree Angle. Use settings below.
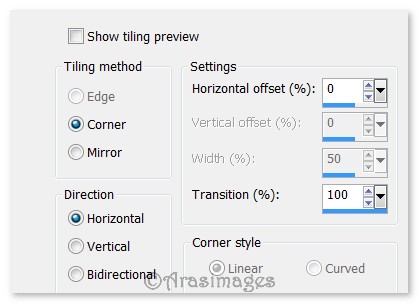
8. Effects/Image Effects/Seamless Tiling. Use settings below.
9. Using Magic Wand, settings below, click inside the diamonds to activate them. Notice the Match Mode has been changed to color.

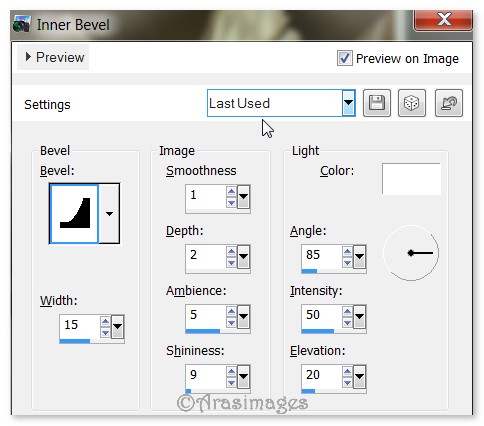
10. Effects/3D Effects/Inner Bevel. Use settings below.
11. Effects/3D Effects/Drop Shadow, Vertical -16, Horizontal 16, Opacity 50, Blur 20, color #000000.
12. Selections/Select None.
13. Effects/Distortion Effects/Wave. Use settings below.

14. Effects/Edge Effects/Enhance.
15. Layers/Add New Layer. Flood fill with #fcf6e0.
16. Open Narah_mask_5011.jpg image. Leave open on workspace.
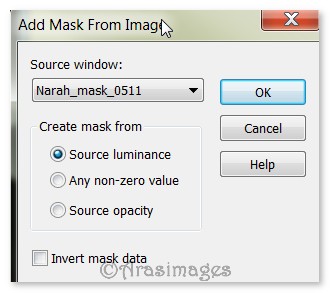
17. Layers/New Mask Layer/From Image. Select Narah_mask_5011.jpg image. Merge/Merge Group.
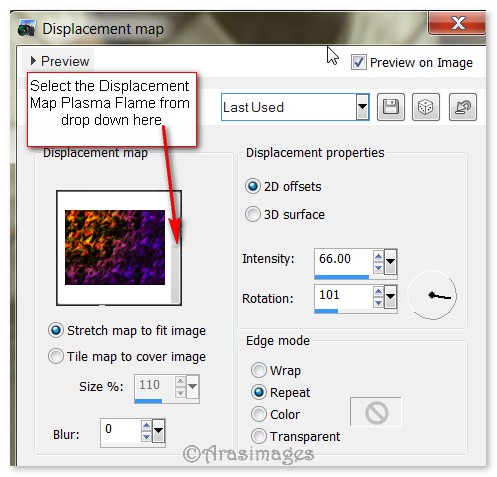
18. Effects/Distortion Effects/Displacement Map. From the drop down, select the Map image called Plasma Flame. Use settings below.
19. Effects/Edge Effects/Enhance.
20. Open dreamlover_bywilma_metaldeco.png image. Copy/Paste as New Layer.
21. Image/Resize/Resize by 22%/Resize all layers unchecked. Move to upper left corner.
22. Adjust/Sharpness/Sharpen.
23. Effects/3D Effects/Drop Shadow, Vertical -16, Horizontal 16, Opacity 67, Blur 20, color #000000.
24. Duplicate. Image/Flip.
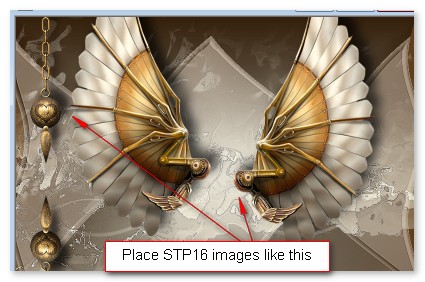
25. Open STP16.png image. Copy/Paste as New Layer.
26. Remove the watermark using the Eraser tool. Move toward the left near the deco.
27. Effects/3D Effects/Drop Shadow, Vertical -16, Horizontal 16, Opacity 67, Blur 30, color #000000.
28. Paste STP16 once again as New Layer. Image/Mirror. Remove the watermark by erasing with Eraser tool. Adjust toward right side of image.
29. Effects/3D Effects/Drop Shadow, Vertical -16, Horizontal 16, Opacity 67, Blur 30, color #000000.
30. Layers/Merge/Merge Down.
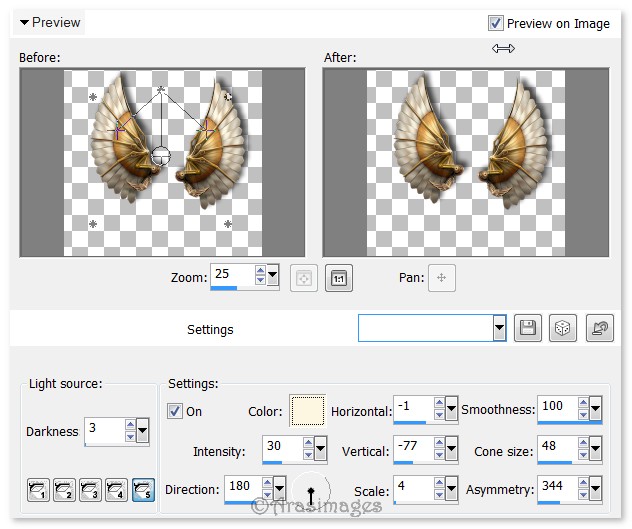
31. (This step is optional). Effects/Illuminations/Lights. Use settings below with #fdf7e1.
32. Open JHanna_123 tube_030409.pspimage. Copy/Paste as New Layer.
33. Move lady down and to the right a little. Using Color Changer tool, left click on her dress a few times to change the white to a more creamy color (like the foreground color is).
34. Adjust/Sharpness/Sharpen.
35. Image/Add Borders/Add 2px border, Symmetric checked, color #fcf6e0.
36. Add your watermark or name if you wish. File/Save As/Steampunk Space Travelers.png in your working folder.
37. Open STP17.png. Image/Resize/Resize by 90%/Resize all layers checked.
38. Remove the watermark using the Eraser tool. Adjust/Sharpness/Sharpen. Copy.
39. Open Animation Shop. In work space, Paste as New Animation.
40. Effects/Insert Image Transition. Under Effects/drop down select Zoom. Click on Customize and select Zoom Out, Preserve top frame transparency and Zoom scaling/scaled. Click OK. Click OK on Insert Image Transition using settings as shown below. (You end up with 69 frames even though the snapshot says 68).
![]()
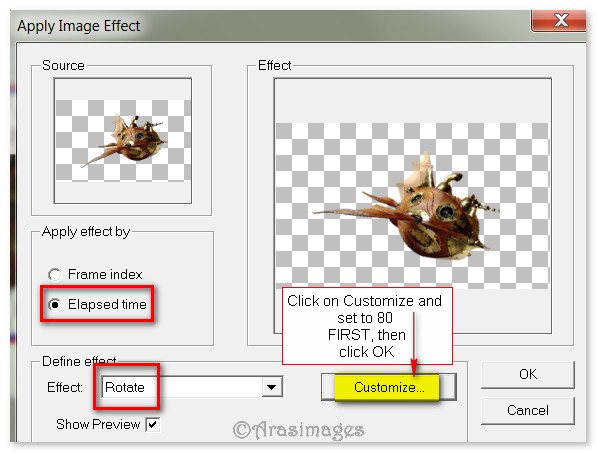
41. Highlight first frame. Edit/Select All. Effects/Apply Image Effect. Click on Customize and set Rotate to 80. Click OK. Use settings below, click OK.
42. Highlight first frame. Edit/Select all. Animation/Frame Properties. Set to 10. Right click on top of image/Copy.
43. File/Open. Open the Steampunk Space Travelers.png file. Using the Duplicate button at the top tool bar, click until you have 69 frames total. You may have to duplicate one by one toward the end of clicking the Duplicate button or you will end up with too many frames.
44. Highlight first frame of Steampunk Space Travelers.png file. Edit/Select All. Right click inside the first frame, Paste/Into Selected Frame. Set the spaceship in place in the bottom right corner, using my finished tag as a guide, and left click when you have it where you want it. It will now be in position.
45. Go back to the spaceship animation. Left click in first frame/Edit/Select All to be sure all frames are selected.
46. Animation/Reverse Frames. Right click on the top bar/Copy.
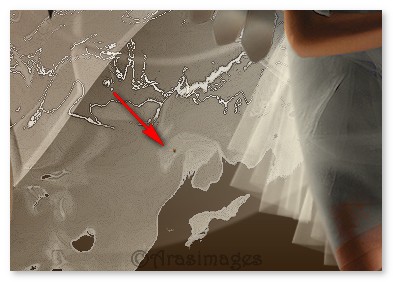
47. Go back to main image. Right click/Paste/Into Selected Frame. Set the small dot that you now see in the first frame to the left of the lady where I have indicated below.
48. Click on View Animation button in the top tool bar to check your animation. If you are pleased with it, click File/Save As. A box will come up where you can direct where to save it-(save in your working folder), give it a file name, (Steampunk Space Travelers) and let it auto save as a .gif file. Click Save. As the boxes change, click Next, Next, Next and Finish. Your image is now saved as a gif file named Steampunk Space Travelers in your working folder.
I give my testers, PamelaD and Evatexas, much credit for their testing of this tutorial. My site would not be the same without their constant assistance.
If you are going to use this tutorial for stationery, cards or place the tutorial/tag on another site, I would appreciate you contacting me for permission, giving Arasimages credit for the original tutorial and if possible, a link back to my site. Thank you.
Copyright © Arasimages All Rights Reserved