

Christmas
For Italian, Dutch and Danish translation, click on the flags.


For this tutorial you will need the materials in the zip file below.

Unzip the materials into a working folder. Open the materials in PSP, copy and close originals, using the copies in the tutorial. Place the JSC Holiday Ribbon One.pspgradient in your PSP/Gradient folder, the Selection Double Gold in your PSP/Selections Folder and the H SparkleWhite TUB file in your Picture Tub folder. Use the font as you normally do. The plugin used in this tutorial are Mura's Meister/Perspective. You will need Animation Shop which is free online if you do the animation. It is assumed you have a working knowledge of PSP to follow these directions. You may notice that I have started to use the shortcut of CTRL+D to deselect. If this is not to your liking, please use the Selections/Select None.
Thanks go to JHanna and to the unknown tubers/artists for the lovely tubes used. If any of these are yours, please contact me so I can give you proper credit by name.
Use the bookmark below to mark your place along the way.

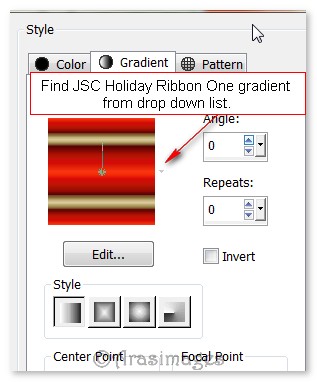
1. In Materials Palette, set Foreground to #JSC Holiday Ribbon One.pspgradient, Background to #413e63.
2. New/New Image 750px by 700px. Flood fill new image with Gradient.
3. Layers/New Raster Layer. Selections/Select All.
4. Open 0_7053c_85a66b6c_XXL.png (blue ice background). Copy/Paste into Selection. CTRl/D.
5. In Layers Palette, set Blend Mode to Luminance (L).
6. Layers/New Raster Layer. Flood fill with Gradient.
7. Effects/Texture Effects/Soft Plastic.
8. Effects/Distortions/Twirl. Degrees set to -154.
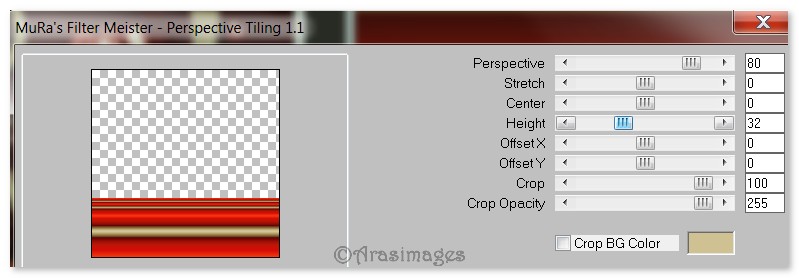
9. Effects/Mura'sMeister/Perspective. Use settings below. (Crop BG Color not applicable here).
10. Image/Mirror.
11. Effects/3D Effects/Drop Shadow. Vertical -10, Horizontal -10, Opacity 50, Blur 21, color #000000.
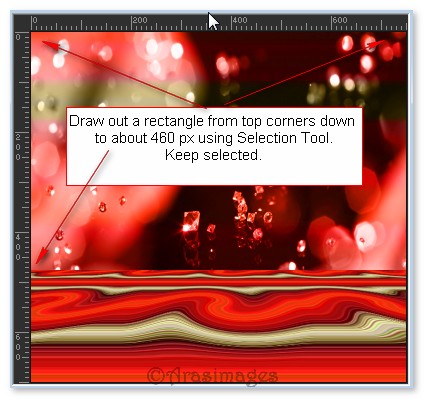
12. Using Selection tool, Rectangle/Replace/Feather 0, Anti-Alias checked, draw out a selection from the top corners down to about 460px. See example below.
13. Layers/New Raster Layer. Flood fill with background color #413e63.
14. Open 0_ccd2e_c2bc19f6_XL.png Mask. Leave open on work space.
15. Layers/New Mask Layer/From Image. From the box that opens, choose the png Mask file in Step 12. Click OK.

16. Merge/Merge Group. CTRL/D.
17. Effects/Edge Effects/Enhance.
18. Layers/New Raster Layer.
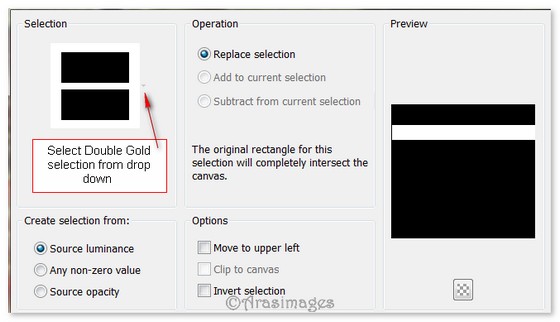
19. Selections/Load/Save Selections/Load Selection from Disk. Choose the Selection Double Gold in the drop down as shown below.
20. Change the background color in Material palette to #d0c193. Flood fill selection.
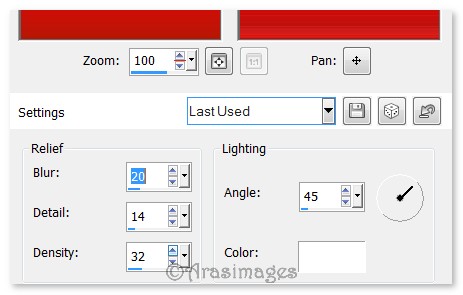
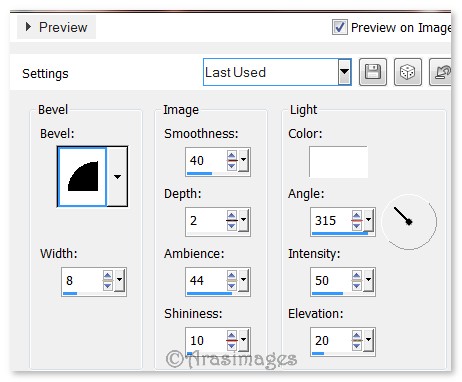
21. Effects/3D Effects/Inner Bevel. Use settings below.
22. Effects/3D Effects/Drop Shadow. Vertical 10, Horizontal 10, Opacity 50, Blur 21, color #000000.
23. Effects/3D Effects/Drop Shadow. Vertical -10, Horizontal -10, Opacity 50, Blur 21, color #000000.
24. CTRL/D.
25. Change Background color in Materials palette to #413e63. Close off Foreground Gradient.
26. From Tool bar select Text tool. From Font list, choose English111Presto BT, (TT0595M_.TTF) Size 60, Solid Line, Stroke 1. (See settings).

27. On the gold bar, type the Word Christmas using the Background color #413e63, space twice, change Background color to #f00003, type Christmas again, space twice, change the Background color back to #413e63 and type Christmas a third time.
28. Objects/Align/Horizontal Center in canvas. Convert to Raster Layer.
29. Effects/3D Effects/Drop Shadow. Vertical 1, Horizontal 0, Opacity 100, Blur 0, color #000000.
30. Open JHanna_615 tube.png (kitties). Copy/Paste as New Layer.
31. Image/Resize/Resize by 95%/Resize all layers unchecked. Move a little to the left and down.
32. Adjust/Sharpness/Sharpen.
33. Effects/3D Effects/Drop Shadow. Vertical -10, Horizontal -10, Opacity 50, Blur 21, color #000000.
34. Open 0_961ca_934891a8_XL.png gold tree. Copy/Paste as New Layer.
35. Image/Resize/Resize by 50%/Resize all layers unchecked.
36. Move tree to the right of image.
37. Effects/Edge Effects/Enhance.
38. Image/Add Borders/Add 10px border, Symmetric checked, color #413e63.
39. Select 10px border with Magic Wand. Apply Inner Bevel as in step #21. CTRL/D.
40. Image/Add Borders/Add 4px border, Symmetric checked, color #d0c193.
41. Image/Add Borders/Add 10px border, Symmetric checked, color #413e63.
42. Select 10px border with Magic Wand. Apply Inner Bevel as in step #21. CTRL/D
43. Add your name or watermark if you wish. Save As .jpg or .png image.
44. Duplicate 4 times, having 5 layers in all.
45. Close off all layers except the top layer.
46. From Tool bar, choose the H Sparkle white tub from the Picture Tub Tool.

47. Starting at the top layer, click once on the top of the Christmas tree with star Scale set to 75. Close off layer.
48. Move down one layer, open and highlight it.
49. Change the Scale to 50 in settings. Click randomly on the stars of the blue kitty and larger stars in the Christmas tree. Close layer.
50. Move down one layer, open and highlight it.
51. Change the Scale to 40 in settings. Click randomly on stars of the kitty and Christmas tree. Close layer.
52. Move down one layer, open and highlight it.
53. Change Scale to 30 in settings. Click randomly on stars of the Christmas tree. Not too many this time. Close layer.
54. Move down to bottom layer, open and highlight it.
55. Change Scale to 15 in settings. Click randomly on the kitty and Christmas tree again.
56. Open all layers that are not open. Save As Animation Shop (*pspimage) called Christmas.
57. File/Open in Animation Shop. Edit/Select All. Click on the top Animation button to check your animation. If it is to your liking, then we will now save.
58. File/Save As. A box will come up giving you the choice of where to save it, what to name it and is set to save as a .gif file. Click Save. As the boxes continue to come up, click Next, Next, Next and finally Finish. Your image is now saved as a .gif file.
I give my testers, PamelaD and Evatexas, much love and credit for their testing of this tutorial. My site would not be the same without their constant assistance.
If you are going to use this tutorial for stationery, cards or place the tutorial/tag on another site, I would appreciate you contacting me for permission, giving Arasimages credit for the original tutorial and if possible, a link back to my site. Thank you.
Copyright © Arasimages All Rights Reserved