
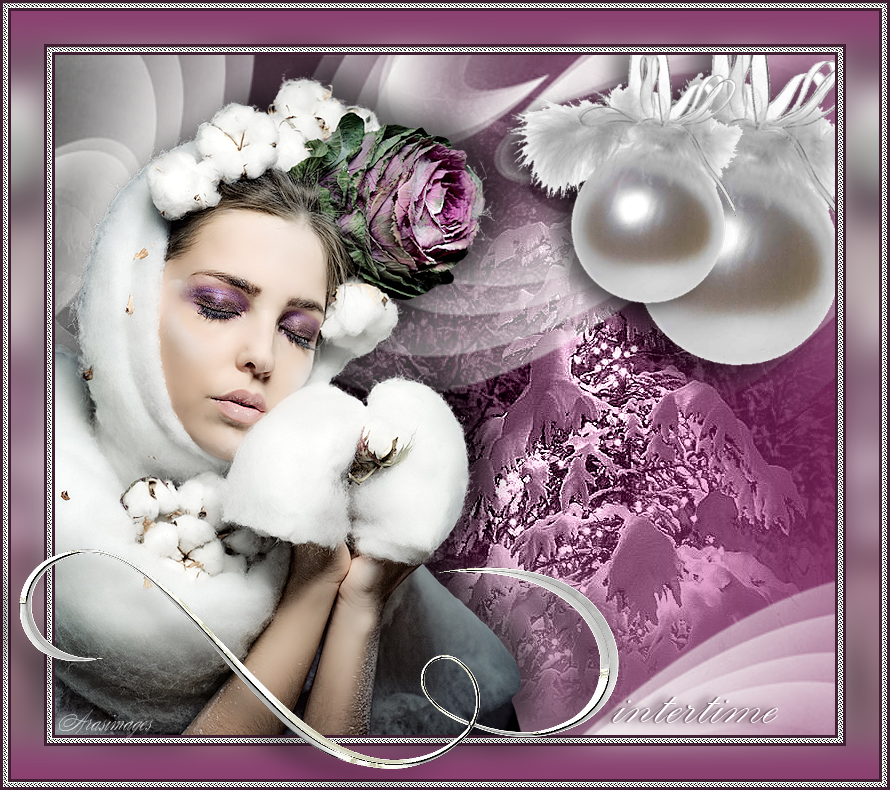
Winter's Softness
For Italian, Dutch and Danish translation, click on the flags.


For this tutorial you will need the materials in the zip file below.

Unzip the materials into a working folder. Open the materials in PSP, copy and close originals, using the copies in the tutorial. Place the Pattern-whitebeads in your PSP/Pattern folder. Use the font as you normally do. The plugin used in this tutorial are Graphics Plus/Horizontal Mirror and AP 7_Gradients/Patterns/Gradient_Diagonal. It is assumed you have a working knowledge of PSP to follow these directions.
Thanks go to Maryse for the beautiful Winter lady tube and to the unknown tubers/artists of the other lovely tubes used.
Use the bookmark below to mark your place along the way.

1. In Materials Palette, set Foreground to #fdfdfb, Background to #8a3e6f.
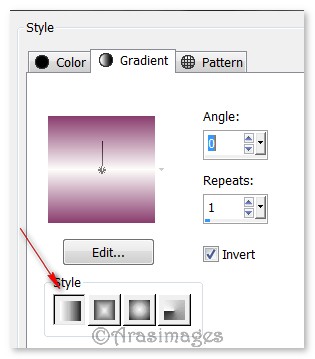
2. Create a gradient using Style Linear, Angle 0, Repeats 1, Invert checked.
3. New/New Raster Layer 780px by 680px.
4. Flood fill with Background color #8a3e6f.
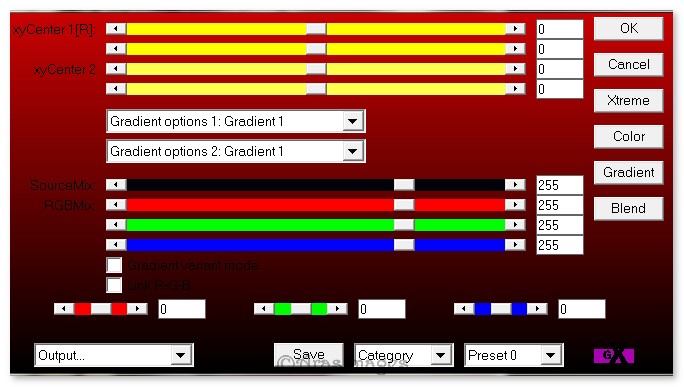
5. Effects/AP-07 Gradients/Patterns/Gradient-Diagonal. Use settings below.
6. Image/Flip.
7. Open Blue Christmas.pspimage. Copy/Paste as New Layer.
8. In Layers Palette, set Blend Mode to Luminance (L).
9. Effects/Edge Effects/Enhance.
10. Layers/New Raster Layer. Flood fill with Foreground color #fdfdfb.
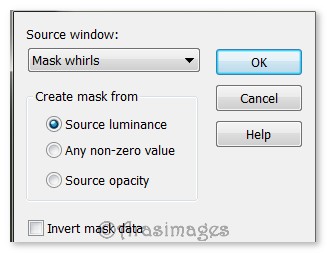
11. Open Mask Whirls.jpg. Leave open on desktop.
12. Layers/New Mask Layer/From Image. From the Source window, select the Mask whirls. Click OK.
13. Merge/Merge Group.
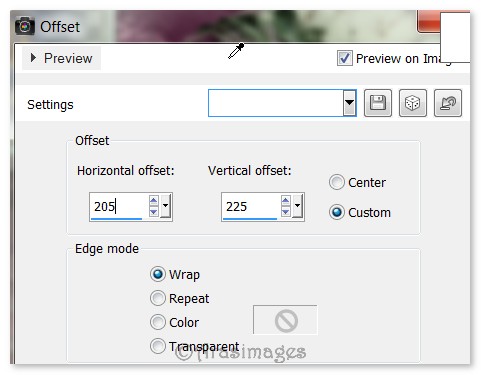
14. Effects/Image Effects/Offset. Use settings below.
15. Open Mr_Winter Woman with Hooded Cotton.pspimage.
16. Using Selection tool, select Maryse watermark/Press Delete key.
17. Selections/Select None.
18. Copy/Paste as New Layer.
19. Image/Resize/Resize by 80%/Resize all layers unchecked.
20. Image/Mirror. Move into bottom left corner.
21. Adjust/Sharpness/Sharpen.
22. Effects/3D Effects/Drop Shadow. Vertical -10, Horizontal 20, Opacity 60, Blur 40, color #000000.
23. Open FeatherBall.pspimage. Copy/Paste as New Layer.
24. Image/Resize/Resize by 80%/Resize all layers unchecked.
25. Move FeatherBall into upper right corner.
26. Effects/3D Effects/Drop Shadow. Vertical 10, Horizontal -20, Opacity 60, Blur 40, color #000000.
27. Duplicate. Image/Resize/Resize by 70%/Resize all layers unchecked.
28. Move duplicated ball to left edge of first ball in upper right corner.
29. Image/Add Borders/Add 3px border, Symmetric checked, color #411f33.
30. Image/Add Borders/Add 5px border, Symmetric checked, color #fdfdfb.
31. Use Magic Wand on 5px border to select it.
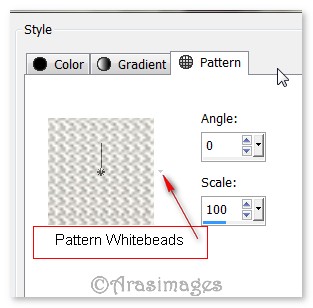
32. In Materials Palette, change Gradient to Pattern whitebeads. (See below). Flood fill activated 5px border.
33. Effects/Edge Effects/Enhance. Deselect.
34. Image/Add Borders/Add 3px border, Symmetric checked, color #411f33.
35. Image/Add Borders/Add 33px border, Symmetric checked, color #fdfdfb.
36. Select 33px border with Magic Wand. Flood fill with Gradient.
37. Effects/Graphics Plus/Horizontal Mirror. Use settings below.

38. Adjust/Blur/Gaussian Blur, Radius set to 16. Selections/Select None.
39. Image/Add Borders/Add 3px border, Symmetric checked, color #411f33.
40. Image/Add Borders/Add 5px border, Symmetric checked, color #fdfdfb.
41. Use Magic Wand on 5px border to activate it. Flood fill with pattern whitebeads.
42. Effects/Edge Effects/Enhance. Selections/Select None.
43. Image/Add Borders/Add 3px border, Symmetric checked, color #411f33.
44. Open Letter W.png. Copy/Paste as New Layer.
45. Place along bottom borders and to left side border.
46. Duplicate. Merge/Merge Down.
47. Effects/3D Effects/Drop Shadow. Vertical 10, Horizontal -20, Opacity 60, Blur 40, color #000000.
48. Activate the Text tool, find Font Kunstler Script, set to Size 72, color #fdfdfb, using settings below, type out "intertime".

49. Convert to Raster Layer. Set in place to right of the Letter W.
50. Effects/3D Effects/Drop Shadow. Vertical 0, Horizontal -2, Opacity 80, Blur 2, color #000000.
51. Effects/3D Effects/Drop Shadow. Vertical 0, Horizontal -9, Opacity 80, Blur 13, color #411f33.
52. Sign your name or leave your watermark if you wish.
53. Merge/Merge Visible. Save as a .jpg or .png file.
I give my testers, PamelaD and Evatexas, much love and credit for their testing of this tutorial. My site would not be the same without their constant assistance.
If you are going to use this tutorial for stationery, cards or place the tutorial/tag on another site, I would appreciate you contacting me for permission, giving Arasimages credit for the original tutorial and if possible, a link back to my site. Thank you.
Copyright © Arasimages All Rights Reserved