
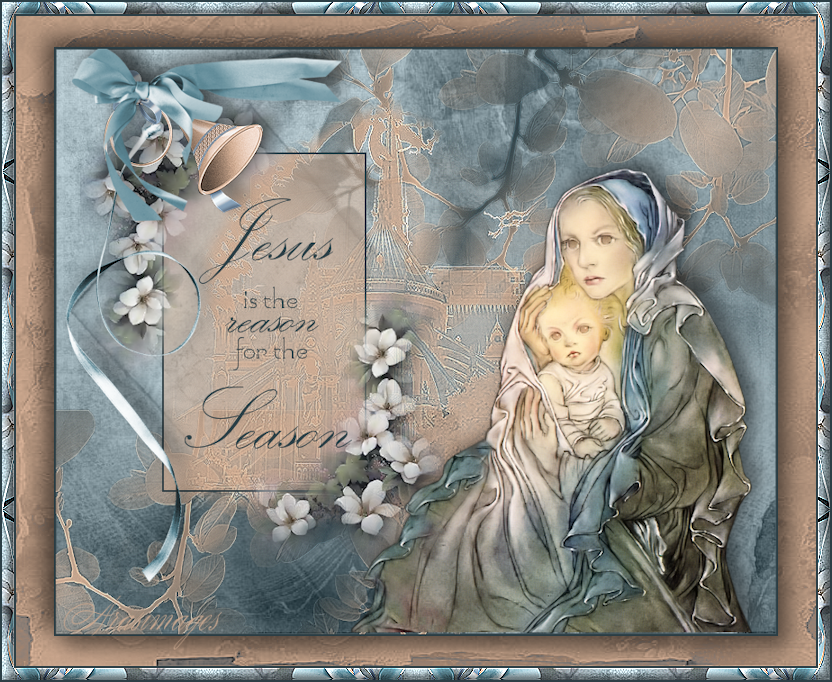
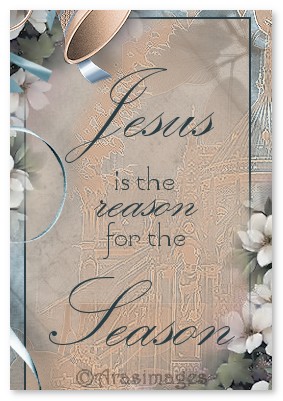
Jesus is the reason for the Season
For Dutch, Italian and Danish translation, click on the flags.


For this tutorial you will need the materials in the zip file below.

Unzip the materials into a working folder. Open the materials in PSP, copy and close originals, using the copies in the tutorial. Export Brushes into your PSP/Brushes folder. The Plugin used Crescent Moon/Terracotta is used in this tutorial. It is assumed you have a working knowledge of PSP to follow these directions. I have used PSPX6 to create this tutorial but other version of PSP will work.
Thanks go to JHanna for the beautiful Mother and Child tube, to Git for the flowers and to the unknown tubers/artists of the other lovely tubes used.
Use the bookmark below to mark your place along the way.

1. In Materials Palette, set Foreground to #cfab91, Background to #2c3f46.
2. New/New Raster Layer 800px by 650px.
3. Flood fill with Background color #2c3f46.
4. Layers/New Raster Layer. Selections/Select All.
5. Open JHanna_549 background.jpg. Copy/Paste into Selection.
6. Selections/Select None. Set Blend Mode to Luminance (L).
7. Layers/New Raster Layer.
8. Set Materials Palette to Gradient, using the Foreground/Background colors, Style Radial, Angle 0, Repeats 11, Invert unchecked, all other settings null.
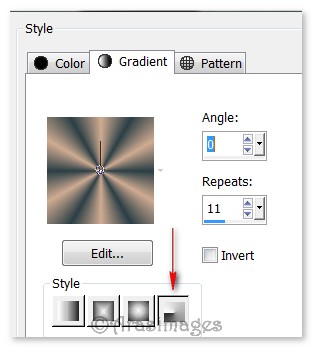
9. From Tool bar, select the Paint Brush tool. Choose Leaves&Trees9 brush. Use settings below to stamp using Gradient.

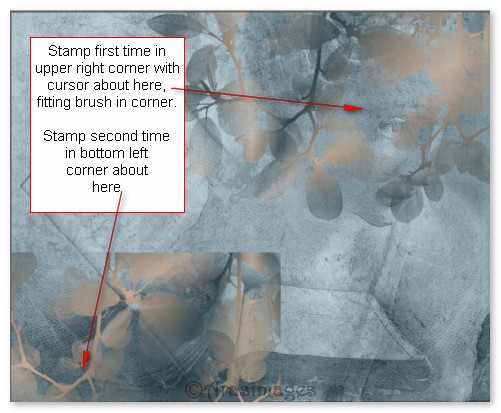
10. Stamp once in top right quadrant. Effects/Edge Effects/Enhance.
11. Layers/New Raster Layer. Stamp once again in bottom left quadrant. Effects/Edge Effects/Enhance.
12. Layers/New Raster Layer.
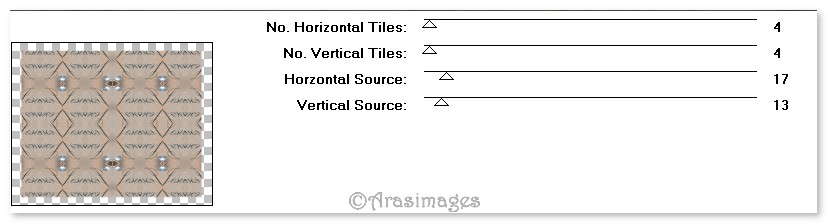
13. Select gh_places04 Brush. Using settings below and color #cfab91, stamp in middle of working image.

14. Effects/Edge Effects/Enhance.
15. Layers/New Raster Layer.
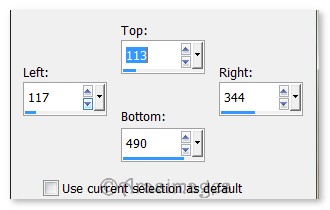
16. Selection Tools/Custom Selection. Use settings below.
17. Flood fill with Foreground color #cfab91. Set Opacity to 50.
18. Layers/New Raster Layer. Flood fill with Background color #2c3f46.
19. Selections/Modify/Contract by 2px. Press Delete key once.
20. Selections/Select None. Merge Down.
21. Open 01-09_flowers_11.git.pspimage. Copy/Paste as New Layer.
22. Image/Resize/Resize by 80%/Resize all layers unchecked.
23. Move to bottom right corner of the Custom Selection.
24. Duplicate/Image Mirror. Image/Flip.
25. Move to top left corner of the Custom Selection.
26. Open JHanna_253 tube.pspimage. Copy/Paste as New Layer.
27. Move to bottom right corner.
28. Effects/3D Effects/Drop Shadow. Vertical -10, Horizontal 10, Opacity 50, Blur 30, color #000000.
29. Open 0_b57ba_a728dcc9_XL.png. With Eraser tool set to Size 20, erase the bow portion and right streamer. COPY. Close out the image/do not save changes.
30. Adjust/Hue and Saturation/Colorize. Hue set to 138, Saturation set to 58.
31. Image/Resize/Resize by 70%/Resize all layers unchecked.
32. Move the ribbon streamer to left side of Custom Selection, from flowers downward.
33. Effects/3D Effects/Drop Shadow. Vertical -10, Horizontal 10, Opacity 50, Blur 30, color #000000.
34. Open 0_5cd3e_b6af09bb_L.png. With Foreground color #cfab91, using Color Changer tool/Tolerance set to 0, click inside the horn in darkest part. (Or use the recolored horn image provided in Materials.)
35. Image/Mirror. COPY. Close out image/do not save changes. Paste as New Layer.
36. Image/Resize/Resize by 50%/Resize all layers unchecked.
37. Move to upper left corner, place over flowers and ribbon streamer.
38. Adjust/Sharpness/Sharpen.
39. Effects/3D Effects/Drop Shadow. Vertical -10, Horizontal 10, Opacity 50, Blur 30, color #000000.
40. Open 0_88e1c_f9fa6d62_M.png. Copy/Paste as New Layer.
41. Adjust/Hue and Saturation/Colorize. Hue set to 138, Saturation set to 58.
42. Effects/3D Effects/Drop Shadow. Vertical -10, Horizontal 10, Opacity 50, Blur 30, color #000000.
43. Move to upper left corner of image over horn and flowers.
44. From Tool bar, select the Text tool. Choose Font Kunstler Script, Size 100, and using other settings as seen below. Using Background color #2c3f46, type the word "Jesus". Convert to Raster Layer.

45. Repeat Step #44 except type the word "Season". Convert to Raster Layer.
46. Move the word "Jesus" to the top and "Season" to the bottom of the Custom Selection.
47. Change size to 70, using same color and type the word "reason". Convert to Raster Layer. Place in middle of Custom Selection. We will adjust the text later.
48. Change the Font to Yolanda Princess, Size 36, and other settings as seen below. Using Background color #2c3f46, type out the words "is the". Convert to Raster Layer. Type out the words "for the". Convert to Raster Layer.

49. Now we will place the words in their proper places using the Move tool (or highlight layer and use up/down/back/forth keys). See below for an example.
50. Image/Add Borders/Add 2px border, Symmetric checked, color #2c3f46.
51. New/New Image 800px by 650px. Selections/Select All.
52. Open 0_70e89_e0867aa2.L.png. Copy/Paste into Selection. Select/Select None.
53. Using Color Changer tool, Tolerance set to 10, left click Foreground color #cfab911 to change color of png file.
54. Go back to the working image. Copy.
55. Paste/Paste as New Layer into the recolored png file.
56. Image/Resize/Resize by 90%/Resize all layers unchecked.
57. Effects/3D Effects/Drop Shadow. Vertical -10, Horizontal -10, Opacity 50, Blur 30, color #00000.
58. Effects/3D Effects/Drop Shadow. Vertical 10, Horizontal 10, Opacity 50, Blur 30, color #000000.
59. Image/Add Borders/Add 2px border, Symmetric checked, color #2c3f46.
60. Image/Add Borders/Add 12px border, Symmetric checked, color #cfab91.
61. Select 12px border with Magic Wand. Paste/Paste into Selection. (Main image is still in memory).
62. Effects/Crescent Moon/Terracotta. Apply as seen below.
63. Effects/Edge Effects/Enhance.
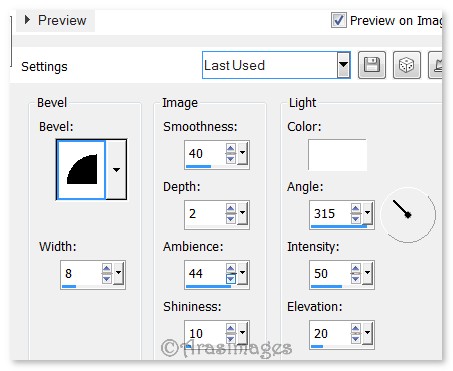
64. Effects/3D Effects/Inner Bevel. Use settings below.
65. Selections/Select None.
66. Image/Add Borders/Add 2px border, Symmetric checked, color #2c3f46.
67. Sign your name or leave your watermark if you wish.
68. Merge/Merge Visible. Save as a .jpg or .png file.
I give my testers, PamelaD and Evatexas, much love and credit for their testing of this tutorial. My site would not be the same without their constant assistance.
If you are going to use this tutorial for stationery, cards or place the tutorial/tag on another site, I would appreciate you contacting me for permission, giving Arasimages credit for the original tutorial and if possible, a link back to my site. Thank you.
Copyright © Arasimages All Rights Reserved