

Time Alone
For Italian, Dutch and Danish translation, click on the flags.


For this tutorial you will need the materials in the zip file below.

Unzip the materials into a working folder. Open the materials in PSP, copy and close originals, using the copies in the tutorial. Place the dkd-pibronze gradient in your PSP/Gradients folder. Place the Font Cravat Display SSi Regular into your PSP/Fonts folder. The Plugins used are Pixelate/Sector Mosiac, AFS IMPORT/MIRROFF (I have mine in Filters Unlimited), AlienSkin Xenofex2/Burnt Edges and Mura's Meister/Perspective. It is assumed you have a working knowledge of PSP to follow these directions. I have used PSPX5 to create this tutorial but other version of PSP will work.
Thanks go to Suzi Sgai for the beautiful woman tube, and to Nikita for her lovely street scene.
Use the bookmark below to mark your place along the way.

1. In Materials Palette, set Foreground to dkd-pibronze Gradient, Background to #844231. Angle 0, Repeats 0, Invert checked, Style Linear.

2. New/New Image 700px by 800px.
3. Flood fill with Gradient.
4. Effects/Pixelate/Sector Mosiac. Both settings at 25.
5. Effects/Edge Effects/Enhance.
6. In Materials Palette, change the Angle of the Gradient to 90.
7. Layers/New Raster Layer. Flood fill with Gradient.
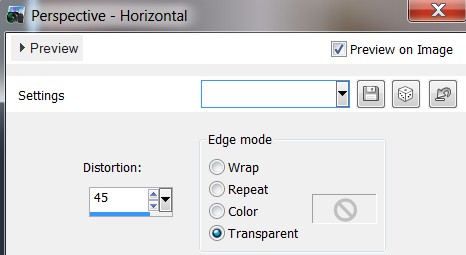
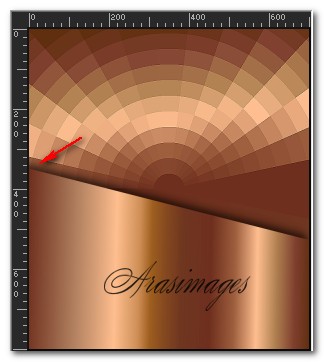
8. Effects/Geometric Effects/Perspective - Horizontal.
9. Move down left side to about 350px.
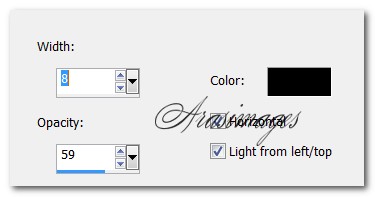
10. Effects/3D Effects/Drop shadow. Vertical -9, Horizontal -9, Opacity 50, Blur 25, color #000000. Repeat.
11. Duplicate. Image/Mirror.
12. Layers/New Raster Layer.
13. Flood fill with Gradient.
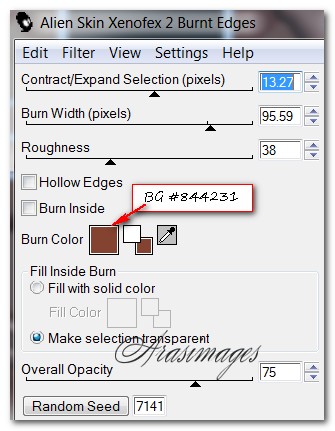
14. Effects/AlienSkin Xenofex2/Burnt Edges.
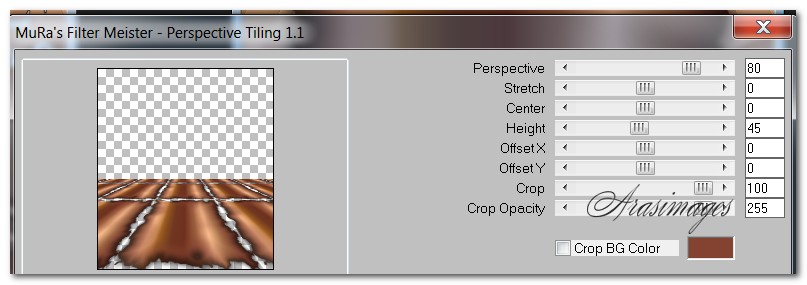
15. Effects/Mura'sMeister/Perspective Tiling.
16. Pull layer down to 466px.
17. Open downloads_paysages_1250147485_paysages.pspimage. Copy/Paste as New Layer.
18. Image/Resize/Resize by 130%/Resize all layers unchecked.
19. Adjust/Sharpness/Sharpen.
20. Merge/Merge Visible. COPY.
21. Effects/Filters Unlimited/AFS IMPORT/MIRROFF on main image. Use default settings.
22. Effects/Texture Effects/Blinds. Both boxes are checked, Color #000000.
23. Paste as New Layer. (Image you copied is still in memory).
24. Image/Resize/Resize by 95%/Resize all layers unchecked.
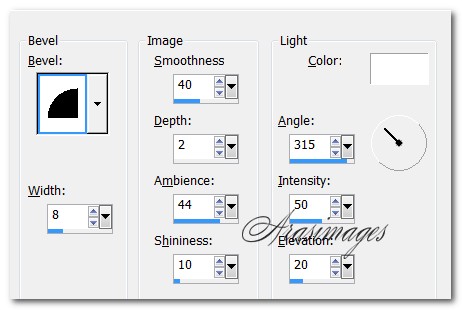
25. Effects/3D Effects/Inner Bevel.
26. With Magic Wand, click on pasted layer to activate it.

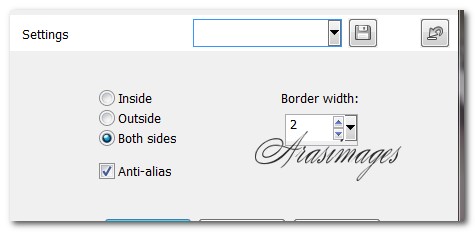
27. Layers/New Raster Layer. Selections/Modify/Select Selections Borders. Use settings below.
28. Flood fill with color #000000. Selections/Select None.
29. Open midnight_fantasy_clock_shadow.png. Copy/Paste as New Layer.
30. Image/Add Borders/Add border 30px, Symmetric checked, color #000000.
31. Image/Add Borders/Add border 10px, Symmetric checked, color #ffffff.
32. Click on 10px border with Magic Wand to activate it.
33. In Materials palette/Gradient, change Angle to 45, Repeats to 1. Flood fill 10px border.
34. Effects/Edge Effects/Enhance. Effects/Edge Effects/Enhance More. Selections/Select None.
35. Image/Add Borders/Add 3px border, Symmetric checked, color #000000.
36. Open SS_144.pspimage. Copy/Paste as New Layer.
37. Place woman in bottom left corner to fit.
38. Effects/3D Effects/Drop Shadow. Vertical -13, Horizontal -13, Opacity 80, Blur 44, Color #000000. Repeat.
39. From Tool bar, select the Text tool. Choose the Font Cravat Display SSi, Size 48, Color #000000, Units set to Points, leave both Foreground and Background open.(see settings below.)

40. Type out the words "Time Alone". Center at the top of image.
41. Convert to Raster Layer. Duplicate.
42. Open Side_Bar.png file. Copy/Paste as New Layer.43. Move over center left borders, carefully placing between the two small black borders. Objects/Align/Vertical Center.
44. Duplicate. Image/Mirror.
45. Sign your name or leave your watermark if you wish.
46. Merge/Merge Visible. Save as a .jpg or .png file.
I give my testers, PamelaD and Evatexas, much love and credit for their testing of this tutorial. My site would not be the same without their constant assistance.
If you are going to use this tutorial for stationery, cards or place the tutorial/tag on another site, I would appreciate you contacting me for permission, giving Arasimages credit for the original tutorial and if possible, a link back to my site. Thank you.
Copyright © Arasimages All Rights Reserved