
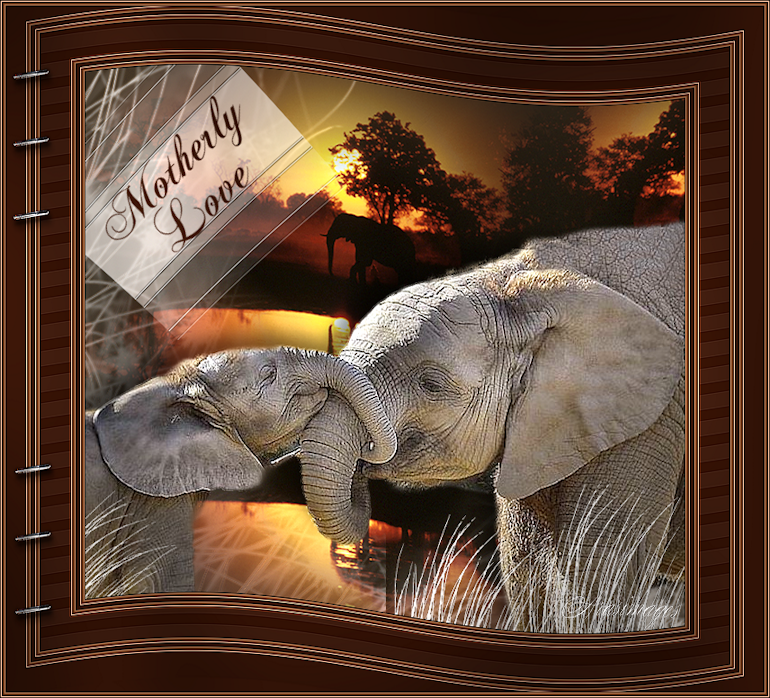
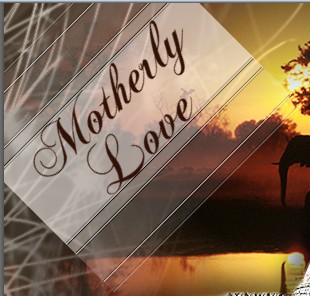
Motherly Love
For Italian, Dutch and Danish translation, click on the flags.


For this tutorial you will need the materials in the zip file below.

Unzip the materials into a working folder on your desktop named Motherly Love. Open the materials in PSP, copy and close originals, using the copies in the tutorial. Export brushes into your PSP/Brushes folder. The Plugins used are Graphics Plus/Cross Shadow, Photo Effects/Scanlines and AAA Frames/Frame Works . It is assumed you have a working knowledge of PSP to follow these directions. I have used PSPX6 to create this tutorial but other version of PSP will work.
Thanks go to Silvie for the Elephants tube, and to Nikita for her lovely elephant sunset scene.
Use the bookmark below to mark your place along the way.
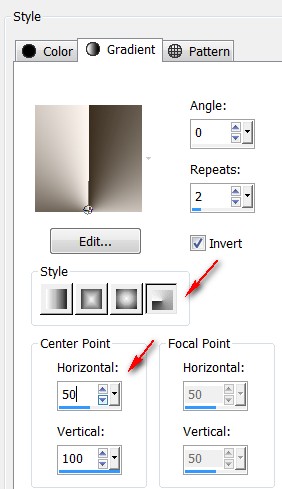
1. In Materials Palette, set Foreground to #fbf7f1, Background to #3b2f21. Create a Gradient using Foreground/Background colors, Style set to Radial, Angle 0, Repeats 2, Invert checked. Center Point Horizontal at 50, Vertical at 100.
2. New/New Image 680px by 600px.
3. Flood fill with Gradient.
4. Layers/New Raster Layer. Flood fill with Background color #3b2f21.
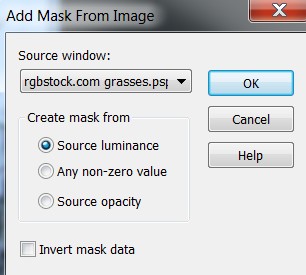
5. Open rgbstock.com grasses.pspimage. Leave open on workspace.
6. Return to working image. Layers/New Mask Layer/From Image. Choose the rgbstock.com image. Click OK.
7. Merge/Merge Group.
8. Effects/Edge Effects/Enhance.
9. Open nikita_reveries_p_41_04.08.pspimage. Copy/Paste as New Layer.
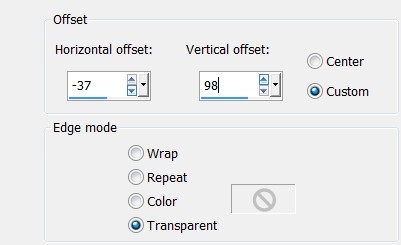
10. Effects/Image Effects/Offset.

11. Paste again as New Layer. Effects/Image Effects/Offset.
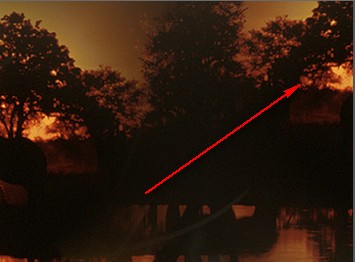
12. Duplicate. Image/Mirror. Pull duplicated image into upper right corner.
13. Open Elefant_Mom_with_Kid.pspimage. Copy/Paste as New Layer.
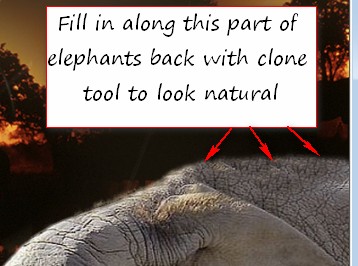
14. Using Clone tool set to Aligned mode and other settings as seen below, right click on mother elephant's back. Left click several times to fill and raise her back so it is natural looking.

15. Adjust/Sharpness/Sharpen.
16. Layers/New Raster Layer.
17. In Materials Palette, change Foreground Gradient to Foreground color #fbf7f1.
18. From Tool bar, select the Paint Brush Tool. Choose Fur 6 brush.
19. Stamp twice on mother elephant's legs in bottom right corner of image with below settings. Set Size to 200, Rotation to 32 and stamp once on baby elephant's body/leg in bottom left corner of image.

20. Effects/Edge effects/Enhance.
21. Layers/New Raster Layer.
22. From Tool Bar, select the Paint Brush Tool. Choose Patternz~CraziiShortii 033 brush. Stamp once in upper left corner.

23. Effects/Edge Effects/Enhance.
24. Image/Free Rotate, Rotate Right by 45 degrees.
25. From Tool Bar, select Text Tool. Choose Font ChopinScript, Size 22, color #321307. Use settings below, type the word "Motherly". Convert to Raster Layer.

26. Image/Free Rotate, Rotate Left by 45 degrees.
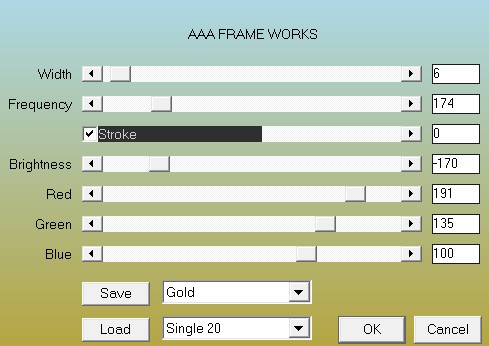
27. Place over the stamped brush image as I have done in my finished image.
28. Using the same settings as in Step 25, type the word "Love". Convert to Raster Layer. Repeat Step #26.
29. Place over the stamped image below the word "Motherly" as I have done in finished image.
30. Adjust the stamped brush layer and text layers so they are in the upper left corner as seen below.
31. Merge/Merge Visible.
32. Effects/AAA Frames/Frame Works.
33. Image/Add Borders/Add 10px border, Symmetric Checked, color #321307.
34. Effects/AAA Frames/Frame Works. Same settings as in Step #32.
35. Image/Add Borders/Add 40px border, Symmetric checked, color #321307.
36. With Magic Wand, select the 40px border.
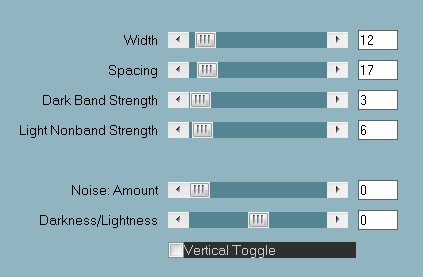
37. Effects/Photo Effects/Scanlines.
38. Effects/Edge Effects/Enhance. Selections/Select None.
39. Effects/AAA Frames/Frame Works. Same settings as in Step #32.
40. Image/Add Borders/Add 10px border, Symmetric Checked, color #321307.
41. Effects/AAA Frames/Frame Works. Same settings as in Step #32.
42. Image/Add Borders/Add 28px border, Symmetric checked, Color #321307.
43. Open Grapas.pspimage. (binders). Copy/Paste as New Layer.
44. Place the Grapas near the top over the outer two small borders.
45. Effects/3D Effects/Drop Shadow, Vertical 6, Horizontal 2, Opacity 50, Blur 5, color #000000. Repeat.
46. Duplicate. Image/Flip.
47. Pull duplicate Grapas down equadistant to top Grapas. Merge/Merge Visible.
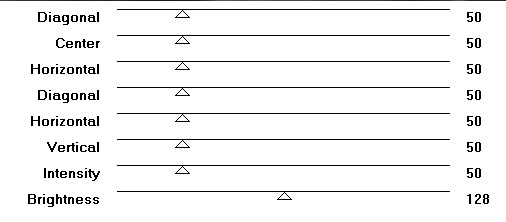
48. Effects/Graphics Plus/Cross Shadow.
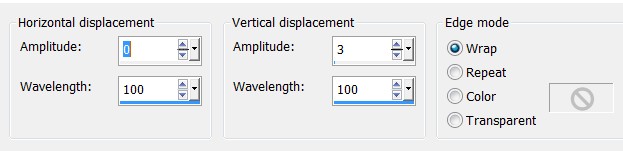
49. Effects/Distortion Effects/Wave.
50. Effects/AAA Frames/Frame Works. Same settings as in Step #32.
51. Image/Resize/Resize by 90%/Resize all layers checked.
52. Sign your name or leave your watermark if you wish.
53. Merge/Merge Visible if needed. Save as a .jpg or .png file.
I give my testers, PamelaD and Evatexas, much love and credit for their testing of this tutorial. My site would not be the same without their constant assistance.
If you are going to use this tutorial for stationery, cards or place the tutorial/tag on another site, I would appreciate you contacting me for permission, giving Arasimages credit for the original tutorial and if possible, a link back to my site. Thank you.
Copyright © Arasimages All Rights Reserved