
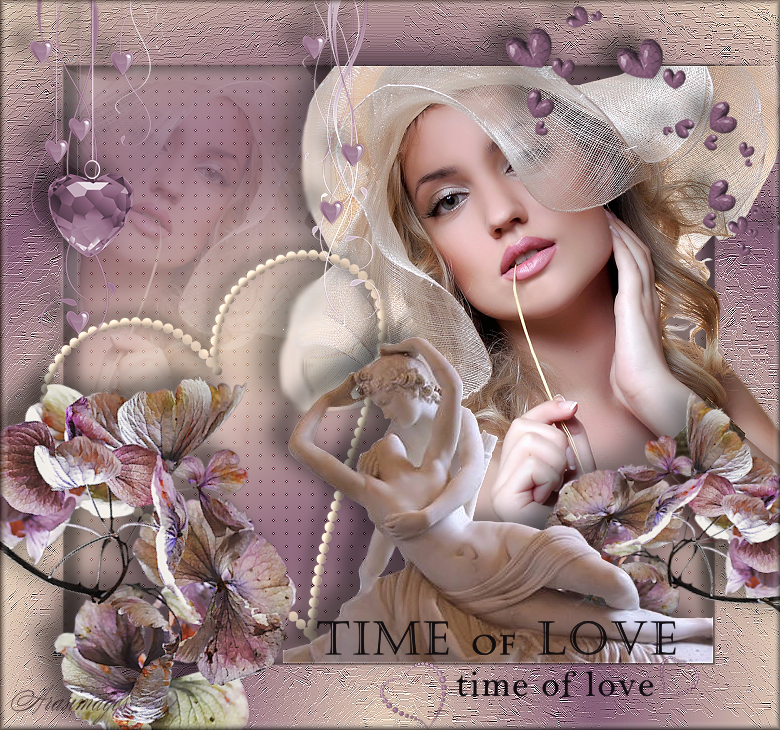
Time of Love
For Italian, Dutch and Danish translation, click on the flags.


For this tutorial you will need the materials in the zip file below.

Unzip the materials into a working folder on your desktop named Time of Love. Open the materials in PSP, copy and close originals, using the copies in the tutorial. Place the Selections ArasimagesBorder in your PSP/Selections folder, Style Line krisbigdot in PSP/Styled Lines folder and Objects.jsl in your PSP/Preset Shapes Folder. (Before installing the Objects.jsl, check to see if you have these already installed in your current PSP program.) Plugins used in this tutorial is Penta/Color Dot. It is assumed you have a working knowledge of PSP to follow these directions. I have used PSPX6 to create this tutorial but other version of PSP will work.
Thanks go to Cibi for the lady and Cupid tubes, and to the unknown tubers of the scraps I've gathered from free sites on the internet.
Use the bookmark below to mark your place along the way.

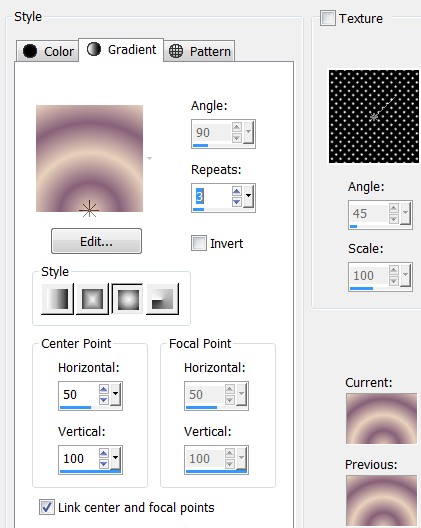
1. In Materials Palette, set Foreground to #e8d2bc, Background to #876079. Create a Gradient using Foreground/Background colors, Style set to Sunburst, Angle grayed out, Repeats 3, Invert unchecked. Center Point Horizontal at 50, Vertical at 100, Link center and focal points checked.
2. New/New Image 780px by 730px.
3. Flood fill with Gradient.
4. Adjust/Blur/Gaussian Blur. Radius set to 30.
5. Effects/Penta/Color Dot. Use settings below.

6. Effects/Edge Effects/Enhance.
7. Layers/New Raster Layer. Selections/Load/Save Selection/Load Selection from Disk. Choose ArasimagesBorder. Load.
8. Flood fill Selection with Gradient.
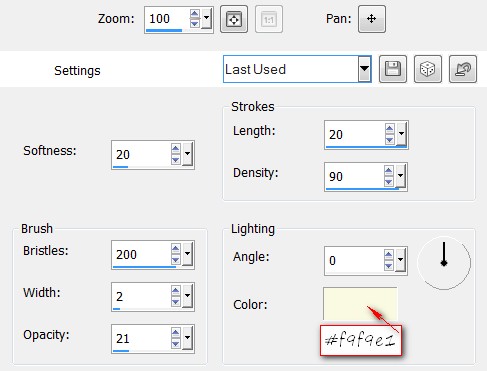
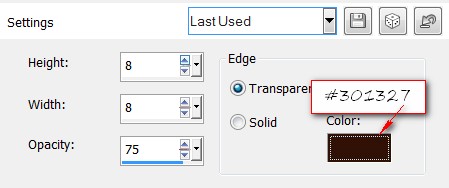
9. Effects/Art Media Effects/Brush Strokes. Use settings below using color #f9f9e1.
10. Effects/Edge Effects/Enhance.
11. Effects/3D Effects/Drop Shadow. Vertical -6, Horizontal -14, Opacity 50, Blur 16, color #000000.
12. Effects/3D Effects/Drop Shadow. Vertical 6, Horizontal 14, Opacity 50, Blur 16, color #000000.
13. Selections/Select None.
14. Open Frivole_CibiBijoux.pspimage. Copy/Paste as New Layer.
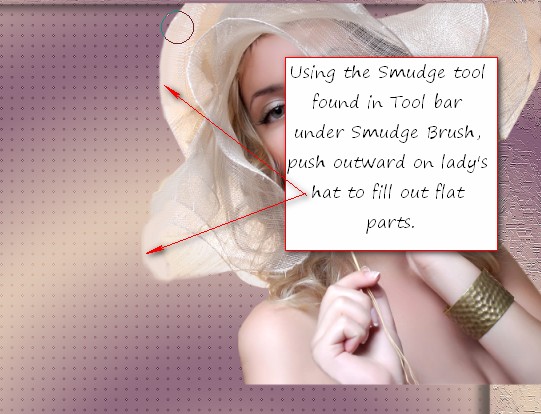
15. From the Tool bar, select Smudge Brush tool. Push outward on areas of hat indicated in illustration below until the flat areas are filled out. You may have to redo a few times~having your image scrolled larger may help you be more accurate. Use brush settings below.

16. Change to Soften tool and leave on default settings, left click, hold down and drag to soften the edges you pushed with Smudge tool. Place lady into upper right corner.
17. Effects/3D Effects/Drop Shadow. Vertical -10, Horizontal -20, Opacity 50, Blur 28, color #000000.
18. Adjust/Sharpness/Sharpen.
19. Working on the Frivole_CibiBijoux.pspimage, Image/Mirror.
20. Image/Resize/Resize by 80%/Resize all layers unchecked.
21. Copy/Paste as New Layer on main working image. Move into upper left corner.
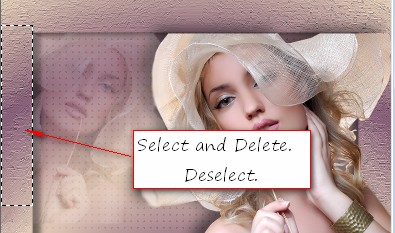
22. Drop Opacity to 25. Using Selections tool, select the border as seen below, press Delete key once. Selections/Select None.
23. Open JHanna_733 tube.pspimage. Copy/Paste as New Layer.
24. Image/Resize/Resize by 56%/Resize all layers unchecked.
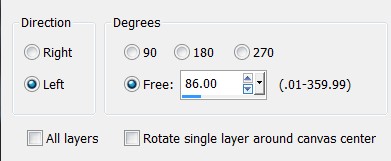
25. Image/Free Rotate. Rotate Left by 86 degrees.
26. Effects/3D Effects/Drop Shadow. Vertical -10, Horizontal -20, Opacity 50, Blur 28, color #000000.
27. Move to right side of image covering part of the lady and border.
28. Paste as New Layer again. (Flower should be in memory).
29. Image/Resize/Resize by 75%/Resize all layers unchecked.
30. Image/Mirror. Image/Free Rotate. Rotate Right by 120 Degrees.
31. Effects/3D Effects/Drop Shadow. Vertical -10, Horizontal -20, Opacity 50, Blur 28, color #000000.
32. Place flower in bottom left corner.
33. In Materials Palette, change the Gradient to the Foreground color, close off the Background color.
34. From Tool bar, select the Preset Shape Tool(P). Choose Heart 2. With settings below and Line Style set to krisbigdot, Width 3, draw out a heart about the same size as I have done. It does not have to be exact. (My testers had different results than I did using Width 3, so just play with Width size until you get the results you like.)

35. Using the turn node, turn so bottom is pointing a little toward the right and the heart sets on an angle. Convert to Raster Layer.
36. Move heart to the left side over the border and have the bottom tip pointing toward the bottom border.
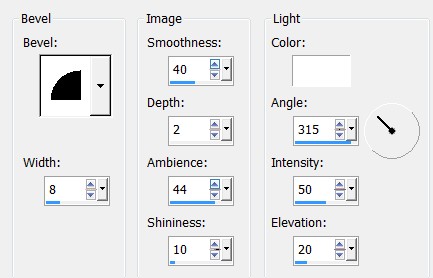
37. Using Magic Wand, select the heart. Effects/3D Effects/Inner Bevel. Use settings below.
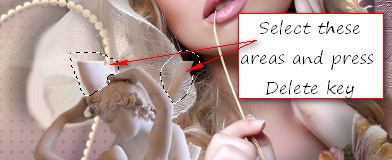
38. Selections/Select None.
39. Effects/3D Effects/Drop Shadow. Vertical -6, Horizontal -8, Opacity 50, Blur 21, color #000000.
40. Pull heart below Raster 6. Highlight top layer to continue.
41. Open Cupidon_CibiBijoux.pspimage. Copy/Paste as New Layer.
42. Adjust/Sharpness/Sharpen. Move into bottom right corner inside the border.
43. Using the Selections/Free Hand selection tool, select around the two areas as shown below. Press Delete key once. Selections/Select None.

44. Effects/3D Effects/Drop Shadow. Vertical -10, Horizontal -20, Opacity 50, Blur 28, color #000000.
45. Open 0_9b703_b15dab30_M.pspimage (hearts). Copy/Paste as New Layer.
46. Adjust/Hue and Saturation/Colorize. Saturize set to 228, Hue set to 43.
47. Effects/3D Effects/Drop Shadow. Vertical -10, Horizontal -20, Opacity 50, Blur 28, color #000000.
48. Move into upper right corner over border and lady's hat.
49. Open 0_6c9b6_62d64a9a.L.pspimage. Copy/Paste as New Layer.
50. Image/Mirror. Image/Resize/Resize by 70%/Resize all layers unchecked.
51. Adjust/Hue and Saturation/Colorize. Saturize set to 228, Hue to 43.
52. Effects/3D Effects/Drop Shadow. Vertical -10, Horizontal -20, Opacity 50, Blur 28, color #000000.
53. Move into upper left corner.
54. Adjust/Sharpness/Sharpen.
55. Open 0_85cb2_b639f8ef_XL.png. (Text). Copy/Paste as New Layer.
56. Image/Resize/Resize by 55%/Resize all layers unchecked.
57. Adjust/Hue and Saturation/Colorize. Saturize set to 228, Hue to 43.
58. Adjust/Sharpness/Sharpen.
59. Duplicate. Merge/Merge Down.
60. Place over Cupidon and bottom border.
61. Merge/Merge Visible.
62. Effects/3D Effects/Buttonize. Use settings below.
63. Sign your name or leave your watermark if you wish. Merge/Merge Visible if necessary. Save as a .jpg or .png file.
Thank you Eva and Pamela for testing of this tutorial. My site would not be the same without your constant assistance.
If you are going to use this tutorial for stationery, cards or place the tutorial/tag on another site, I would appreciate you contacting me for permission, giving Arasimages credit for the original tutorial and if possible, a link back to my site. Thank you.
Copyright © Arasimages All Rights Reserved