
Hearts and Flowers
For Italian, Dutch, Danish and German translation, click on the flags.


For this tutorial you will need the materials in the zip file below.

Unzip the materials into a working folder. Open the materials in PSP, copy and close originals, using the copies in the tutorial. No Plugins are used in this tutorial but for animation, you will need the program Animation Shop which can be found free on the internet. It is assumed you have a working knowledge of PSP to follow these directions. I have used PSPX6 to create this tutorial but other version of PSP will work.
Thanks go to Fanou66 for the young girl, Lilas_Old_Garden for the netting lace and to the unknown tubers/artists of the other lovely tubes used.
Use the bookmark below to mark your place along the way.

1. In Materials Palette, set Foreground to #b39b79, Background to #840014.
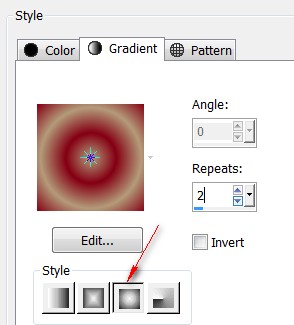
2. Create a Gradient using Style Sunburst, Angle 0, Repeats 2, Invert unchecked, Center Point and Focal Point set to 50.
3. New/New Image 800px by 760px. Flood fill with Gradient.
4. Adjust/Brightness and Contrast/Highlight/Midtone/Shadow.

5. Open Fanou66-octobre-2010-tm77.pspimage of young girl. Copy/Paste as New Layer.
6. Image/Resize/Resize by 60%/Resize all layers unchecked.
7. Adjust/Sharpness/Sharpen. Move girl down so red circle is around her head.
8. Open 0_9ae0f_281f41dc_XXL.pspimage (leaves). Copy/Paste as New Layer.
9. Move leaves toward the top a little.
10. Effects/3D Effects/Drop Shadow, Vertical -11, Horizontal 16, Opacity 50, Blur 13, color #000000.
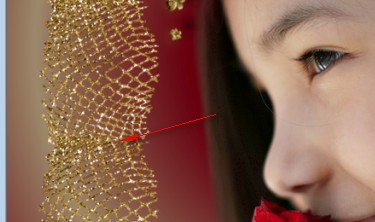
11. Open Lilas_Old_Garden_elmt(27).png (netting). Copy/Paste as New Layer.
12. Move to left side of image having right edge about at 200px.
13. Duplicate. Pull down so top and bottom edges of netting meet. Merge/Merge/Down.
14. Effects/3D Effects/Drop Shadow, Vertical -11, Horizontal 16, Opacity 50, Blur 13, color #000000.
15. Duplicate. Image/Mirror and pull all the way to right edge.
16. Open SideBarWithShadow.png. Copy/Paste as New Layer.
17. Pull to left side of image, positioning so netting is showing on right side of SideBar. Objects/Align/Vertical Center.
18. Open 0_8d5a3_ef03b70a_XL.png (ribbon). copy/Paste as New Layer.
19. Adjust/Hue and Saturation/Colorize. Hue set to 24, Saturation set to 68.
20. Image/Free Rotate. Rotate Left by 90 Degrees.
21. Pull ribbon to the right side of image so it cascades over left side of netting.
22. Effects/3D Effects/Drop Shadow, Vertical -11, Horizontal 16, Opacity 50, Blur 13, color #000000.
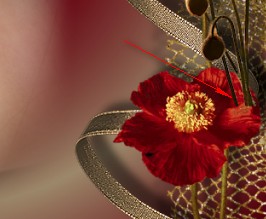
23. Open OpenPoppy.Png. Copy/Paste as New Layer.
24. Using Color Changer tool, right click several times in the poppy using Background color #840014.
25. Image/Resize/Resize by 55%/Resize all layers unchecked.
26. Effects/3D Effects/Drop Shadow, Vertical -11, Horizontal 16, Opacity 50, Blur 13, color #000000.
27. Move OpenPoppy over Ribbon and netting in bottom right corner of image.
28. Open TwoPoppies.Png. Copy/Paste as New Layer.
29. Using Color Changer tool, right click several times in the poppies using Background color #840014.
30. Image/Resize/Resize by 50%/Resize all layers unchecked.
31. Effects/3D Effects/Drop Shadow, Vertical -11, Horizontal 16, Opacity 50, Blur 13, color #000000.
32. Move TwoPoppies to right side of image, placing over the OpenPoppy so stem sits on a petal.
33. Open FallingHearts.Png. Copy/Paste as New Layer.
34. Place over SideBar on left so hearts fit nicely.
35. Effects/3D Effects/Drop Shadow, Vertical -11, Horizontal 16, Opacity 50, Blur 13, color #000000.
36. Open ThreeHearts.Png. Copy/Paste as New Layer.
37. Effects/3D Effects/Drop Shadow, Vertical -11, Horizontal 16, Opacity 50, Blur 13, color #000000.
38. Place in top right corner.
39. Image/Add Borders/Add 3px border, Symmetric checked, color #b39b79.
40. Image/Add Borders/Add 17px border on top, bottom and left side, 80px on right side, Symmetric unchecked, color #840014.
41. With Magic Wand Select the outside border to activate it.
42. Selections/Invert. Apply Drop Shadow as in Step #37, then apply another Drop Shadow with Vertical at 11, Horizontal -16, all other settings the same. Deselect.
43. Image/Add Borders/Add 3px border, Symmetric checked, color #b39b79.
44. From Tool bar, select Text tool. Choose Font Liorah BT, Size 60, color #b49777. See below for other settings.

45. Type the words "Hearts and Flowers". Convert to Raster Layer.
46. Image/Free Rotate. Rotate Right by 90 degrees.
47. Place the text in the larger border on the right side of image. Objects/Align/Vertical Center.
48. Duplicate. Merge/Merge Down.
49. Effects/3D Effects/Drop Shadow, Vertical 11, Horizontal 2, Opacity 50, Blur 13, color #000000. Repeat
50. Sign your name or leave your watermark if you wish.
51. Merge/Merge Visible. Save as a .jpg or .png file. COPY.
52. Open the Animation Shop program. Paste as New Animation.
53. Duplicate image until you have 9 frames in all. (see example below where to duplicate.)

54. Highlight the first frame. Edit/Select All.
55. File/Open the floatie00295.gif.
56. Highlight the first frame. Edit/Select All. Right click on the top of the bar and Copy.
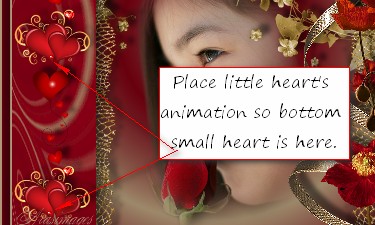
57. Go back to the main image. Inside the first frame, right click, Paste/Into Selected Frame-see next step where to paste.
58. Place the animated hearts on the left side of main image on the bottom little heart as shown in example. Left click to set into place. See where I have placed mine.
59. Repeat twice more so all three sets of hearts on left side of image are animated.
60. Click View Animation button at the top to check your animation.
61. If all is as you would like it to be, then File/Save As. When the box comes up, name your destination for your finished work and leave it set as .gif. Click Save.
62. As the boxes come up, click Next, Next, Next and then Finish.
This tutorial was tested by PamelaD and Evatexas. Thanks ladies!
If you are going to use this tutorial for stationery, cards or place the tutorial/tag on another site, I would appreciate you contacting me for permission, giving Arasimages credit for the original tutorial and if possible, a link back to my site. Thank you.
Copyright © Arasimages All Rights Reserved