
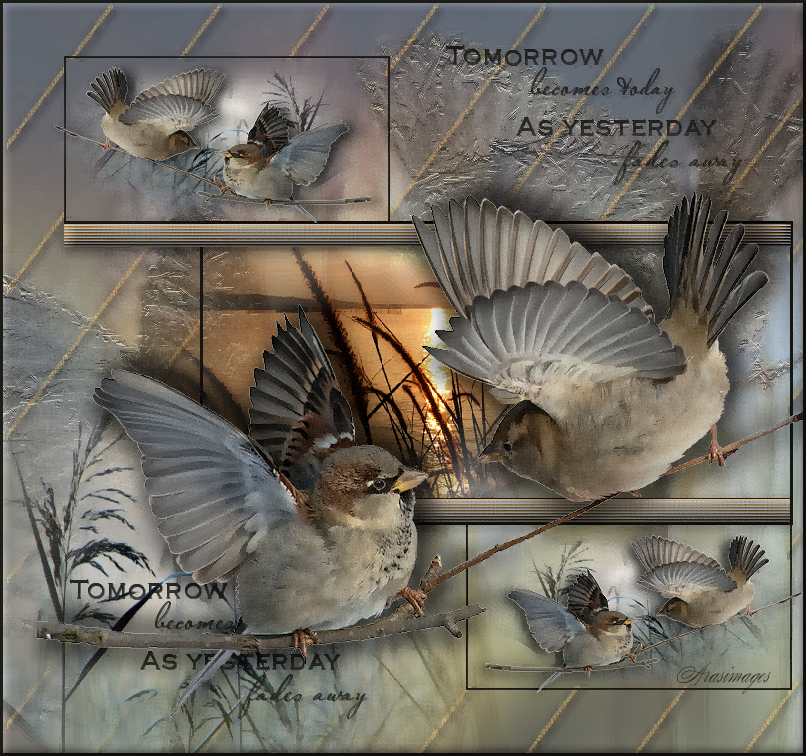
Tomorrow Becomes Today
For Italian, Dutch and Danish translation, click on the flags.


For this tutorial you will need the materials in the zip file below.

Unzip the materials into a working folder. Open the materials in PSP, copy and close originals, using the copies in the tutorial. Place the Selection in your PSP/Selections folder. Export the Brush Poetry99 into your PSP/Brushes folder. The Plugins used in this tutorial are Greg's Factory Output Vol.II/Pool Shadow, Nik/ColorEfexPro 3.0/Bi-Color and Sienna, Redfield/Fractalius and Xero/SuperSmooth. It is assumed you have a working knowledge of PSP to follow these directions. I have used PSPX6 to create this tutorial but other versions of PSP will work although older versions will not have the Color Changer required for some of my tutorials.
Thanks go to Angie, to Colorel, to Silvie and to the unknown tubers of the scraps I've gathered from free sites on the internet.
Use the bookmark below to mark your place along the way.

1. In Materials Palette, set Foreground to #9b9a95, Background to #b3c9e3.
2. Create a Gradient using Style Radial, Angle 45, Repeats 3, Invert unchecked, Center Point Horizontal set to 100/Vertical set to 50. Focal Point grayed out.

3. New/New Image 800px by 750px. Flood fill with Gradient.
4. Layers/New Raster Layer. Selections/Select All.
5. Open JHanna_113 bground.jpg. Copy/Paste into Selection. Selections/Select None.
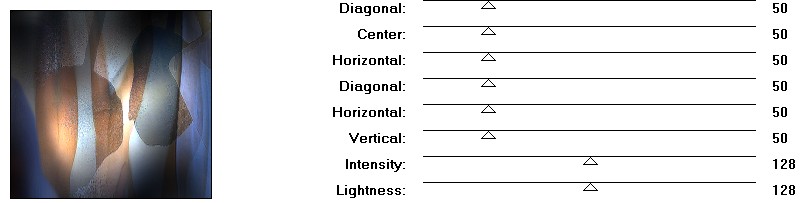
6. Effects/Greg's Factory Output Vol.II/Pool Shadow.
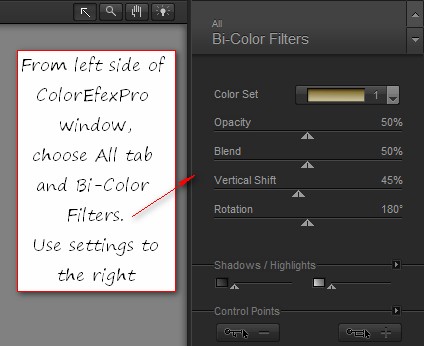
7. Effects/Nik Software/Color Efex Pro 3.0 Complete. From left side of page, select Bi-Color under All tab.
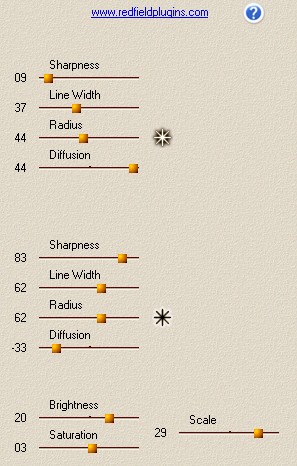
8. Effects/Redfield/Fractalius.
9. Drop Opacity down to 51.
10. Open spring meeting.pspimage by Colorel. Copy/Paste as New Layer.
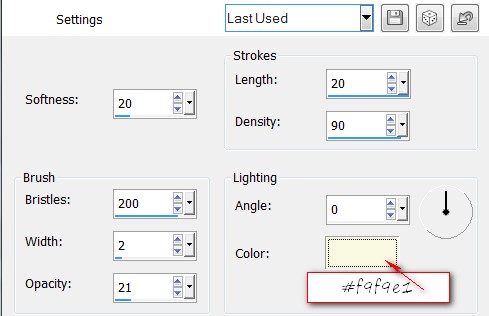
11. Effects/Art Media Effects/Brush Strokes.
12. Drop Opacity to 54.
13. Layers/New Raster Layer. Selections/Select All.
14. Open tag 48 linhas.pspimage. Copy/Paste into Selection. Selections/Select None.
15. Effects/Edge Effects/Enhance.
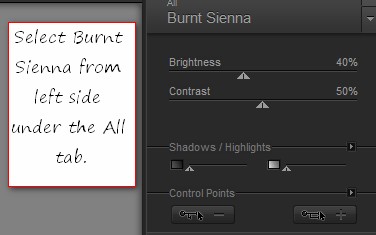
16. Effects/Nik Software/Color Efex Pro.3.0/Burnt Sienna (choose from left side).
17. Effects/3D Effects/Drop Shadow. Vertical 2, Horizontal 3, Opacity 70, Blur 7, color #000000.
18. Using Pick Tool, pull down to bottom and to right side until the horizontal bars are not showing at the edges.
19. Open T2009_angie080.pspimage. Copy/Paste as New Layer.
20. Move into bottom left corner.
21. Open Landscape_3_6.4.08.pspimage. Copy/Paste as New Layer.
22. Move to the left a little. (It may need to be adjusted later).
23. Layers/New Raster Layer.
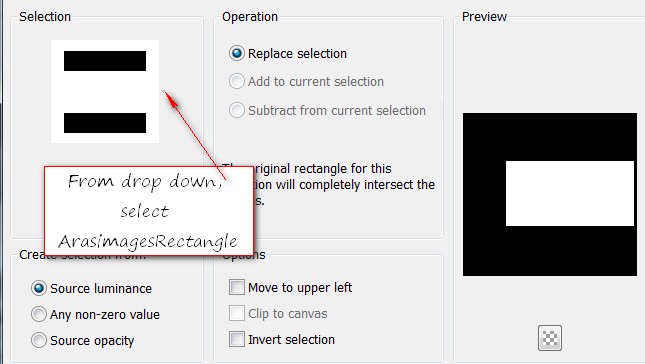
24. Selections/Load/Save Selections/Load Selection From Disk. Choose ArasimagesRectangle1. Load.
25. Flood fill Selection with color #161511.
26. Selections/Modify/Contract by 3. Press Delete key once.
27. Drop down to Raster 4 (diagonal lines layer) and press Delete key again.
28. Selections/Select None.
29. Go to the top layer (Raster 7), highlight to continue.
30. Copy/Paste as New Layer.
31. Image/Resize/Resize by 55%, Resize all layers unchecked.
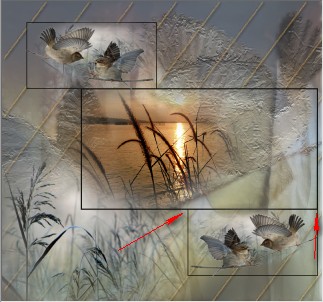
32. Move rectangle to sit at the top of the larger rectangle as shown below.

33. Using the Selection tool (or Magic Wand), select inside the small rectangle. Move to Raster 4, highlight it and press Delete key once. Go back to top layer, highlight to continue.
34. Layers/New Raster Layer.
35. Open T2009_angie080.pspimage. Image/Mirror. Copy/Paste into Selection. Adjust if needed.
36. Layers/New Raster Layer.
37. Open spring meeting.pspimage. Image/Mirror. Copy/Paste into Selection. Adjust if needed.
38. Selections/Select None.
39. Adjust/Sharpeness/Sharpen.
40. Effects/3D Effects/Drop Shadow. Vertical 2, Horizontal 2, Opacity 70, Blur 15, color #000000.
41. Make sure top layer is highlighted.
42. Merge/Merge Down 2X.
43. Duplicate. Image/Mirror. Place at bottom right below large rectangle.
44. Using Selections tool, select the bottom smaller rectangle, highlight Raster 4. Press Delete key once.
45. Selections/Select None. Go back to the top layer, making sure it is highlighted to continue.
46. Open the StripeBar.pspimage. Copy/Paste as New Layer.
47. Place below the top small rectangle, under the top black line of the large rectangle.
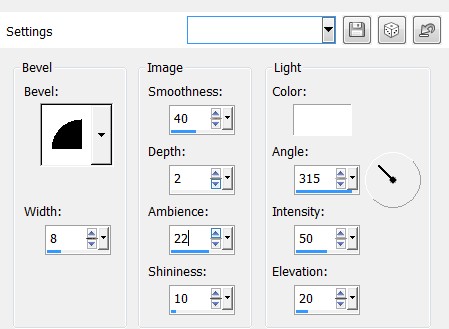
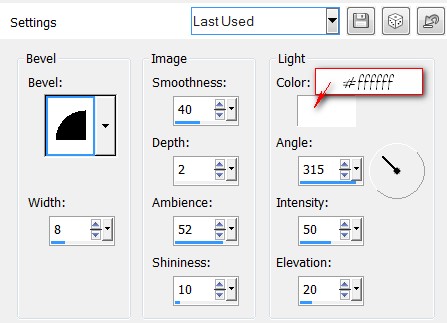
48. Effects/3D Effects/Inner Bevel.
49. Effects/3D Effects/Drop Shadow, Vertical 3, Horizontal 0, Opacity 65, Blur #15, color #000000.
50. Duplicate. Move duplicated StripeBar downward so it rests above bottom black line of large rectangle.
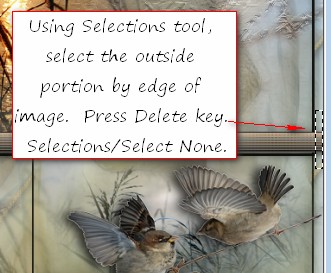
51. Using the Selections tool, select excess of bar that is outside of the rectangle on the right side of image. Delete. Deselect.
52. From the Tool bar, select the Paint Brush tool. From the drop down, find the Brush Poetry99. Set the size to 310. See below for all other settings.

53. Layers/New Raster Layer.
54. Using color #161511, stamp the Brush in upper right quadrant. Duplicate. Merge/Merge Down.
55. Duplicate. Move duplicated text to bottom left corner.
56. Open spring meeting.pspimage. Copy/Paste as New Layer.
57. Image/Resize/Resize by 75%, Resize all layers unchecked.
58. Effects/3D Effects/Drop Shadow, Vertical -15, Horizontal 15, Opacity 65, Blur 30, color #000000.
59. Effects/3D Effects/Drop Shadow, Vertical 13, Horizontal -3, Opacity 65, Blur 30, color #000000.
60. Move birds into place as I have mine in finished image.
61. Image/Add Borders/Add 3px border, Symmetric checked, color #161511.
62. Effects/3D Effects/Inner Bevel.
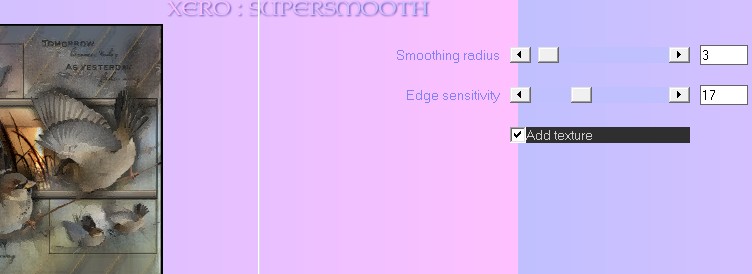
63. Effects/Xero/SuperSmooth.
64. Sign your name or leave your watermark if you wish. Merge/Merge Visible if necessary.
This tutorial was tested by PamelaD and Evatexas. Thanks ladies!
If you are going to use this tutorial for stationery, cards or place the tutorial/tag on another site, I would appreciate you contacting me for permission, giving Arasimages credit for the original tutorial and if possible, a link back to my site. Thank you.
Copyright © Arasimages All Rights Reserved