
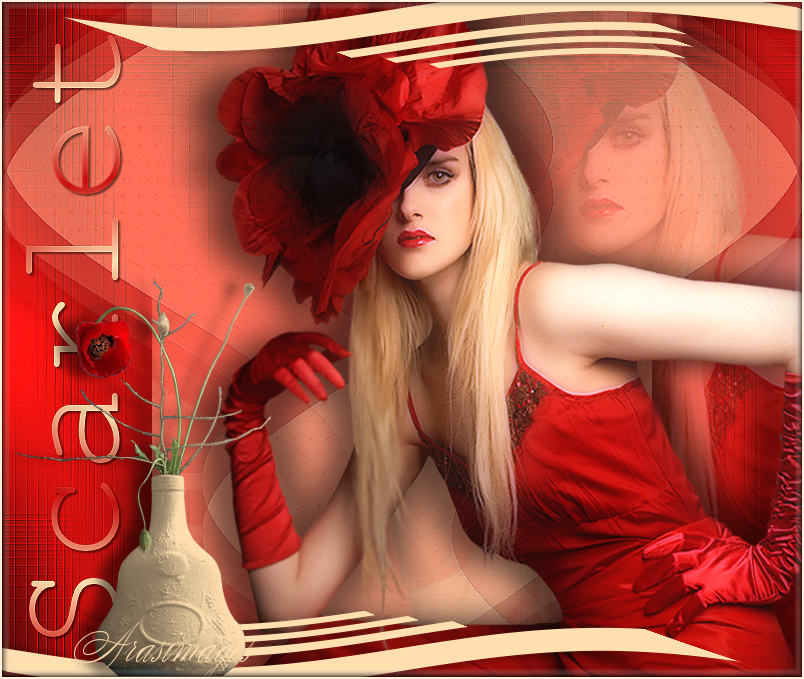
Scarlet
For Italian, French, Dutch, Danish and German translation, click on the flags.


For this tutorial you will need the materials in the zip file below.

Unzip the materials into a working folder. Open the materials in PSP, copy and close originals, using the copies in the tutorial. Plugins used in this tutorial are Penta/Dot and Cross, GraphicsPlus/Cross Shadow, AFS IMPORT/Streaker and Toadies/What are you?. Place the Selections in your PSP/Selections Folder. It is assumed you have a working knowledge of PSP to follow these directions. I have used PSPX6 to create this tutorial but other versions of PSP will work although older versions will not have the Color Changer required for some of my tutorials.
Thanks go to Cibi and to PamelaD for the tubes used.
Use the bookmark below to mark your place along the way.

1. In Materials Palette, set Foreground to #ffdeaf, Background to #c4100e.
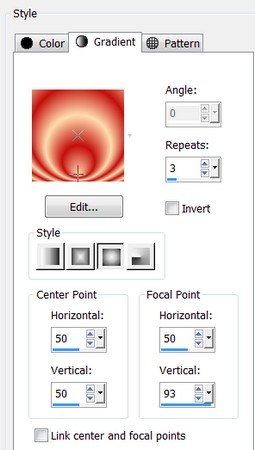
2. Create a Gradient using Style Sunburst, Angle 0 (grayed out), Repeats 3, Invert unchecked, Center Point and Focal Point set as seen below.
3. New/New Image 800px by 675px. Flood fill with #c4100e.
4. Effects/Graphics Plus/Cross Shadow.
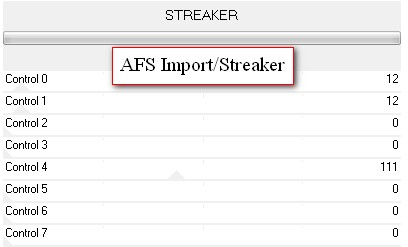
5. Effects/Filters Unlimited II/AFS IMPORT/Streaker.
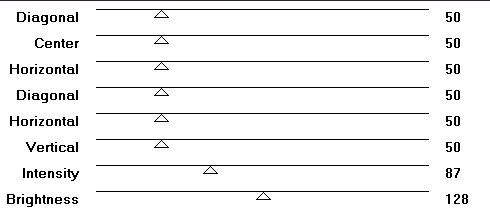
6. Effects/Edge Effects/Enhance More.
7. Adjust/Sharpness/Sharpen more.
8. Open Miss_Flower_CibiBijoux.pspimage. Copy/Paste as New Layer.
9. Image/Resize/Resize by 115%/Resize all layers unchecked.
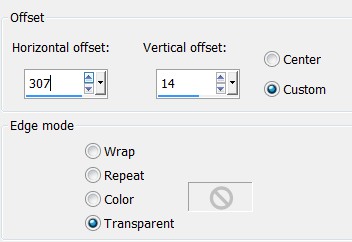
10. Effects/Image Effects/Offset. Horizontal Offset 307, Vertical offset 14. Custom and Transparent checked. Drop Opacity down to 48.
11. Layers/New Raster Layer.
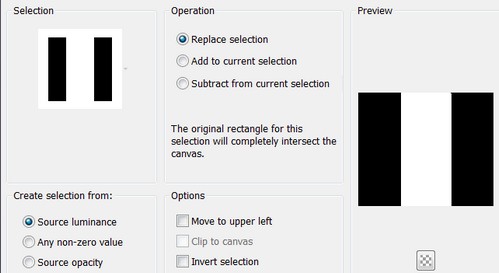
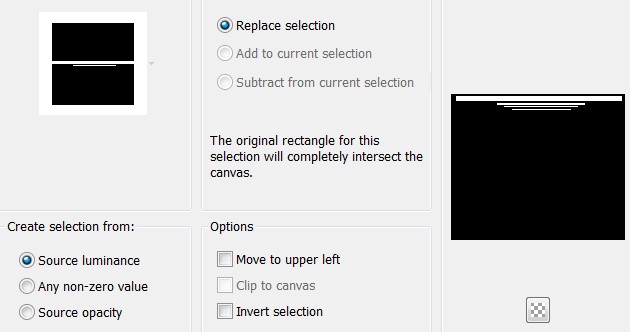
12. Selections/Load/Save Selections/Load Selection from Disk. Choose ArasimagesVerticalCenter from drop down. Load.
13. Flood fill Selection with Foreground color #ffdeaf.
14. Effects/Penta/Color Dot.
15. Effects/Edge Effects/Enhance. Repeat.
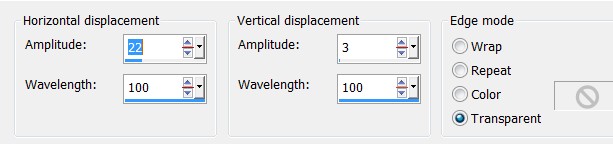
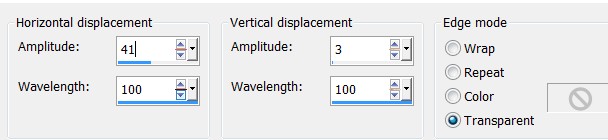
16. Effects/Distortion Effects/Wave.
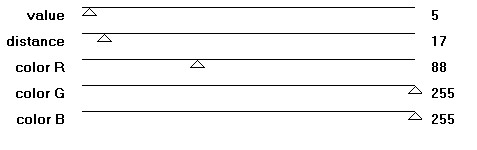
17. Effects/Toadies/What are you?. X-dose at 20, Y-dose at 20.
18. Effects/Edge Effects/Enhance.
19. Selections/Select None.
20. Drop Opacity to 45.
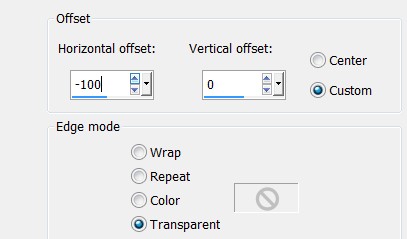
21. Effects/Image Effects/Offset. Horizontal offset at -100, Vertical offset at 0. Custom and Transparent checked.
22. Effects/3D Effects/Drop Shadow. Vertical 0, Horizontal -18, Opacity 50, Blur 16, color #000000.
23. Duplicate. Image/Mirror.
24. Open Miss_Flower_Cibijoux.pspimage. Copy/Paste as New Layer.
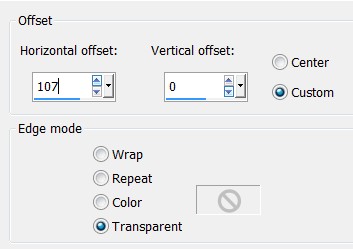
25. Effects/Image Effects/Offset. Horizontal offset at 107, Vertical 0. Custom and Transparent checked.
26. Effects/3D Effects/Drop Shadow. Horizonal 5, Vertical 25, Opacity 50, Blur 42, color #000000.
27. Effects/3D Effects/Drop Shadow. Horizonal -5, Vertical -25, Opacity 50, Blur 42, color #000000.
28. Layers/New Raster Layer.
29. Selections/Load/Save Selection/Load Selection from Disk. Choose ArasimagesLines4. Load.
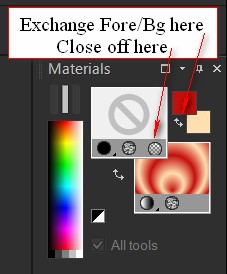
30. Flood fill lines with Foreground color #ffdeaf. Deselect.
31. Effects/3D Effects/Drop Shadow. Vertical 0, Horizontal -18, Opacity 50, Blur 16, color #000000.
32. Effects/Distortion Effects/Wave.
33. Image/Mirror.
34. Duplicate. Image/Flip. Image/Mirror.
35. In Materials Palette Restore your Gradient, using the small double arrows to swap Foreground/Background boxes. Close off top box having Gradient showing at the bottom. See example below.
36. From Tool bar, select the Text tool. Choose Font Rod, Size 150, type out the word "Scarlet" using the Gradient for the color.

37. Using the nodes of the selection around the font, turn so the word Scarlet is vertical and on the left side of image.
38. Objects/Align/Vertical Center. Adjust toward or away from left edge if necessary. Convert to Raster Layer.
39. Effects/3D Effects/Drop Shadow. Horizontal 2, Vertical 2, Opacity 50, Blur 2, color #000000.
40. Adjust/Sharpness/Sharpen.
41. Open LonePoppy.pspimage(tubed). Copy/Paste as New Layer.
42. Image/Resize/Resize by 90%/Resize all layers unchecked.
43. From Tool bar, select Color Changer tool (located by flood fill tool). Left click once or twice on Vase with Foreground color #ffdeaf.
44. Effects/3D Effects/Drop Shadow. Vertical 0, Horizontal -18, Opacity 50, Blur 16, color #000000.
45. Adjust/Sharpness/Sharpen.
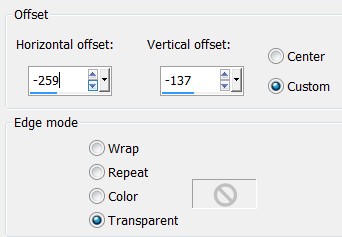
46. Effects/Image Effects/Offset. Horizontal -259, Vertical offset -137.
47. Sign your name or leave your watermark if you wish. Merge/Merge Visible.
48. Effects/3D Effects/Buttonize.
49. Image/Add Borders/Add 2px border, Symmetric checked, color #ffdeaf.
This tutorial was tested by PamelaD and Evatexas. Thanks ladies!
If you are going to use this tutorial for stationery, cards or place the tutorial/tag on another site, I would appreciate you contacting me for permission, giving Arasimages credit for the original tutorial and if possible, a link back to my site. Thank you.
Copyright © Arasimages All Rights Reserved