

Spider World
For Italian, Dutch, Danish and Spanish translation, click on the flags.


For this tutorial you will need the materials in the zip file below.

Unzip the materials into a working folder you have created on your desktop named Spider World. Open the materials in PSP, copy and close originals, using the copies in the tutorial for your work. Plugins used in this tutorial are Flaming Pear/Flood and Eye Candy 3.1/Glow. I have also used Animation Shop which you can get for free online. Place Narah_Mask_0412 in your PSP/Masks folder. Place vyp_gradient_03.jgd in your PSP/Gradient folder. It is assumed you have a working knowledge of PSP to follow these directions. I have used PSPX6 to create this tutorial but other versions of PSP will work although older versions will not have the Color Changer required for some of my tutorials.
Thanks go to KRYS and to Thafs for the great tubes used.
Use the bookmark below to mark your place along the way.

1. In Materials Palette, set Foreground to #c4a460, Background to #aba7a6.
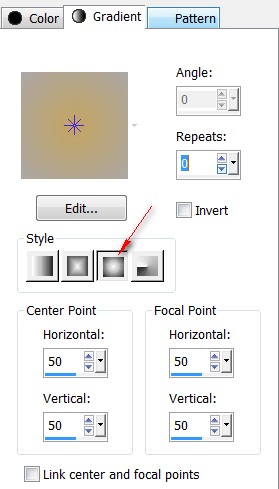
2. Create a Gradient using Style Sunburst, Angle 0, Repeats 0, Invert unchecked, Focal points 50, all other settings not applicable.
3. New/New Image 780px by 680px. Flood fill with Gradient.
4. Effects/Flaming Pear/Flood. Using default setting.
5. Open KRYSMISTSTEAMPUNK-12-02-14-001.pspimage. Copy/Paste as a New Layer.
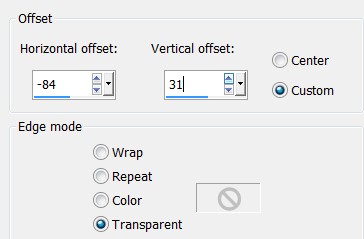
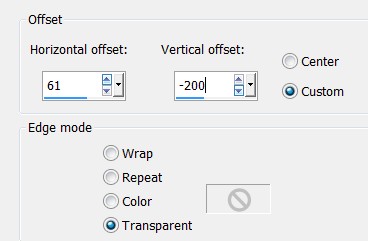
6. Effects/Image Effects/Offset.
7. Duplicate. Image/Mirror.
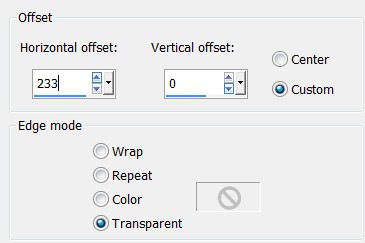
8. Effects/Image Effects/Offset.
9. Merge/Merge Down.
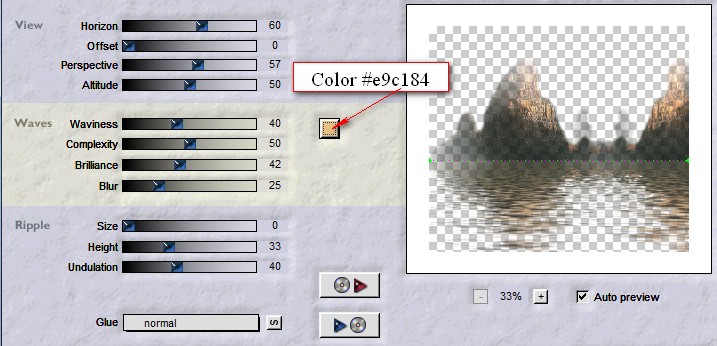
10. Effects/Flaming Pear/Flood. Use settings below.
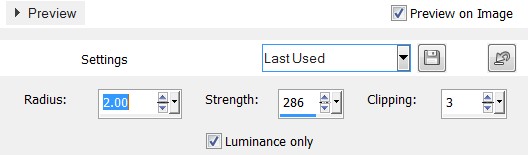
11. Adjust/Sharpness/Unsharpen Mask. Use settings below.
12. Merge/Merge Visible. Image/Add Borders/Add 3px border, Symmetric checked, color #000000.
13. Copy. Paste as New Image. Save as Spider World.jpg First Layer. (We will work on this layer later).
14. Go back to original working image to continue.
15. Layers/New Raster Layer. Flood fill with color #000000.
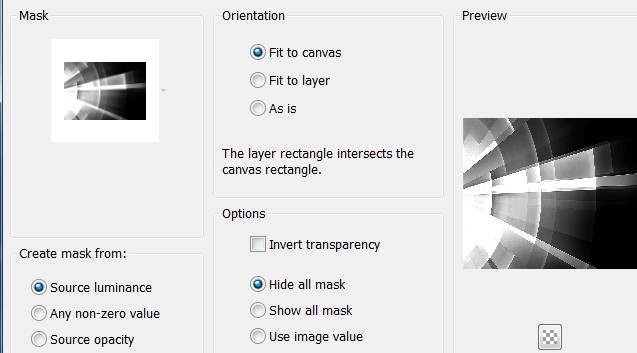
16. Layers/Load/Save Mask/Load Mask From Disk. Select Narah_Mask_0412. Load.
17. Merge/Merge Group. Pull Mask to the right to 430px. We will adjust its placement later.
18. Effects/Geometric Circle, transparent ticked.
19. Duplicate. Image/Mirror.
20. Open SpiderArmy.pspimage. Copy/Paste as New Layer.
21. Place largest Spider in upper left corner so spider army is positioned down to center water horizon.
22. Open Steampunk_Brass_Spider_tubed_by_thafs.pspimage. Copy/Paste as New Layer.
23. Image/Resize/Resize by 50 %/Resize all layers unchecked.
24. Adjust/Sharpness/Sharpen.
25. Place Spider in lower left corner.
26. Effects/3D Effects/Drop shadow. Vertical 12, Horizontal 12, Opacity 70, Blur 23, color #000000.
27. Open KRYSSTEAMPUNK-28-01-14.pspimage. Copy/Paste as New Layer.
28. Image/Mirror. With Eraser tool, erase KRYS watermark off the copy being used (You saved the original leaving watermark intact!)
29. Adjust/Sharpness/Unsharpen Mask as in Step #11. Adjust/Sharpness/Sharpen.
30. Move KRYSSTEAMPUNK-28-01-14.pspimage into lower right corner.
31. Using Move tool, move Mask (Group-Raster 1) to the left so left edge of Mask is at 480px.
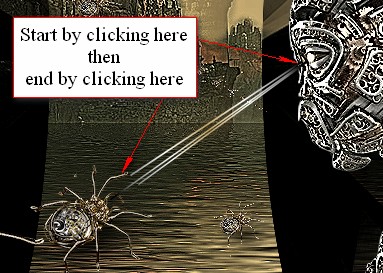
32. Open SpiderArmy1.pspimage. Copy/Paste as New Layer.
33. Effects/Image Effects/Offset.
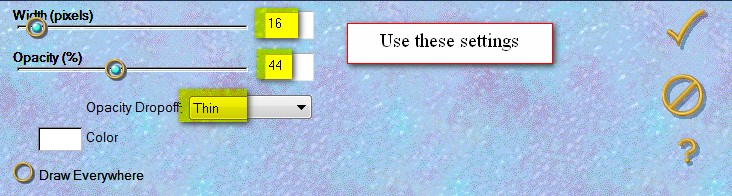
34. Close off bottom layer. Merge/Merge Visible.
35. From Tool bar, select the Pen tool. Set the Style line to Solid, Width at 2.00, Anti-alias checked.

36. Change the Foreground color of the Materials palette to vyp_gradient03.jgd.
37. Click to the left of the white of the lady's eye, then click once more near the center spider. Repeat twice more making the lines vary in length. See example below.
38. Convert to Raster Layer.
39. Effects/Eye Candy 3.1/Glow. Use settings below to make the lines appear like laser beams.
To enhance them, Adjust/Sharpness/Sharpen.
40. Copy/Paste as New Image. File/Save As/Laser Beam.PSP Animation Shop (*psp) file.
41. Close off the laser beam layer.
42. Add your watermark or name if you wish. Merge/Merge Visible if needed.
43. File/SaveAs/SpiderWorld Second Layer.PSP Animation Shop (*psp).
44. ANIMATION: Open Animation Shop. File/Open SpiderWorldFirstLayer.jpg image. Using one of the duplicating methods (Edit/Duplicate Selected is one), duplicate 9 times so you have 10 frames in all.
45. Click within the FIRST FRAME, Edit/Select All. HINT: Before you paste into the frames, be sure ALL of them are highlighted (Selected). Sometimes they become unselected as you work.
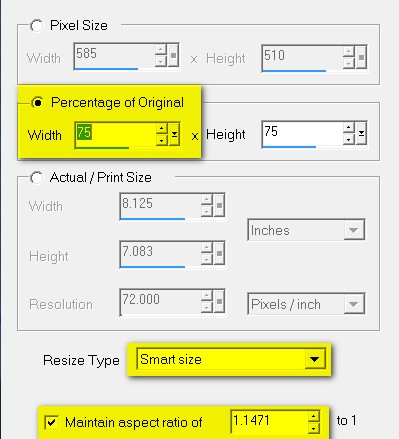
46. File/Open ArasimagesFog.psp. Having the Animated fog highlighted on all frames, Animation/Resize Animation by 75%.
47. Click on the top bar of ArasimagesFog, Right click/Copy.
48. Go to SpiderWorldFirstLayer, right click within first frame, Paste/Into Selected Frame. It will be hard to see where the fog is located; move it around to see where it is over the image. Left click to set in place on the water to the center right.
49. Right click within the first frame. Paste/Into Selected Frame again. Left click to place fog in the center left of the water.
50. Working on the Animated fog again, make sure all frames are highlighted. Animation/Reverse Frames.
51. Right click the top bar of the animated reversed fog, Copy.
52. Go back to the SpiderworldFirstLayer, right click within first frame, Paste/Into Selected Frame. Left click to set in place in middle of the water.
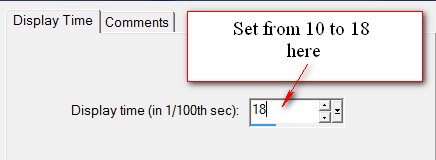
53. From the top tool bar, select the View Animation button and check the animation of the fog. It will appear to be moving too quickly. To slow it down, click Animation/Frame Properties. Default is set to 10; change it to 18.
54. Open SpiderWorldSecondLayer.(*psp) image. Edit/Propagate Paste.
55. Right click on the top bar of SpiderworldSecondLayer, Copy.
56. Go to the SpiderWorldFirstLayer on which you have placed the fog. Check to see if all frames are selected. Right click/Paste/Into Selected Frame. Left click to set into place.
57. Open Spider91.gif. Edit/Select All. Edit/Propagate Paste. Right click on top bar/Copy. Go to main image SpiderWorldFirstLayer. Right click inside first frame, place the spider over KRYSSTEAMPUNK-28-01-14.pspimage (lady's) shoulder. Left click to set in place.
58. Edit/Open Laser Beam.PSP image. Right click on top bar/Copy.
59. Return to the main animated image you have been working on. Make sure ALL frames are deselected. We are going to place the Laser Beam layer in only two of the frames, one at a time.
60. Right click inside Frame 5 of the main working image. Paste/Into Selected frame 5 only. Try to get the Laser Beams in the same spot. Repeat on Frame 8.
61. Now click on the View Animation button in the top tool bar. Check all of your animations to see if they are as you would like them to be. If so, then we will now save our work.
62. File/Save As. A box will come up giving you the choice of where to save your .gif and to name it. Name it Spider World and save in your working folder. Click Save. As the boxes come up, keep clicking Next three times, then Finish. ALL DONE!
You have just completed a complicated animation tutorial. Be proud of yourself!
This tutorial was tested by PamelaD and Evatexas. Thanks ladies!
If you are going to use this tutorial for stationery, cards or place the tutorial/tag on another site, I would appreciate you contacting me for permission, giving Arasimages credit for the original tutorial and if possible, a link back to my site. Thank you.
Copyright © Arasimages All Rights Reserved