
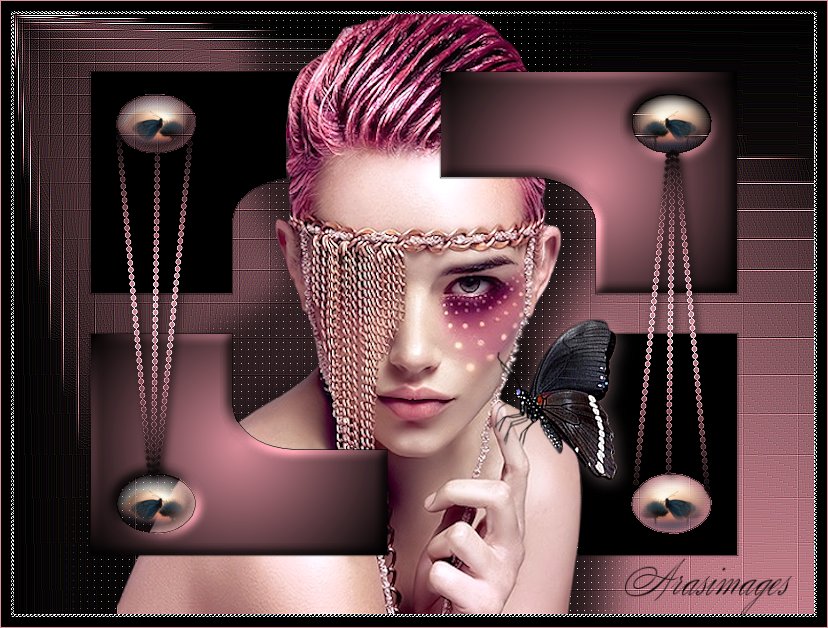
Seriously Pink
For Italian, Russian, Dutch, Danish and Spanish translation, click on the flags.


For this tutorial you will need the materials in the zip file below.

Unzip the materials into a working folder you have created on your desktop named Seriously Pink. I have used the plugins Penta/Color Dot and PhotoshopII/Bailey. Place the Preset Shapes Tiles.pspshape in your Preset Shapes folder. If your PSP does not have the included Styled Line dotted_4 installed, place the dotted_4 Styled Line in your PSP/Styled Line folder. Place the Pattern silverpunk.pspimage in your PSP/Patterns folder. It is assumed you have a working knowledge of PSP to follow these directions. I have used PSPX5 to create this tutorial but other versions of PSP will work although older versions will not have the Color Changer required for some of my tutorials.
Thanks go to K@rine_Dre@ms and to PamelaD and Evatexas of Arasimages for the great tubes used in this tutorial.
Use the bookmark below to mark your place along the way.

1. In Materials Palette, set Foreground to #dd909d, Background to #000000.
2. Create a Gradient using Style Sunburst, Angle 0, Repeats 0, Invert unchecked, Center Point Horizontal/Vertical at 50, Focal Points grayed out, and Link center and focal points checked.

3. New/New Image 800px by 600px. Flood fill with Gradient.
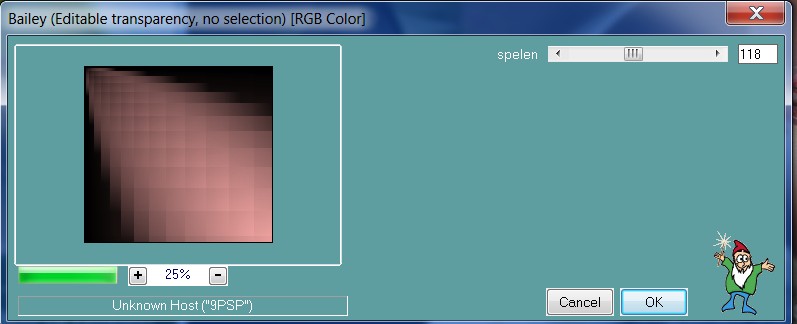
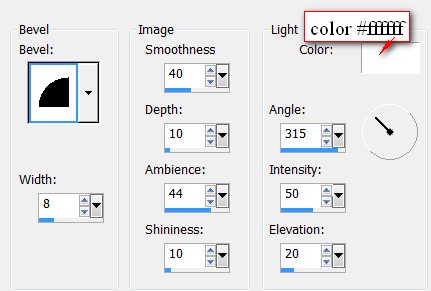
4. Effects/PhotoshopII/Bailey. Use settings below.
5. Effects/Edge Effects/Enhance. Repeat with Enhance More.
6. Open Karine_Dreams_Lady_Jewel_2865_Mars_2014.pspimage. Copy/Paste as New Layer.
7. Move lady down and to the left a bit...you may have to adjust her later on.
8. Adjust/Sharpness/Sharpen. Repeat.
9. Effects/3D Effects/Drop Shadow. Horizontal -83, Horizontal -35, Opacity 60, Blur 39, Color #000000, Shadow on new layer checked.
10. Effects/Penta/color dot.
11. Effects/Edge Effects/Enhance.
12. Activate the top layer. Effects/3D Effects/Drop Shadow. Horizontal -13, Horizontal 37, Opacity 80, Blur 59, Color #000000, Shadow on new layer checked.
13. Repeat color dot as in Step #10. Repeat Enhance as in Step #11.
14. Activate the top layer.
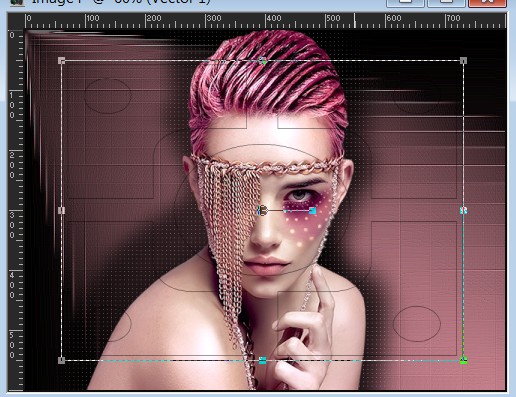
15. View/Rulers. From Tool bar, choose the Preset Shape Tool. Reset to default. Close off Background color. Select the Preset Shape i. Draw out the preset shape i as you see it below. To center it, click on Objects/Align. Apply both Vertical Center and Horizontal Center.
16. Convert to Raster Layer.
17. Using the Eraser tool, erase the center line.
18. Using the move tool, move lady to center position in Preset Shape. Hint: Use shapes just touching her chin on each side to help.
19. Go back to top layer to continue.
20. Using the Magic Wand, Tolerance/Feather set to 0, click inside the top left shape to activate it. Flood fill with Background #000000.
21. Effects/3D Effects/Inner Bevel. Apply twice. Ctrl+D.

22. Using Magic Wand, Activate upper right corner shape. Flood fill with Foreground Gradient.
23. Effects/3D Effects/Inner Bevel. Apply twice. Use settings as in Step #21. Ctrl+D.
24. Activate lower left shape. Flood fill with Foreground Gradient.
25. Effects/3D Effects/Inner Bevel. Apply twice. Use settings as in Step #21. Ctrl+D.
26. Activate lower right shape. Flood fill with Background color #000000.
27. Effects/3D Effects/Inner Bevel. Apply twice. Use settings as in Step #21. Ctrl+D.
28. With the Magic Wand, click inside upper left small circle inside the shape to activate it.
29. Open BlueButterfly.pspimage. Copy Mask Layer/Paste into Selection.
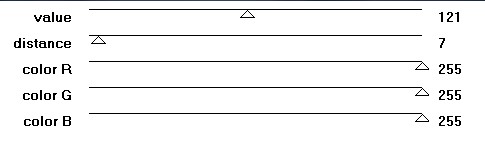
30. Effects/3D Effects/Inner Bevel. Use settings below on butterfly circle. Ctrl+D.
31. Click on upper right circle to activate it. Paste into Selection.
32. Image/Flip Horizontal. Defloat.
33. Apply Inner Bevel as in Step #30. Ctrl+D.
34. Click on lower left circle to activate it. Paste into Selection.
35. Apply Inner Bevel as in Step #30. Ctrl+D.
36. Click on lower right circle to activate it. Paste into Selection.
37. Image/Flip Horizontal. Defloat. Apply Inner Bevel as in Step #30. Ctrl+D.
38. Drop Opacity on Selection layer to 50% so you can better see where to draw selections to delete.
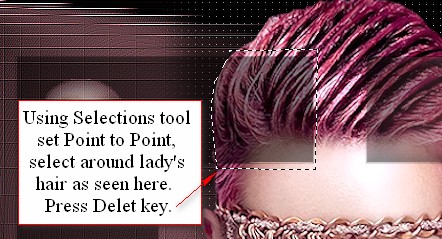
39. With Selection type set Point to point, Mode Replace, Feather at 0, Anti-alias checked, select around the portion of the lady's hair that is not showing under upper left shape. Press Delete key once. CTRL+D.
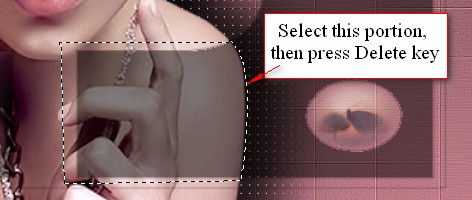
40. Repeat selection of lower right shape over lady's shoulder. Press Delete key once. CTRL+D.
41. Raise Opacity back to 100%.
42. Using Selection tool, carefully select the outer line around the preset shape. Press Delete key to eliminate all of the line all the way around. Or use the Eraser tool set to Size 10 to eliminate the line.
43. From Tool bar, select the Pen tool. Use the settings below to draw out the lines.


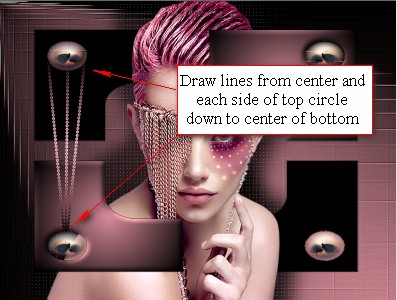
44. Choose Line style dotted_4, Size 2, Foreground Gradient, start by left clicking between the top and bottom circle centers with the butterflies. Click again from lower side edges of top circle down to center of bottom circle. See example below of where to place lines.
45. Layers/Convert to Raster Layer.
46. Effects/Edge Effects/Enhance.
47. Duplicate. Image/Mirror. Image/Flip. Adjust placement if needed.
48. Effects/3D Effects/Drop Shadow. Vertical 3, Horizontal 3, Opacity 80, Blur 12, color #000000, Shadow on new layer not ticked.
49. Apply the above drop shadow on each layer of lines. Make sure to highlight the top layer to continue.
50. Open BflyGA.pspimage. Copy tubed layer/Paste as New Layer.
51. Image/Free Rotate. Rotate Left by 45 degrees.

52. Image/Resize/Resize by 85%/Resize all layers unchecked.
53. Using Eraser tool set to Size 10, carefully erase legs at the bottom.

54. Adjust/Sharpness/Sharpen.
55. Effects/3D Effects/Drop Shadow. Vertical 3, Horizontal 3, Opacity 40, Blur 23, color #d7afb6.
56. Adjust/Sharpness/Sharpen more.
57. Image/Add Borders/Add 3px border, Symmetric checked, color #ffffff.
58. Using Magic Wand, activate 3px border.
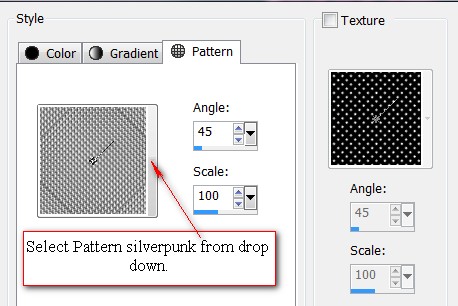
59. In Materials Palette, choose Pattern silverpunk. Flood fill the 3px border with silverpunk.
60. Effects/Edge Effects/Enhance. CTRL+D.
61. Image/add Borders/Add 10px border, Symmetric checked, color #000000.
62. Image/Add Borders/Add 1px border, Symmetric checked, color #dd909d.
63. Sign your name or leave your watermark if you wish. Save as .png or .jpg file.
This tutorial was tested by PamelaD and Evatexas. Thanks ladies!
If you are going to use this tutorial for stationery, cards or place the tutorial/tag on another site, I would appreciate you contacting me for permission, giving Arasimages credit for the original tutorial and if possible, a link back to my site. Thank you.
Copyright © Arasimages All Rights Reserved