
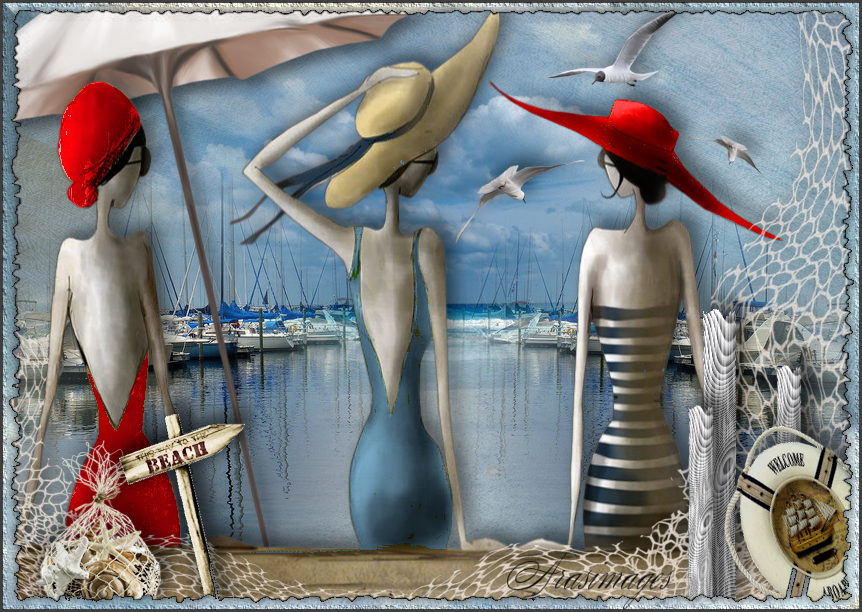
Shore Gals
For Italian, Dutch, Danish and Spanish translation, click on the flags.


For this tutorial you will need the materials in the zip file below.

Unzip the materials into a working folder you have created on your desktop named Shore Gals. Please duplicate and close originals. I have used the plugins Filters Unlimited 2.0/Frames and Edges/Square, Eye Candy 4000/Wood, Andromedia/Perspective and AAA Frames/Texture. Place the SwivelTube.pfp preset in the PSP/Plugins/andromeda-serie portable>Perspective-Presets>andromeda>02Full Canvas>20Floors folder. Place the ArasimagesWoodGrainPost file in the PSP/Plugins/Eye Candy 4000/Wood folder. Place the ArasimagesWoodPost Selection in your PSP/Selection folder. It is assumed you have a working knowledge of PSP to follow these directions. I have used PSPX6 to create this tutorial and other versions of PSP will work although older versions will not have the Color Changer used in some of my tutorials. I have written an alternative method in this tutorial.
Thanks go to JHanna and to Evatexas of Arasimages for the great tubes used in this tutorial.
Use the bookmark below to mark your place along the way.
1. In Materials Palette, set Foreground to #ff0000, Background to #c0c0c0.
2. New/New Image 850px by 600px. Selections/Select All.
3. Open 0_60d3e_da692674_XXL.png background. Copy/Paste into Selection. Ctrl+D.
4. Open BeautifulBeach.pspimage. Copy/Paste as New Layer.
5. Pull BeautifulBeach horizon up to about 300px.
6. Open Boats in the Harbour.pspimage. Copy/Paste as New Layer.
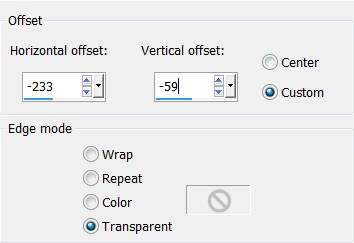
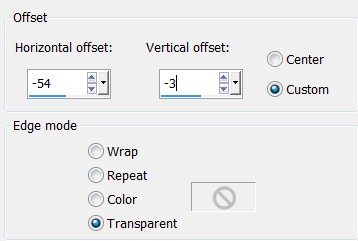
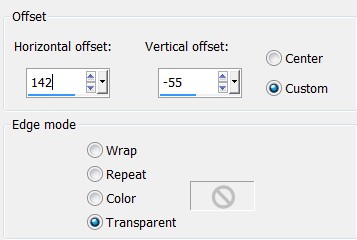
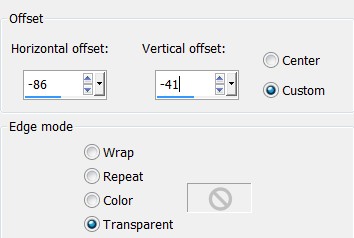
7. Effects/Image Effects/Offset.
8. Duplicate. Image/Mirror.
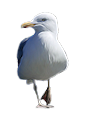
9. Open 0_60c66_8e0d29a2_XXL.png image of birds. Copy/Paste as New Layer.
10. Image/Resize/Resize by 38%/Resize all layers unchecked.
11. Effects/3D Effects/Drop Shadow. Vertical -8, Horizontal 9, Opacity 50, Blur 24, Color #000000.
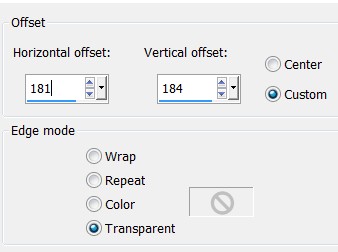
12. Effects/Image Effects/Offset.
13. Open 0_87c03_a9bf5a98_XL.png image of umbrella. Copy/Paste as New Layer.
14. Image/Flip Horizontal.
15. Image/Resize/Resize by 82%/Resize all layers unchecked.
16. Effects/3D Effects/Drop Shadow. Vertical 8, Horizontal 9, Opacity 50, Blur 20, Color #000000.
17. Effects/Image Effects/Offset.

18. Open JHanna_765 tube(copyright)SibylleDotinot.png of ladies. Copy/Paste as New Layer.
19. Using the Selection tool/Selection, select around the text "tubed by Johanna". Press Delete Key once. Ctrl+D.
NOTE FOR RECOLORING: If you do not have the color changer in your PSP or wish to use another method, you can use the Selections Tool/Freehand Selections set Point to Point (see settings below) and select around the areas you wish to recolor. Then go to Adjust/Hue and Saturation/Colorize. Use Saturation and Hue both set to 255 for red color, Hue 143, Sat. 99 for blue color. Ctrl+D.

20. If you have the Color Changer in the PSP you are using, click on it in the tool bar to activate it, Tolerance set to 10. Using Foreground color #ff0000, recolor the turbin and dress of the lady on the left to red. Recolor the hat of the lady on the right to red. NOTE: I found it easier to select each area first, then recolor using Color Changer, then Ctrl+D.
21. In Materials Palette, change the Foreground color to #77a7c3. Select around the dress of the lady in the center. Left click on the center lady's dress to change it to blue.
22. Effects/3D Effects/Drop Shadow. Vertical -9, Horizontal 9, Opacity 50, Blur 24, Color #000000.
23. Effects/Image Effects/Offset.
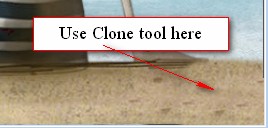
24. Using Clone tool (found above the Brush tool in tool bar), clone the bench they are sitting on filling in the empty space on the right side of image.

25. Open 0_682f4_32a87fc6_XXL.png net. Copy/Paste as New Layer.
26. Image/Resize/Resize by 85%/Resize all layers unchecked.
27. Pull into bottom right corner with top of net at top right corner.
28. Adjust/Sharpness/High Pass Sharpen.
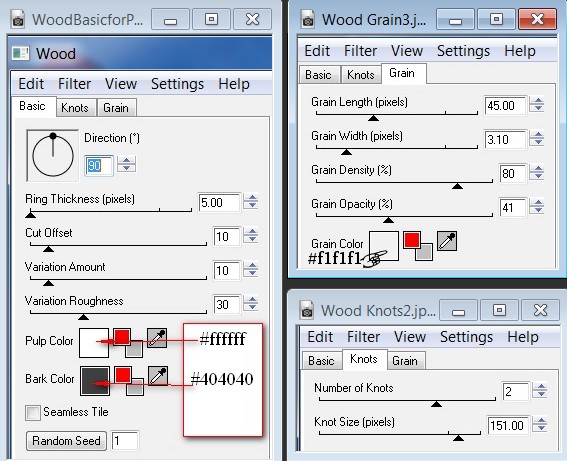
29. Duplicate. Image/Mirror.
30. Image/Resize/Resize by 65%/Resize all layers unchecked.
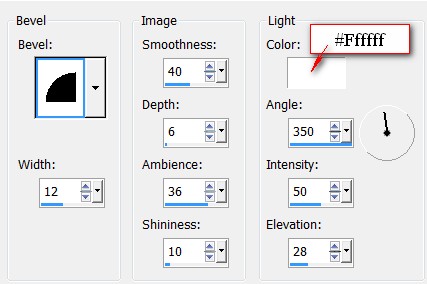
31. Pull down into bottom left corner so netting meets in center.
32. Layers/New Raster Layer.
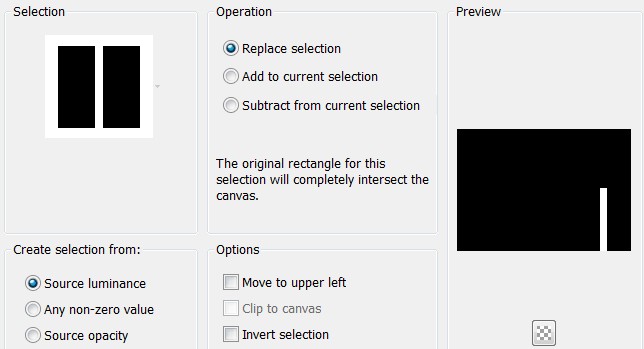
33. Selections/Load/Save Selection/Load Selection from Disk. Find ArasimagesPost selection. Load.
34. Flood fill Selection with Background color #c0c0c0.
35. Effects/Eye Candy 4000/Wood. Under Settings find ArasimagesWoodGrainPost and click on it. Use its settings.
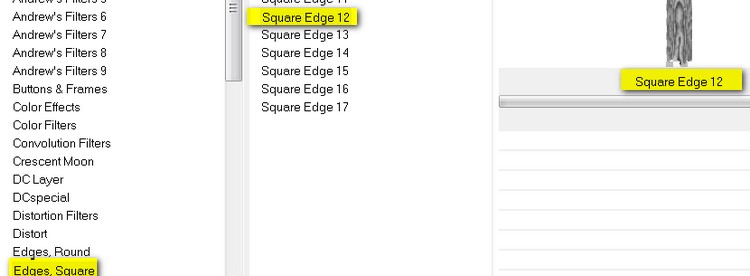
36. Effects/Filters Unlimited 2/Edges,Square/Square Edge 12.
37. Effects/3D Effects/Inner Bevel. Ctrl+D.
38. Effects/3D Effects/Drop Shadow. Vertical -12, Horizontal 9, Opacity 50, Blur 24, Color #000000.
39. Pull post downward so it is sitting on bottom edge of image.
40. Duplicate. Image/Resize/Resize by 74%/Resize all layers unchecked.
41. Effects/Image Effects/Offset.
42. Apply Drop Shadow as in Step #38.
43. Duplicate. Effects/Image Effects/Offset.
44. Open 0_9ad79_d9dceb34_L[1].png bag of shells. Copy/Paste as New Layer.
45. Image/Resize/Resize by 38%/Resize all layers unchecked.
46. Effects/3D Effects/Drop Shadow. Vertical -12, Horizontal 9, Opacity 50, Blur 24, Color #000000.
47. Pull bag of shells to bottom left corner so it sits behind the lady in the red dress.
48. Adjust/Sharpness/High Pass Sharpen as in Step #28.
49. Open 0_9adc0_f372353a_L[1].png sign. Copy/Paste as New Layer.
50. Image/Resize/Resize by 60%/Resize all layers unchecked.
51. Adjust/Sharpness/High Pass Sharpen as in Step #28.
52. Effects/3D Effects/Drop Shadow. Vertical -12, Horizontal 9, Opacity 50, Blur 24, Color #000000.
53. Pull sign into bottom left corner to the right of bag of shells.
54. Open 0_9ad6b_a993cfde_L[1].png tube. Copy/Paste as New Layer.
55. Image/Resize/Resize by 73%/Resize all layers unchecked.
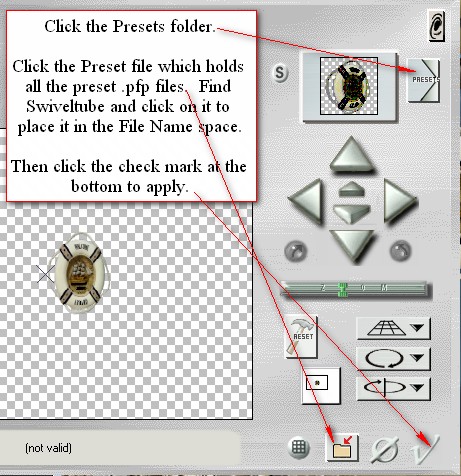
56. Effects/Andromeda/Perspective. Click the Presets located at the top right. Then at the bottom click the yellow file. Find SwivelTube.pfp which you placed in 02Full Canvas/20Floors earlier, click on it to show in the File Name space, then click the okay check mark. This places the tube on an angle.
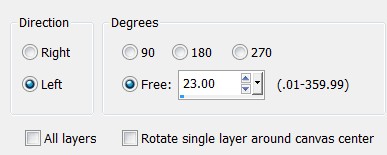
57. Image/Free Rotate Left by 23 degrees.
58. Effects/3D Effects/Drop Shadow. Vertical -12, Horizontal 9, Opacity 50, Blur 24, Color #000000.
59. Pull angled tube into bottom right corner over posts.
60. Adjust/Sharpness/Sharpen.
61. Image/Add Borders, Add 3px border, Symmetric checked, Color #c0c0c0.
62. Filters Unlimited 2.0/Edges,Square/Square Edge 17.
63. Using Magic Wand set to default, click within the ragged border to activate it.
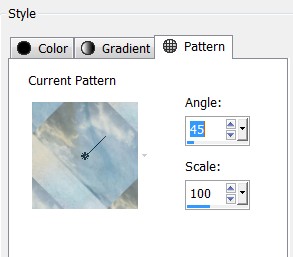
64. Open 0_60d3e_da692674_XXL.png background. In Materials Palette, set to Pattern. Find the Current Pattern and set it to Foreground. Flood fill outside ragged edge with Pattern.
65. Selections/Invert. Apply a Drop Shadow of Vertical 2, Horizontal 2, Opacity 40, Blur 10, color #000000.
66. Apply Drop Shadow again using Vertical -2, Horizontal -2, all other settings the same.
67. Ctrl+D. Image/Add Borders, Add 3px border, Symmetric checked, Color #3f3f3f.
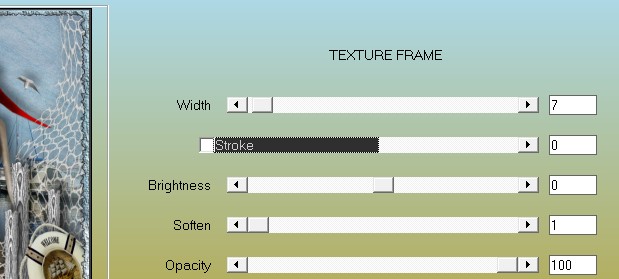
68. Effects/AAA Frames/Texture Frame.
69. Sign your name or leave your watermark if you wish. Save as .png or .jpg file.
This tutorial was tested by PamelaD and Evatexas. Thanks ladies!
If you are going to use this tutorial for stationery, cards or place the tutorial/tag on another site, I would appreciate you contacting me for permission, giving Arasimages credit for the original tutorial and if possible, a link back to my site. Thank you.
Copyright © Arasimages All Rights Reserved