
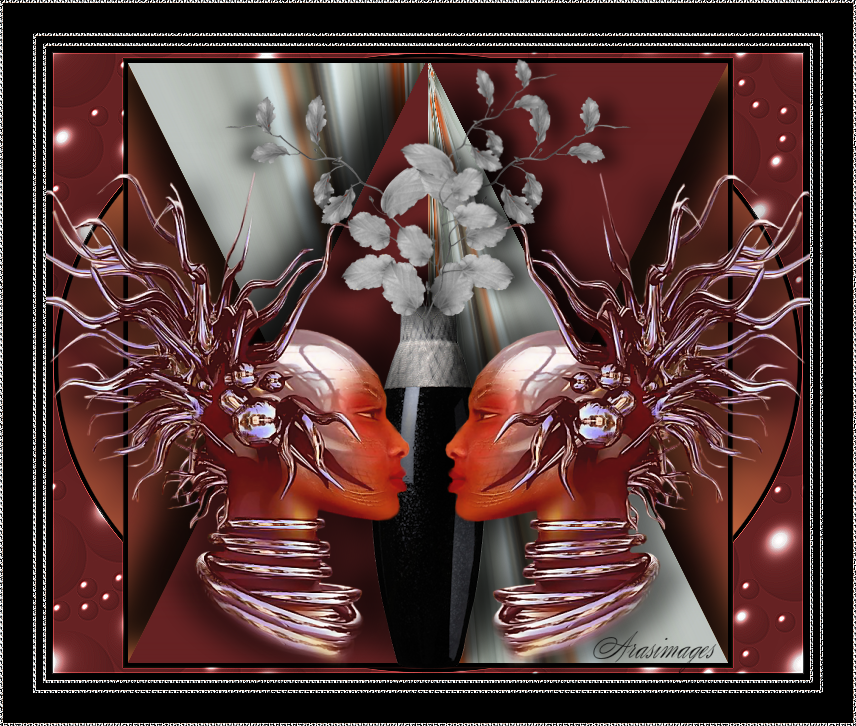
Face Off
For Italian, Dutch and Danish translation, click on the flags.


For this tutorial you will need the materials in the zip file below.

Unzip the materials into a working folder you have created on your desktop named Face Off. Please duplicate and close originals. Place the Silverpunk Pattern in your PSP/Patterns folder. I have used the plugins BorderMania/Ellipse and Mura'sMeister/Perspective Tiling for this tutorial. It is assumed you have a working knowledge of PSP to follow these directions. I have used PSPX6 for this tutorial.
Thanks go to Irene and the unknown tubers for the beautiful tubes used in this tutorial.
Use the bookmark below to mark your place along the way.

1. In Materials Palette, set Foreground to #f78e4d, Background to #662223.
2. In Materials Palette, set to Gradient, Style Sunburst, Angle 45 (grayed out), Repeats 3, Invert unchecked, Center Points and Focal Points all set to 50.
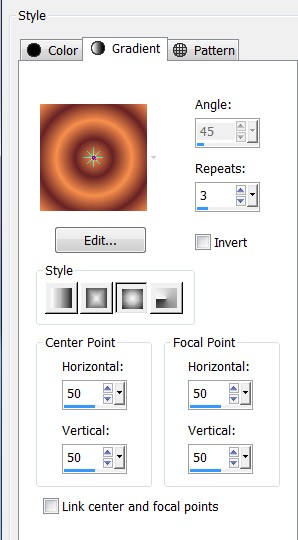
3. New/New Image 600px by 600px. Flood fill with Gradient.
4. Adjust/Blur/Gaussian Blur, Radius set to 37.
5. Open Background.png. Copy/Paste as New Layer.
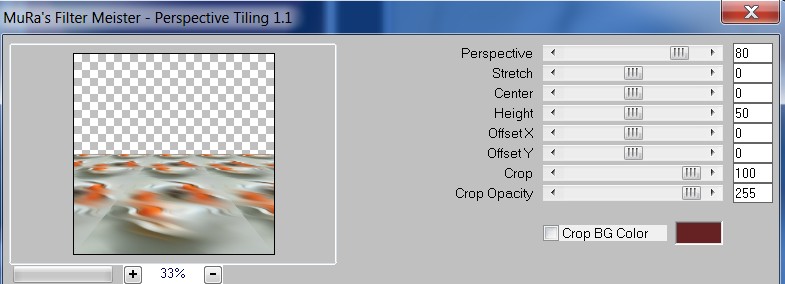
6. Effects/Mura'sMeister/Perspective Tiling.
7. Flood fill top portion of image above perspective tiling with Background color #662223.
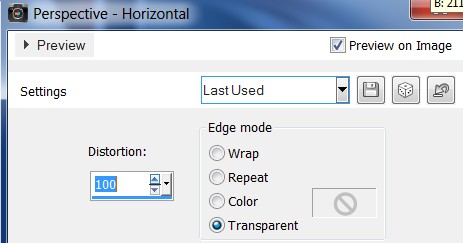
8. Effects/Geometric Effects/Perspective-Horizontal.
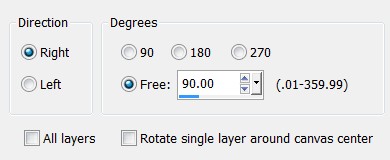
9. Image/Free Rotate Right by 90 degrees.
10. Effects/3D Effects/Drop Shadow. Vertical -11, Horizontal -39, Opacity 84, Blur 50, color #000000.
11. Effects/3D Effects/Drop Shadow. Vertical 11, Horizontal 39, Opacity 84, Blur 50, color #000000.
12. Duplicate. Image/Flip. Image/Mirror.
13. Image/Add Borders/Add 5px border. Symmetric checked, color #000000.
14. Image/Add Borders/Add Top Border of 5, Side Borders of 70, Bottom Border of 5, Symmetric not checked, color #662223.
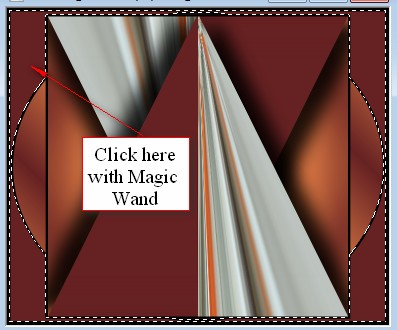
15. Using Magic Wand, activate the large border.
16. Layers/New Raster Layer. Flood fill with Gradient.
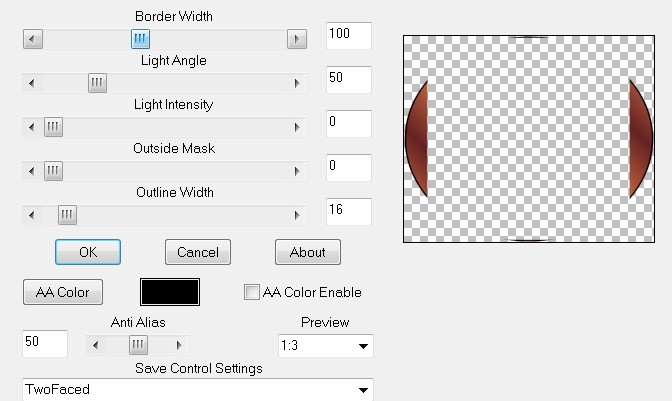
17. Effects/BorderMania/Ellipse.
18. Selections/Select None.
19. Image/Add Borders/Add 7px border. Symmetric checked, color #000000.
20. Using Magic wand, select the outside solid border.
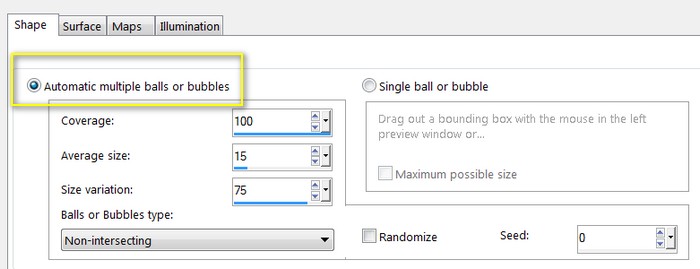
21. Effects/Artistic Effects/Balls and Bubbles. Reset to Preset using arrow at top right. Check Automatic multiple balls or bubbles.
22. Selections/Select None.
23. Open BlackVase.png. Copy/Paste as New Layer.
24. Image/Resize/Resize by 50%/Resize all layers unchecked.
25. Effects/3D Effects/Drop Shadow. Vertical -2, Horizontal 19, Opacity 70, Blur 27, color #000000.
26. Effects/3D Effects/Drop Shadow. Vertical -12, Horizontal -25, Opacity 50, Blur 34, color #000000.
27. Pull vase to set on bottom inside black border.
28. Open 0_a754f_ffbf101e_L.png. Copy/Paste as New Layer.
29. Using Color Changer and color #c0c0c0, click on leaves until you have all gray leaves. If you don't have the Color Changer on your PSP, you may use the method of Adjust/Hue and Saturization/Colorize. Hue of 255, Saturize of 0.
30. Image/Resize/Resize by 50%/Resize all layers unchecked.
31. Effects/3D Effects/Drop Shadow. Vertical 2, Horizontal -15, Opacity 70, Blur 27, color #000000.
32. Image/Flip. Place leaves in the vase pointing to the left side.
33. Duplicate. Image/Mirror. Leaves will point to the right.
34. Duplicate. Image/Resize/Resize by 80%/Resize all layers unchecked.
35. Image/Free Rotate/Left by 15 Degrees.
36. Move leaves into the center and up a little to the right.
37. Open DI-fantasie14.pspimage. Copy/Paste as New Layer.
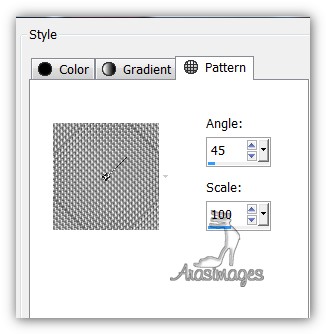
38. Effects/3D Effects/Drop Shadow. Vertical -12, Horizontal -25, Opacity 50, Blur 34, color #000000.
39. Effects/3D Effects/Drop Shadow. Vertical 12, Horizontal 25, Opacity 50, Blur 34, color #000000.
40. Move woman to right side of image having her face on right side of vase and her neck rings near bottom border.
41. Duplicate. Image/Mirror.
42. Image/Add Borders/Add 3px border, Symmetric checked, color #f78e4d.
43. In Materials Palette, click on Pattern tab and select Silverpunk pattern.
44. Using Magic Wand, activate the 3x border. Flood fill with Silverpunk pattern.
45. Effects/Edge Effects/Enhance. Selections/Select None.
46. Image/Add Borders/Add 7px border, Symmetric checked, color #000000.
47. Image/Add Borders/Add 3px border, Symmetric checked, color #f78e4d.
48. Using Magic Wand, activate the 3x border. Flood fill with Silverpunk pattern.
49. Effects/Edge Effects/Enhance. Selections/Select None.
50. Image/Add Borders/Add 30px border, Symmetric checked, color #000000.
51. Image/Add Borders/Add 3px border, Symmetric checked, color #f78e4d.
52. Using Magic Wand, activate the 3x border. Flood fill with Silverpunk pattern.
53. Effects/Edge Effects/Enhance. Selections/Select None.
54. Sign your name or leave your watermark if you wish. Save as .png or .jpg file.
This tutorial was tested by PamelaD and Evatexas. Thanks ladies!
If you are going to use this tutorial for stationery, cards or place the tutorial/tag on another site, I would appreciate you contacting me for permission, giving Arasimages credit for the original tutorial and if possible, a link back to my site. Thank you.
Copyright © Arasimages All Rights Reserved