
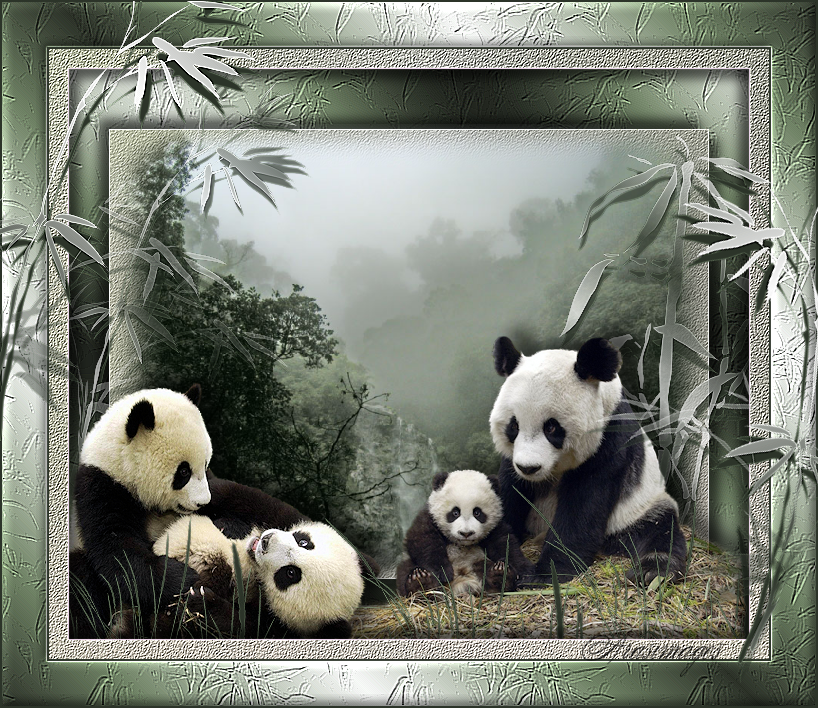
Panda~monium
For Italian, Dutch and Danish translation, click on the flags.


For this tutorial you will need the materials in the zip file below.

Unzip the materials into a working folder you have created on your desktop named Panda~monium. Please duplicate and close originals. Export the brushes included in material into your PSP/Brushes folder. Place the Texture natfl238.bmp in your PSP/Texture folder. I have used the plugin Xero/Tekstya in this tutorial. It is assumed you have a working knowledge of PSP to follow these directions. I have used PSPX6 for this tutorial but other versions may be used.
Thanks go to Silvie and to our own PamelaD for the beautiful tubes used in this tutorial.
Use the bookmark below to mark your place along the way.

1. In Materials Palette, set Foreground to #fbfbfb, Background to #000000.
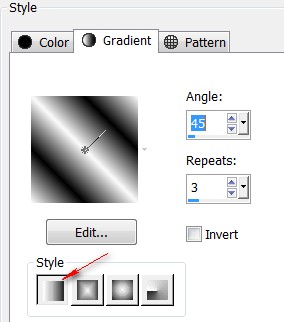
2. In Materials Palette, set to Gradient, Style Linear, Angle 45, Repeats 3, Invert unchecked, all other settings not applicable.
3. New/New Image 680px by 570px. Flood fill with Gradient.
4. Adjust/Blur/Gaussian Blur, Radius set to 50.
5. Adjust/Hue and Saturation/Colorize. Set Hue to 70, Saturation to 30.
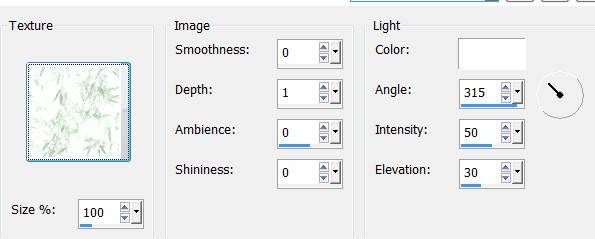
6. Effects/Texture Effects/Texture. From the drop down arrow, select Texture natfl238. Apply.
7. Effects/Edge Effects/Enhance More.
8. Open PandaBG.jpg. Copy/Paste as New Layer.
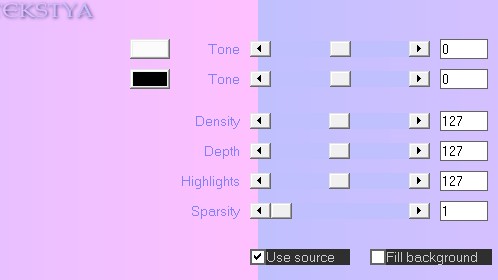
9. Effects/Xero/Tekstya.
10. Effects/Edge Effects/Enhance.
11. Effects/3D Effects/Drop Shadow. Vertical -10, Horizontal -10, Opacity 60, Blur 15, color #000000.
12. Effects/3D Effects/Drop Shadow. Vertical 10, Horizontal 10, Opacity 60, Blur 15, color #000000.
13. Open Jungle1_01_02_09.pspimage. Copy/Paste as New Layer.
14. In Materials Palette, change the Background color to #2C3429, Gradient Repeats to 8.
15. From Tool bar, select the Paint Brush tool. Choose the Brush_Pack__Bamboo_by_MouritsaDA_Stock_6.brush. Set the size to 430.

16. Layers/New Raster Layer.
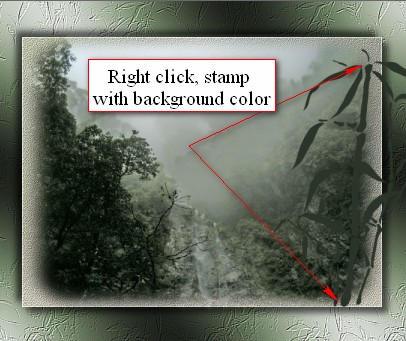
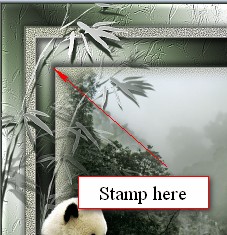
17. Right click/Stamp with Background color on the right side of image.
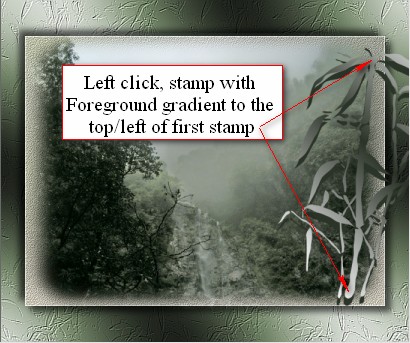
18. Left click/Stamp with Foreground gradient just to the top/left of first stamp.
19. Effects/Edge Effects/Enhance. Lower Opacity to 67.
20. Layers/New Raster Layer.
21. From Tool bar, select the Paint Brush tool. Choose the Brush_Pack__Bamboo_by_MouritsaDA_Stock_4.brush. Set the size to 430.

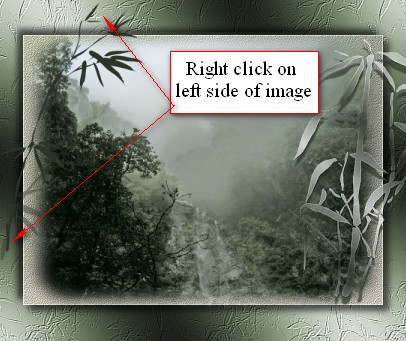
22. Right click/Stamp with Background color on the left side of image.
23. Left click/Stamp with Foreground gradient just to the left of background stamp like you did in Step #18.
24. Note: These double stampings make it appear as though there were shadows of Bamboo.
25. Effects/Edge Effects/Enhance. Lower Opacity to 67.
26. Open Pandas219.pspimage. Copy HALF_MIST/Paste as New Layer.
27. Image/Resize/Resize by 70%/Resize all layers unchecked.
28. Move the bears to bottom right corner.
29. Effects/3D Effects/Drop Shadow. Vertical -10, Horizontal 17, Opacity 60, Blur 25, color #000000.
30. Adjust/Sharpness/Sharpen.
31. Open PandaPlay.pspimage. Copy TUBED/Paste as New Layer.
32. Image/Resize/Resize by 74%/Resize all layers unchecked.
33. Place Panda babies into left corner.
34. Effects/3D Effects/Drop Shadow. Vertical -10, Horizontal 17, Opacity 60, Blur 25, color #000000.
35. Adjust/Sharpness/Sharpen.
36. Layers/New Raster Layer.
37. From Tool bar, select the Paint Brush tool. Choose LadyVictorie_Foliage_8.png brush. Size 294. With Background color, right click three times randomly along the bottom of image (see my finished image for placement-you do not have to be exact). Keep grass away from bear eyes.
38. Effects/Edge Effects/Enhance.
39. Image/Add Borders/Add 20px border, Symmetric checked, color #ff00ff.
40. Select with Magic Wand.
41. Layers/New Raster Layer.
42. Open PandaBG.jpg. Copy/Paste into Selection.
43. Effects/Xero/Tekstya.
44. Effects/Edge Effects/Enhance More.
45. Effects/3D Effects/Drop Shadow. Vertical -10, Horizontal -10, Opacity 60, Blur 15, color #000000.
46. Effects/3D Effects/Drop Shadow. Vertical 10, Horizontal 10, Opacity 60, Blur 15, color #000000.
47. Selections/Select None.
48. Image/Add Borders, Add 2px border, Symmetric checked, color #2c3429.
49. Image/Add Borders, Add 45px border, Symmetric checked, color #fbfbfb.
50. Select the 45px border with Magic Wand.
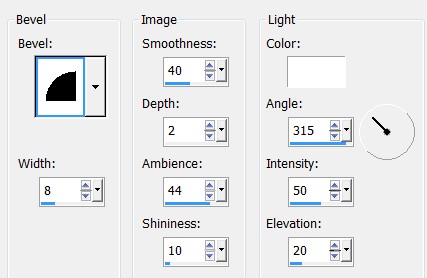
51. Layers/New Raster Layer.
52. Change the Materials Palette gradient Repeats to 3, check the Invert. Flood fill the 45px border with new gradient.
53. Adjust/Hue and Saturation/Colorize. Set Hue to 70, Saturation to 30.
54. Effects/Texture Effects/Texture. From the drop down arrow, select Texture natfl238. Click OK.
55. Effects/Edge Effects/Enhance More.
56. Effects/3D Effects/Inner Bevel.
57. Selections/Select None.
58. Image/Add Borders/Add 2px border, Symmetric checked, color #2c3429.
59. In Materials Palette, Gradients/uncheck the Invert.
60. Layers/New Raster Layer.
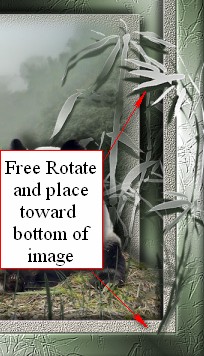
61. From Tool bar, select the Paint Brush tool. Select the Brush_Pack__Bamboo_by_MouritsaDA_Stock_4.brush. Use Size 500. Right click/stamp in upper left corner using Background color. Repeat with left click/stamp using Foreground Gradient, just a little bit up and left of first stamp.
62. Effects/Edge Effects/Enhance. Duplicate.
63. Image/Mirror the duplicated layer.
64. Image/Free Rotate. Rotate Right by 27 degrees.

65. Place on right side of image toward the bottom.
66. Sign your name or leave your watermark if you wish. Merge/Merge Visible. Save as .png or .jpg file.
This tutorial was tested by PamelaD and Evatexas. Thanks ladies!
If you are going to use this tutorial for stationery, cards or place the tutorial/tag on another site, I would appreciate you contacting me for permission, giving Arasimages credit for the original tutorial and if possible, a link back to my site. Thank you.
Copyright © Arasimages All Rights Reserved